Deploy DXP
Explains deployment procedures in Optimizely Digital Experience Platform (DXP), such as publishing of code, database, and content between the different environments.
You can deploy solutions from your development environment to any cloud environment as code packages. You can also move databases and BLOBs between environments using the source environment API.
See also DXL Cloud API for Deployment REST APIs,
CautionAfter going live, you can no longer overwrite the production database using the deployment API.
Optimizely takes care of the following as part of the service:
- Set up of environments.
- Initial troubleshooting and roll-back if issues arise.
Deploy to production
The following image illustrates deployment from a local development environment to Production. In this scenario, the production environment is "empty" initially. You first create code and content in your local development environment and then push this to your Integration environment. You then deploy to Preproduction and validate that everything works as expected. When ready, you can deploy to Production.

Continuous deployment
After the first deployment, website users edit content in the Production environment. As part of the upgrade process, you can move content from Production back to the Preproduction and Integration environments, where developers can add solution updates.

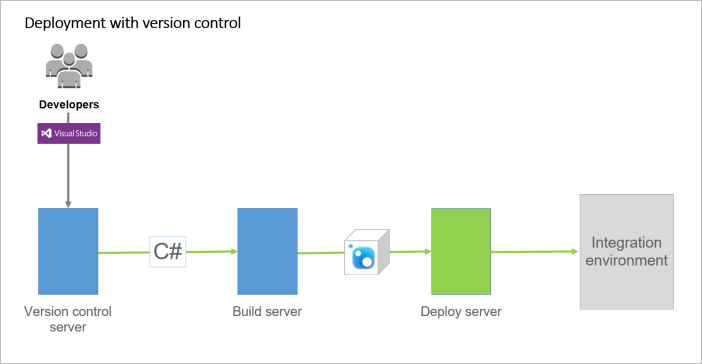
Deployment methods
You can deploy using deployment tools for a version-controlled team development environment or through Visual Studio using the Optimizely extensions and publish profiles. In both cases, you need to contact Optimizely for the first time before you deploy to get the needed information on deployment integration settings.
You can use any deployment tool that supports Azure Resource Manager (ARM), such as Octopus Deploy, Visual Studio Team Foundation Server, or TeamCity.
-
Deploy using Deployment API – Deploying the code changes using the Deployment API is currently the recommended approach for publishing application code to a DXP Environment. See Deployment API for an overview and instructions on how to use the API.
-
Deploy from a version-controlled environment – Work in a development team using version control for your source code. You can use any deployment tool such as Octopus Deploy, Visual Studio Team Services, or Azure DevOps and Optimizely deployment API (blog post by Anders Wahlqvist) for instructions on how to integrate Deployment API to CI/CD pipeline such as Azure DevOps.
Related blog post: Azure DevOps and Episerver (Optimizely) deployment API (Anders Wahlqvist)
Deploy code changes between environments
In Optimizely Digital Experience Platform (DXP), manage deployments using the DXP Management Portal.
Optimizely's deployment automation engine performs the following steps when deploying.
-
Package code from the source environment – Creates a deployment package of the code in the source environment.
-
Create a slot on the target environment – This slot has the same configuration as the current production slot. Other settings, such as logging to BLOB storage, are also configured according to DXP standards. At this stage, the slot is in a stopped state.
-
Deploy code to the slot – The code package created in step one is deployed.
-
Prepare monitoring and extensions – Extensions for application performance monitoring are installed on the slot and configured according to DXP standards.
-
Apply configuration transforms – Any configuration transforms included in the code package matching the target environment are applied on the target. See Environment configurations.
-
Configure warmup for the target slot – The deployment engine checks for an
<applicationInitialization>section inweb.config; if none exists, it is created. See Warm up sites. -
Start the slot and prepare for "Go Live" – The slot is started and initiates a "swap with preview." The deployment engine monitors the site until it completely starts and warm-up finishes for its instances. The slot scales to the same level as the current production site to handle the production traffic load after the swap.
-
Validate the site – A manual "smoke test" is performed to verify that the site works as expected. For this to work, configure your Optimizely site to respond to the slot address. See Before going live step 1 in the Going live section.
-
Go Live/Reset – If the site works as expected, it is swapped into the site's production slot of the current target environment (Preproduction or Production), and the old slot is stopped. If the site in the slot does not behave as expected, the swap is aborted, and the slot site is stopped. The files are saved for troubleshooting or until a new deployment is attempted.
Important notifications
-
Make sure that the software you deploy supports Azure Web Apps. See Requirements for supported software and components.
-
To avoid data loss or corruption, if you have breaking changes where the old version of the sites' code cannot work with the new database version, deploy using maintenance page when you deploy database schema updates or changes to content types. The target site is then taken offline, showing the (customizable) maintenance page. If a deployment contains these types of changes, inform Optimizely when ordering deployment to production. You should also ensure that the major or minor version is incremented to trigger the initialization module to make the necessary updates.
-
When you deploy to a production environment, apply the correct configurations. Never use credentials, tokens, or endpoints from a Preproduction environment, in Production. You can set up environment-specific configurations that automatically apply depending on the environment; see Environment configurations.
-
If you use add-ons on the site, ensure that you include the modules and modulesbin folders in the project so that these are published. Publish the database schema on the first publish operation only.
-
You must install add-on modules to the Integration environment through NuGet to work with the DXC Service deployment process. The default configuration prevents users from installing add-ons on a production website; do not change this.
-
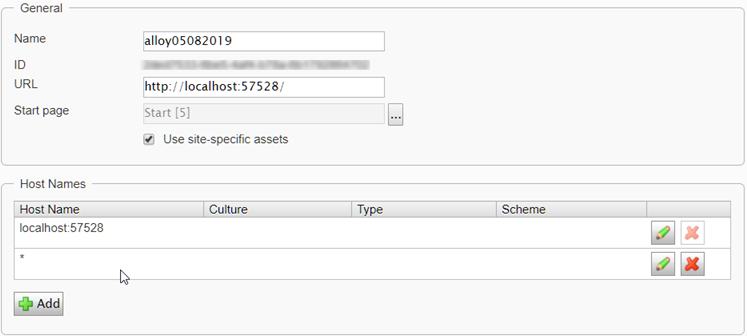
Before you deploy, add a wildcard binding to the site in the Manage Websitesscreen. This helps to prevent failures due to URL-dependent code when migrating the database between environments. See the following image, which shows an example of this binding.
-
Select Admin > Configuration > Manage Sites.
-
Click Add and add a wildcard (*) Host Name.
-
Related topics
- Create a CMS site and deploy
- Deploy a CMS site
- Deploy a Commerce (PaaS) site
- Deploy code changes
- Blog post: Setting up Continuous Integration with Azure DevOps and Episerver DXC Service (Optimizely DXP)
Updated about 6 hours ago