Configure and authenticate the app
Configure and authenticate a sample Connect Platform for Optimizely Data Platform (ODP) app using the app settings form.
Before you configure and authenticate your app using the app settings form, you must first:
- Complete the prerequisites
- Scaffold the app and define the schema
- Publish to the Optimizely Data Platform (ODP) sandbox
You will learn how to:
- Create custom app settings
- Validate and save user input
- Show success/failure messages to users
Create custom app settings
Connect Platform for Optimizely Data Platform (ODP) apps include a Settings tab in the app detail view of the ODP App Directory. This is where you define settings that customers configure to use the app. For the sample app in this quickstart guide, configure the Settings tab with the fields so that users can connect their Azure account. The Settings tab will look as follows:
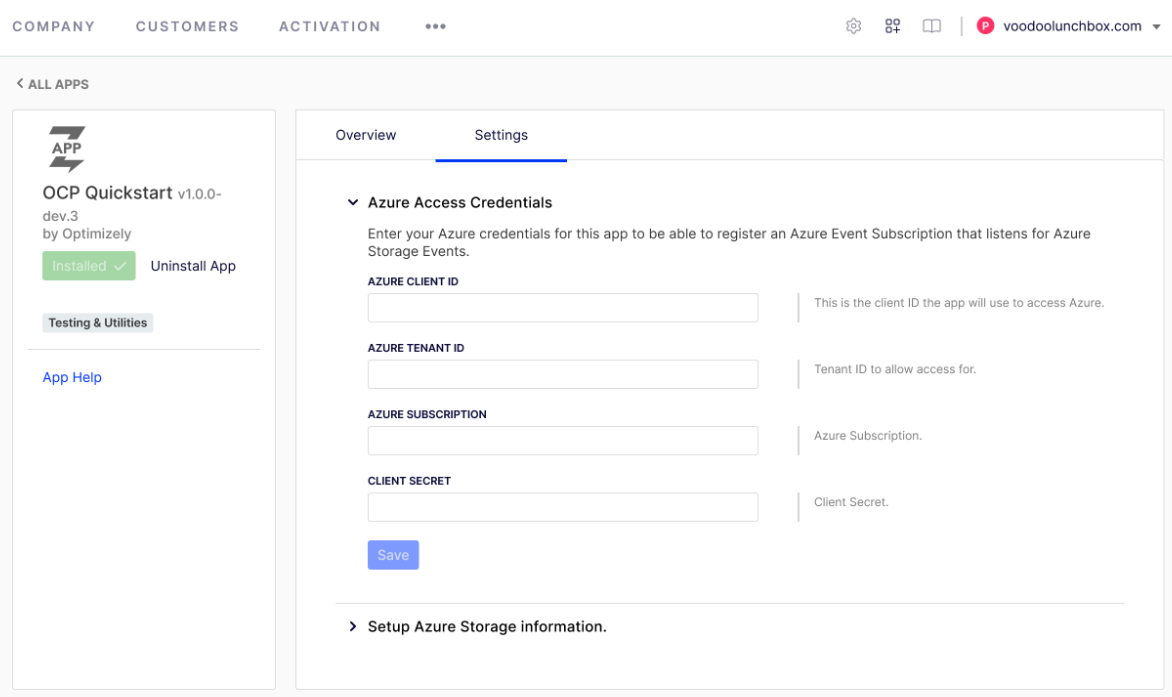
The form is divided into two sections:
- Azure Access Credentials – Provides fields for the user to enter their Azure account information to authenticate against Azure APIs.
- Setup Azure Storage information – Provides fields for the user to configure file storage locations.
Define this app settings form using the following forms/settings.yaml file. This file specifies input types, validation rules, and labels for the interface, and field names the app can use to read data out of the settings store.
sections:
  - key: credentials
    label: Azure Access Credentials
    elements:
    - type: instructions
      text: Enter your Azure credentials for this app to be able to register an Azure Event Subscription that listens for Azure Storage Events.
    - type: text
      key: clientId
      label: Azure Client ID
      help: This is the client ID the app will use to access Azure.
      required: true
      validations:
      - regex: "^[0-9a-fA-F]{8}-[0-9a-fA-F]{4}-[0-9a-fA-F]{4}-[0-9a-fA-F]{4}-[0-9a-fA-F]{12}$"
        message: Must be a UUID
    - type: text
      key: tenantId
      label: Azure Tenant ID
      help: Tenant ID to allow access for.
      required: true
      validations:
      - regex: "^[0-9a-fA-F]{8}-[0-9a-fA-F]{4}-[0-9a-fA-F]{4}-[0-9a-fA-F]{4}-[0-9a-fA-F]{12}$"
        message: Must be a UUID
    - type: text
      key: subscriptionId
      label: Azure Subscription
      help: Azure Subscription.
      required: true
      validations:
      - regex: "^[0-9a-fA-F]{8}-[0-9a-fA-F]{4}-[0-9a-fA-F]{4}-[0-9a-fA-F]{4}-[0-9a-fA-F]{12}$"
        message: Must be a UUID
    - type: secret
      key: clientSecret
      label: Client Secret
      help: Client Secret.
      required: true
    - type: button
      action: save_credentials
      label: Save
      help: Validate and Save Settings.
      style: primary
      disabled:
        operation: any
        comparators:
        - key: clientId
          empty: true
        - key: tenantId
          empty: true
        - key: clientSecret
          empty: true
  - key: settings
    label: Setup Azure Storage information.
    elements:
    - type: instructions
      text: Enter the Azure Storage Blob settings.
    - type: text
      key: resourceGroup
      required: true
      label: Resource Group Name
      help: The name of the resource group that the event subscription will be set up in.
    - type: text
      key: accountName
      required: true
      label: Storage Account Name
      help: The name of the Storage Account to register the event subscription for.
    - type: text
      key: orderContainer
      required: true
      label: Container Name for Orders
      help: The name of the container where the order data will be uploaded to.
    - type: text
      key: offlineStoreContainer
      required: true
      label: Container Name for Offline Stores
      help: The name of the container where offline store data will be stored.
    - type: button
      action: save_settings
      label: Save Settings
      help: Validate Settings
      style: primary
      disabled:
        operation: any
        comparators:
        - key: resourceGroup
          empty: true
        - key: accountName
          empty: true
        - key: orderContainer
          empty: true
        - key: offlineStoreContainer
          empty: true
For information on the concepts used in this app settings form, see the following Connect Platform for ODP developer documentation:
Add required dependencies
To interact with the Azure APIs, you need the Azure SDK for JavaScript middleware library. Add the following required dependencies to the app:
npm install --save @azure/identity
npm install --save @azure/arm-eventgrid
Similarly, you can add any other dependencies that are available on npm. Run yarn to install new dependencies.
Define data types
You defined each field for the app settings form in the forms/settings.yaml file. Next, define the data type for each of those fields in the src/data/Azure.ts file:
import { ValueHash } from '@zaiusinc/app-sdk';

export interface Credentials extends ValueHash {
  clientId: string;
  clientSecret: string;
  tenantId: string;
  subscriptionId: string;
}

export interface StorageAccountSettings extends ValueHash {
  resourceGroup: string;
  accountName: string;
  orderContainer: string;
  offlineStoreContainer: string;
}
These interfaces extend ValueHash, which lets you persist data into the settings store.
Submit form data
At this point, you have defined two sections in the forms/settings.yaml file, and each of those sections defines a button with its own action value that app users click to submit their data:
- Azure Access Credentials –
save_credentials - Azure Storage Information –
save_settings
However, this settings form does not yet interact with the app's backend. You need to configure the app to handle form submission events in the backend to validate and save user data. To do that, you need to map a separate handler to the save_credentials button and to the save_settings button.
Validate and save Azure Access Credentials
To handle form submissions from the Azure Access Credentials section of the settings form, implement the onSettingsForm method in the app's lifecycle handler to validate the data by making a request to the Azure API. If successful, store the data in the settings store. If anything goes wrong during the process, use the LifecycleSettingsResult method to display an error message to the customer and log a message. Define these lifecycle hooks in the src/lifecycle/Lifecycle.ts file:
  import {Credentials, StorageAccountSettings} from '../data/Azure';
  import {Azure} from '../lib/Azure/Azure';
  /* .. */
  public async onSettingsForm(
    section: string, action: string, formData: App.SubmittedFormData): Promise<App.LifecycleSettingsResult> {
    const result = new App.LifecycleSettingsResult();
    try {
      switch (action) {
      case 'save_credentials':
        logger.info('Validating Credentials');
        const credential = {
          clientId: formData.clientId,
          tenantId: formData.tenantId,
          clientSecret: formData.clientSecret,
          subscriptionId: formData.subscriptionId,
        } as Credentials;

        if (await Azure.validateCredentials(credential)) {
          logger.info('Storing Settings');
          await storage.settings.put('credentials', credential);
          result.addToast('success', 'Credentials have been successfully validated and stored.');
          result.redirectToSettings('settings');
        } else {
          result.addToast(
            'danger',
            'Validation of the provided credentials failed. Check your credentials and try again.'
          );
        }
        break;
      }
      return result;
    } catch (e) {
      logger.error('Error during setup', e);
      return result.addToast('danger', 'Sorry, an unexpected error occurred. Please try again in a moment.');
    }
  }
To validate the submitted credentials, introduce the namespace Azure in the src/lib/Azure/Azure.ts file. Also introduce a validateCredentials function, which is used to validate incoming credentials from the settings form, and to re-validate the values on read to ensure they have not expired.
import { logger } from '@zaiusinc/app-sdk';
import { Credentials } from '../../data/Azure';
import { ClientSecretCredential } from '@azure/identity';
import { EventGridManagementClient } from '@azure/arm-eventgrid';

export namespace Azure {
  export async function validateCredentials(credentials: Credentials) {
    const csc = new ClientSecretCredential(credentials.tenantId, credentials.clientId, credentials.clientSecret);
    const eventgridClient = new EventGridManagementClient(csc, credentials.subscriptionId);

    try {
      await eventgridClient.eventSubscriptions.listGlobalBySubscription().next();
    } catch (e) {
      logger.warn('Could not authenticate with the provided credentials.', e);
      return false;
    }

    return true;
  }
}
Validate and save Azure Storage Information
Similarly, save data the user submits in the Azure Storage Information section of the app settings form, such as the name of the resource groups, containers, and so on. These are used by the function and job code to read data from the containers in Azure. Add the following case statement to the onSettingsForm method in the src/lifecycle/Lifecycle.ts file to handle this form data:
      case 'save_settings':
        logger.info('Saving settings');
        const settings = {
          accountName: formData.accountName,
          resourceGroup: formData.resourceGroup,
          orderContainer: formData.orderContainer,
          offlineStoreContainer: formData.offlineStoreContainer
        } as StorageAccountSettings;

        await storage.settings.put('settings', settings);
        result.addToast('success', 'Settings have been successfully stored.');
        break;
Test the settings form
Now, you can build, publish, and test the settings form. First, run the following command to build and publish a new version of the app:
ocp app prepare --bump-dev-version --publish
NoteWhen an app version (for example,
1.0.0-dev.0) is published, you cannot update it. If you need to make changes to the app, increment the version number inapp.ymland publish a new version. Add the--bump-dev-versionflag to theopti app preparecommand to increment the version number automatically.
This upgrades the app version in your sandbox account automatically. To verify this, run the following command:
$ ocp directory list-installs ocp_quickstart
Active environment: production

Tracker        Version            Created At                  Updated At
<TRACKER-ID>   1.0.0-dev.2        2023-05-16T12:34:34Z        2023-05-16T15:01:16Z
Notice the app version is now 1.0.0-dev.2.
To test the settings form of your new app version:
- In ODP, go to the App Directory.
- Open the app detail view of your app, and click the Settings tab.
- Expand the Azure Access Credentials section, complete the fields, and click Save.
- Expand the Azure Storage Information section, complete the fields, and click Save Settings.
You have not implemented any code that uses this data yet, but you can confirm that your form handlers work by checking logs:
$ ocp app logs --appId=ocp_quickstart --trackerId=<TRACKER-ID>

2023-05-17T08:30:12.984Z INFO  Validating Credentials
2023-05-17T08:30:15.382Z INFO  Storing Settings
2023-05-17T08:33:13.984Z INFO  Saving settings
Next, you can write your first function.
Updated 5 days ago