Customer Profiles
Describes Dynamic Customer Profiles (DCP), which are a collection of your customers' attributes.
Dynamic Customer Profiles (DCP) are a collection of your customers' attributes, including demographic data, behavioral characteristics, or any other information particular to your industry and customers. DCP provides a consolidated, dynamic view of your customers, enabling you to refine this view as you obtain more information and to take action based on this view.
A single customer profile contains attributes collected by you, or by services that you use, and provided to Optimizely to create a single view of the customer. These attributes are organized and stored in tables (also known as datasources) and linked across tables using identity aliases.
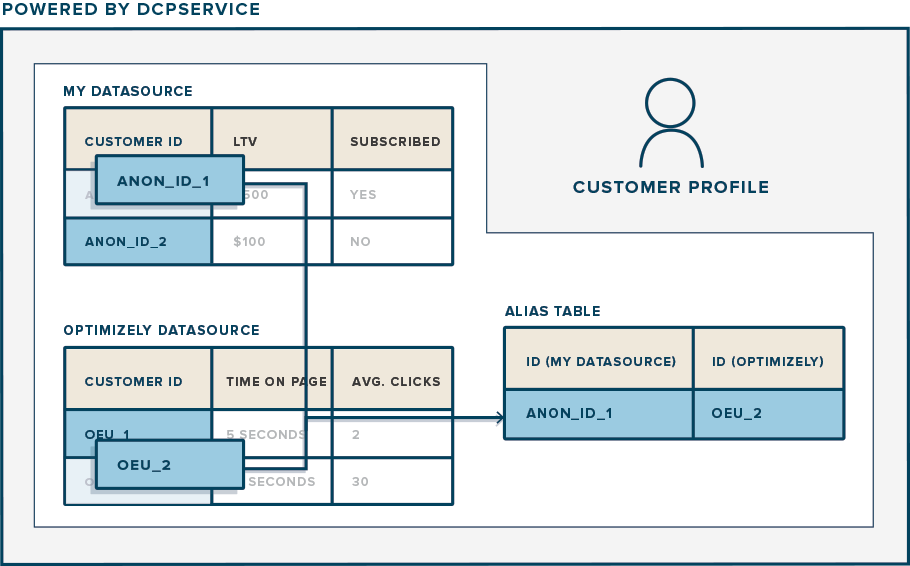
Customer profiles can be used to create audiences for targeting and exported for use in other integrations or analyses.
Use the Optimizely API (1.0) to configure DCP Services, Tables, and attributes. You can also read and write customer profiles, or get and create aliases using the Optimizely API (1.0).
Currently, all DCP REST APIs make use of only classic tokens for authorization. They do not accept personal-tokens to authorize API requests.
To enable DCP for your account, contact Optimizely Support.
NoteRemember, your terms of service prohibit you from collecting or sending any personally identifiable information (PII), such as names, Social Security numbers, email addresses or any similar data to Optimizely's services or systems through Dynamic Customer Profiles or any other feature.
Customer Profiles
Customer Profiles are a collection of your customers' attributes across several Tables. The following APIs allow you to create, update, and read customer attributes for a single Table.
To use these APIs, we recommend that you first read the sections on DCP Services, Tables, and attributes.
Using the consolidated customer profile API call, you can retrieve the complete Customer Profile across all Tables.
Bulk upload
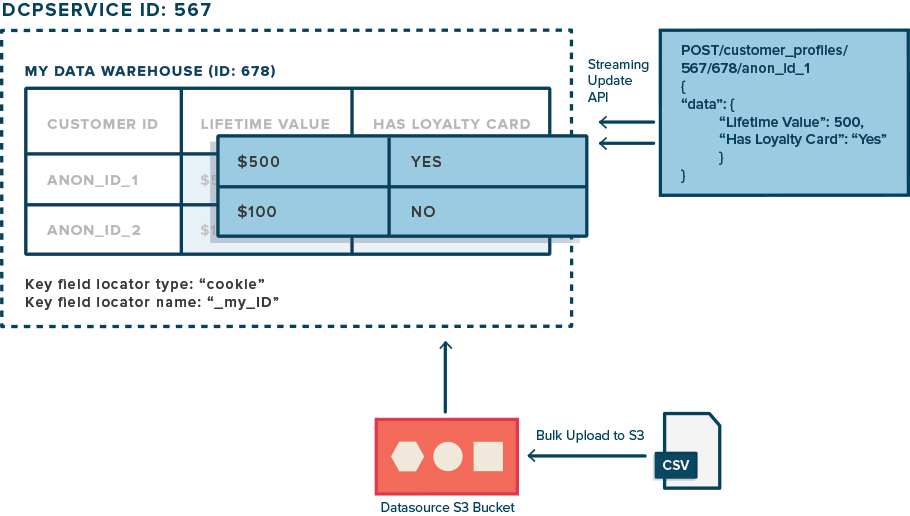
You can upload a CSV (or TSV) file to the optimizely-import S3 bucket using the provided Table S3 path. We'll parse the provided CSV, validate each row of data against the registered attributes, and store the successfully processed rows. Each row is treated as an update request.
NoteFiles uploaded to
optimizely-importS3 bucket must be under 10GB or will not be accepted.
Using the provided AWS credentials, it's possible to upload CSV files in a variety of ways. The simplest approach is to use an S3 client application such as Cyberduck.
Upload with Cyberduck
Once you've downloaded and installed Cyberduck, follow these steps to upload a file:
- Retrieve the datasource's
AWS Access Key,AWS Secret Key, andS3 Import Pathfrom the Optimizely interface (Audiences > Attributes > More Actions > Data Upload). - Launch Cyberduck and create a new Bookmark (Bookmark menu > New Bookmark).
- Enter a descriptive name for the datasource and your
AWS Access Key. - Click More Options to enter the
S3 Import Path. Note: Cyberduck requires the full S3 import path, including both theoptimizely-importbucket and the givens3_path(for example, whens3_path=dcp/567/678, use/optimizely-import/dcp/567/678). - View your bookmarks and double-click to connect to the S3 bucket. Cyberduck will prompt you to enter the
AWS Secret Keyfrom Step 1. - You are now connected to your datasource's S3 bucket. You can drag and drop files to be uploaded via the Cyberduck interface.
Please note that this process may change in future versions of Cyberduck. See the official Cyberduck website for current documentation.
Upload programmatically
To upload the data, you need one of the following clients at a minimum:
- AWS CLI version 1.11.108 and later
- AWS SDKs released after May 2016
- Any library that makes AWS S3 GET and PUT requests via SSL and using SigV4
You can retrieve the AWS credentials and S3 path from the Table endpoint. This information is also displayed in the Optimizely web application in the Data Upload menu within each Table.
After uploading a file to S3, you can check Upload History to confirm that your file has been processed. If you need to upload an updated version of your file, make sure that any files with the same name have already been processed. Uploading multiple files with the same name to the same S3 path can cause the files to be processed out of order and prevent your updates from being detected.
CSV format requirements
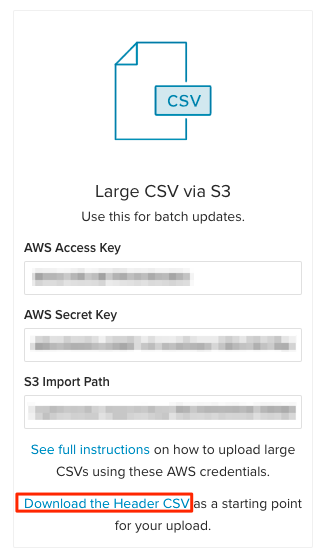
- You can download a template CSV file for each of your Tables under the Data Upload menu. This file will include a correctly formatted header row with each of the attributes registered for the Table:
- Each column in the header row must be a registered attribute
name. A CSV may contain a subset of the registered attributes. - The header row must include a column named
customerId(case-insensitive). All rows must also contain a valid value for this column. Note that the values of this column should correspond with expected values for the Table's customer ID field (defined during Table configuration). For example, if your Table's customer ID field is a cookie named "logged_in_id", then the value of thecustomerIdcolumn for each row should be the user's ID as it would appear in their "logged_in_id" cookie. - If a column header doesn't correspond to a registered attribute
name, the upload will fail. - If an attribute value doesn't respect the attribute's
datatype/format, the upload will fail. See the CSV Datatype Requirements section for more information. - If you add an attribute of type String or Text, make sure that any double quotation marks that are part of the attribute are escaped with another quotation mark prefixed before it. Except for double quotes, none of the other symbols or characters need to be escaped. For example, a formatted data row in your input file can look like this:
"CustomerId1", "John Doe", "Height: 6'1"""As shown for the "Height" attribute, the double quotes that are part of the data need to be escaped with another double quote even though the field value is enclosed in separate double quotes, while the single quote in the attribute value can be used as-is.
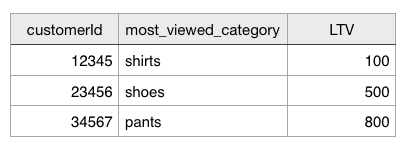
- Here's an example of what your CSV file would look like for a Table containing two attributes,
most_viewed_categoryandLTV:
CSV Datatype Requirements
Boolean
This datatype is case sensitive and only accepts true and false.
| customerId | booleanField | Valid/Invalid |
|---|---|---|
| 1 | "false" | valid |
| 2 | True | valid |
| 3 | "TRUE" | valid |
| 4 | 0 | invalid |
| 5 | 1 | invalid |
| 6 | "y" | invalid |
| 7 | "n" | invalid |
Number (Long)
This datatype allows integer numbers from -2^63-1 to 2^63-1 (-9223372036854775807 to 9223372036854775807).
| customerId | longField | Valid/Invalid |
|---|---|---|
| 1 | 1 | valid |
| 2 | "-2" | valid |
| 3 | 9223372036854775807 | valid |
| 4 | -9223372036854775807 | valid |
| 5 | "foo" | invalid |
| 6 | 9223372036854775810 | invalid |
Number (Double)
This datatype allows double numbers with a decimal. The biggest number is (2-2^52) x 2^1023 which can be positive or negative and the smallest number is 2^-1023.
| customerId | doubleField | Valid/Invalid |
|---|---|---|
| 1 | 1 | valid |
| 2 | “-2.3” | valid |
| 3 | “foo” | invalid |
| 4 | “2,3” | invalid (notice the comma) |
Date (yyyy-mm-dd)
This datatype is formatted with year, month, and day separated by a hyphen (“-“). The separator is mandatory.
| customerId | dateField | Valid/Invalid |
|---|---|---|
| 1 | “2022-05-02” | valid |
| 2 | 1999-01-02 | valid |
| 3 | 2022-13-01 | invalid (invalid month value) |
| 4 | 2022/05/02 | invalid (invalid separator) |
Date with Time (yyyy-mm-ddThh:mm:ssZ)
This is similar to the previous datatype but includes time information with the "T" character separator and ending with “Z”. This is parsed as UTC.
| customerId | dateField | Valid/Invalid |
|---|---|---|
| 1 | “2022-05-02T10:10:59Z” | valid |
| 2 | 1999-01-01T00:00:00 | valid |
| 3 | “2022-05-02” | invalid (missing the time) |
| 4 | 2022/05/02T10:10:59Z | invalid (invalid separator) |
| 5 | 2022-05-02 10:10:59 | invalid (did not include T and Z) |
| 6 | 2022-05-02t10:10:59z | invalid (T and Z are case-sensitive and need to be capitalized) |
| 7 | 2022-05-02T55:10:59Z | invalid (55 is an invalid hour value) |
Timestamp (epoch)
This datatype is different from the previous date/time as it only accepts positive integers and represents the number of seconds from 00:00:00 UTC on January 1, 1970.
| customerId | dateField | Valid/Invalid |
|---|---|---|
| 1 | “0” | valid |
| 2 | 1651676123 | valid |
| 3 | “2022-05-02” | invalid (not a number) |
| 4 | “2022-05-02T10:10:59Z” | invalid (not a number) |
| 5 | -1651676123 | invalid (negative) |
Alias
Aliases are used to link each customer ID in your Tables to an Optimizely user ID. The Optimizely user ID is a random ID generated by Optimizely Web Experimentation (stored in the optimizelyEndUserId cookie).
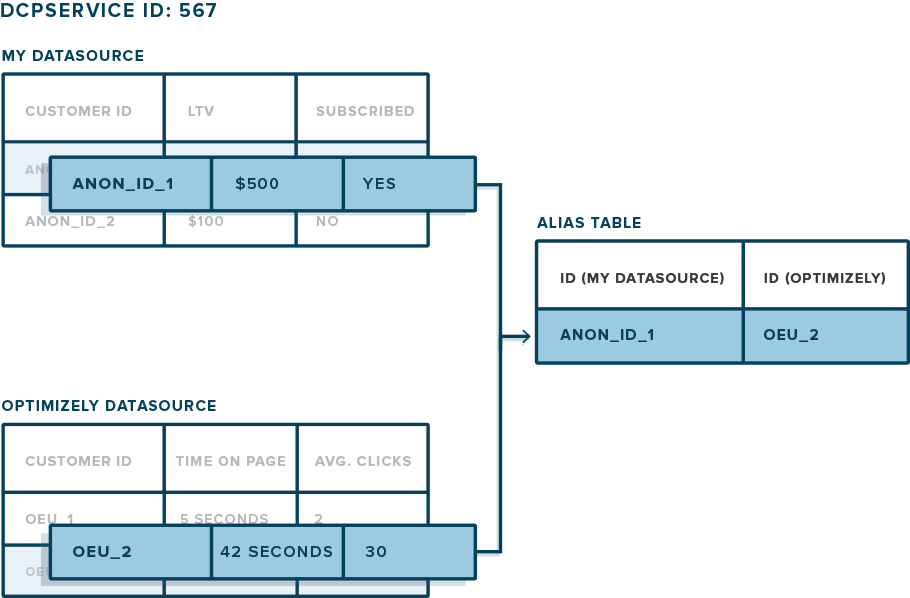
As shown in the figure, an alias indicates that the same customer is identified by ANON_ID_1 in "My Datasource" and by OEU_2 in "Optimizely Datasource". This lets Optimizely present a consolidated customer profile for that customer and allows you to target customers based on all of your Table attributes. See the API Reference for endpoints related to aliases.
Profile Integrations
Customer Profile Integrations allow you to upload attributes to enrich a customer profile.
This section walks through how to build an integration that uploads customer attributes to Optimizely Web Experimentation.
Prerequisites
- Your application must store customer IDs. For example, hashed email addresses or other unique IDs.
- Customer IDs must not be personally identifiable, as per Optimizely's Terms of Service.
- Customer IDs must be accessible via the customer's device. For example, in a cookie, query parameter, or JavaScript variable.
- You are comfortable using REST APIs.
1. Get access
If you are interested in building an integration with DCP and need DCP enabled for your account, please contact [email protected].
2. Register your application
We highly recommend that you use OAuth 2.0 to authenticate with the Optimizely REST API. This will allow you to provide a seamless experience to users in your application and periodically send data to Optimizely. Learn how to connect to Optimizely using OAuth 2.0.
3. Create a DCP service
After connecting with Optimizely, you should create a DCP service and associate it with your project. This service will contain all your datasources. If you already have a DCP service, you can proceed to the next step.
4. Create a Table
Create a Table within your DCP service. This will be the location for all of your application's customer data. A Table allows you to send customer data to Optimizely, organized under a common ID space, without worrying about the relationship of customers across Tables.
5. Register attributes
Register attributes for the Table with create attribute. Attributes must be registered prior to customer profile data being uploaded to that Table.
6. Upload data
Write customer profile attribute values for the registered attributes. You can also bulk upload attribute data by dropping a CSV file into the table's S3 Import path: optimizely-import/<s3_path>; the s3_path is included in the table's metadata.
7. Test integration
To test the integration end-to-end, verify that:
- A Table has been created in the Audiences > Attributes dashboard.
- Table attributes appear in the audience builder under the list of External Attribute conditions, and you can create an audience based on these attributes.
- You can run an experiment targeted to this audience based on uploaded data.
Updated about 1 month ago
