App types
This topic describes the various categories of Optimizely apps.
NoteThese are third-party integrations and not Optimizely subprocessors. See Optimizely's Third-Party Add-Ons & Platform Integration Terms.
Applications (apps, sometimes called add-ons or integrations) with Optimizely Web Experimentation typically fall into one of the following categories. For each category, we have included some examples as well as a link to an implementation guide with step-by-step instructions on how to build the app.
NoteThe experiment ID and variation IDs generated by Optimizely are 16-digit numbers. This can potentially cause issues with custom integrations that might misinterpret these IDs as credit card numbers, resulting in data being flagged or removed.
To prevent this, consider incorporating a letter prefix or using a combination of name and ID (for example
expID(expName)orvarID(varName)) in your custom integration configuration. This cannot be done in the Optimizely UI, instead this would be done in your custom integration. Adjustments may be necessary for custom integrations to ensure data is captured correctly.
Analytics integrations
Optimizely Web Experimentation offers a custom analytics integration solution to enable users to build their own analytics integrations on top of Optimizely. It is an open framework built to deliver:
- Flexibility in timing and data sent to third-party analytics tools.
- Improved data consistency between Optimizely and third-party analytics tools.
- The opportunity to reduce the number of events sent to third-party analytics tools, which can reduce costs for analytics tools that charge per event.
- A standardized process for experiment configuration reduces the number of mistakes from selecting incorrect custom dimensions or values.
You can read the in-depth integrations article to learn more about how to create your own analytics apps using custom code, and example integrations can be found in the GitHub library. There is also a troubleshooting article that can be helpful when building an integration.
If you have built any open-source integrations, you should contribute them to the GitHub library. Email [email protected] to begin the process of submitting a contribution.
Audience apps
Audience apps let you target a specific audience based on data from an external source. With a simple drag-and-drop interface, you can personalize content and experiments based on third-party demographic data such as gender, location, weather, and age, or first-party behavioral data such as buying intent, lifetime value, and cart abandonment. This section explains how to create audiences in Optimizely Web Experimentation (with the REST API) and add a visitor to that audience in the browser (with the JavaScript API).
Prerequisites
- Audience data from your platform is available client-side (in the browser).
- You are comfortable using REST APIs.
- You possess basic JavaScript skills.
Log in to your Optimizely account
Log in to the Optimizely Application.
Register your app
You must use OAuth 2.0 to authenticate with the Optimizely REST API. This provides a seamless experience to users in your app who want to install the Optimizely snippet. Learn how to connect to Optimizely using OAuth 2.0.
Create a test page
Create a page to test the app on. On the test page, the Optimizely snippet needs to be added to the top of the <head> section. Instructions on how to install the Optimizely snippet can be found in Optimizely Web Experimentation JavaScript snippet documentation.
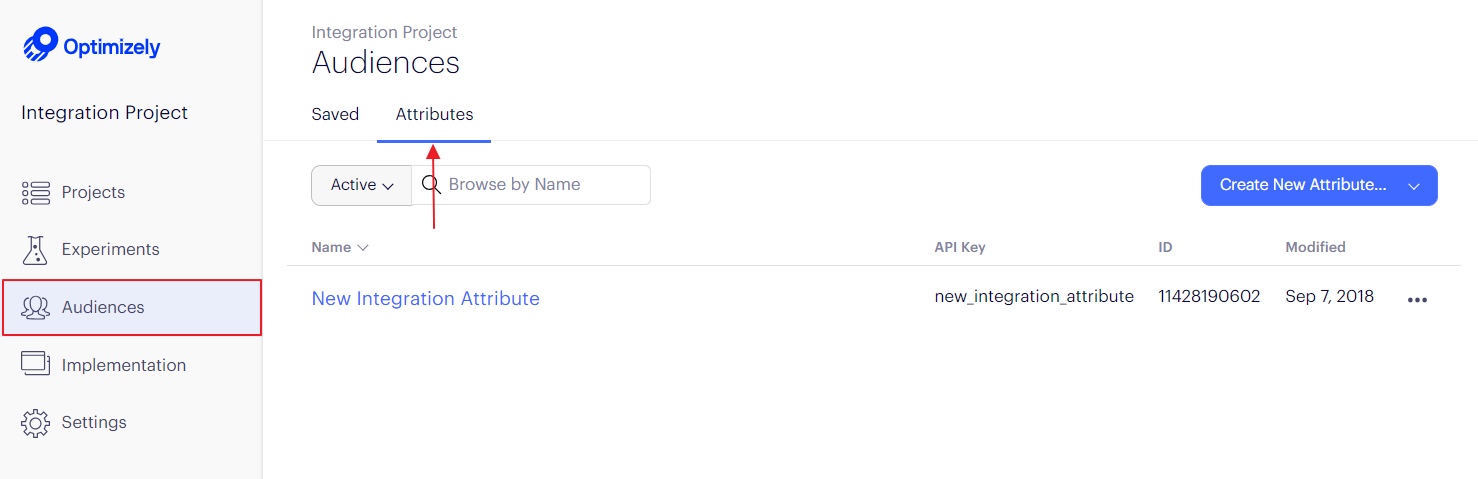
Create a custom attribute
You can now create custom attributes with the REST API. Custom attributes are set with the JavaScript API and can be used to define audience conditions. When a user indicates that they want to use an audience from your platform in Optimizely Web Experimentation, you should create a custom attribute to store information about that audience. You'll use this attribute when creating an Optimizely audience in the next step. Learn how to create custom attributes in Optimizely using the REST API.
The following is an example of the Optimizely REST API call with cURL:
curl -X POST \
  -H "Authorization: Bearer abcdefg123456" \
  -H "Content-Type: application/json" -d @- \
  "https://api.optimizely.com/v2/attributes"
{
  "key": "my_integration_attribute",
  "archived": false,
  "project_id": 12345678,
  "name": "My Integration Attribute"
}
You will use the key of the newly created custom attribute when defining an audience and setting values for the attribute with the JavaScript API.
Create an Optimizely audience
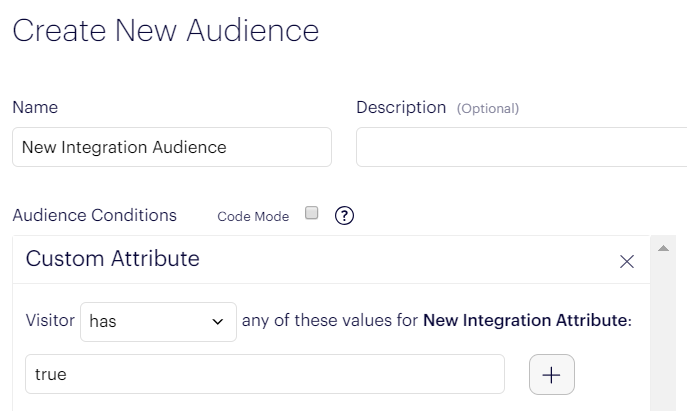
Next, use your custom attribute to define an Optimizely audience using the REST API. Audiences are constructed using one or more conditions, where conditions are an expression that can be evaluated as True or False. Conditions are expressed as JSON objects. The most straightforward implementation is to create one custom attribute per imported audience and set the value to "true" for eligible visitors. The condition's object references the key defined during attribute creation as name. Learn how to create audiences in Optimizely using the REST API.
The following is an example of the Optimizely REST API call with cURL:
curl -X POST \
  -H "Authorization: Bearer abcdefg123456" \
  -H "Content-Type: application/json" -d @- \
  "https://api.optimizely.com/v2/audiences"
{
  "project_id": 12345678,
  "archived": false,
  "conditions": "[\"and\", {\"type\": \"custom_attribute\", \"name\": \"my_integration_attribute\", \"value\": \"true\"}]",
  "description": "Visitor belongs to externally defined audience",
  "is_classic": false,
  "name": "My Integration Audience",
  "segmentation": false
}
Set custom attribute values
The Optimizely JavaScript API lets you programmatically set values for custom attributes for a visitor. Your integration should deploy this code before the Optimizely snippet or through Optimizely's project JavaScript (which is possible to update with the REST API). You would typically wrap this code in a conditional construct that checks the client-side representation of your product's audiences to determine if a visitor qualifies for a given audience. To set a custom attribute value, you can use the following function:
window["optimizely"].push({
  "type": "user",
  "attributes": {
    "my_integration_attribute": "true"
  }
});
Keys in the attributes dictionary correspond with the key used when creating custom attributes.
Test your integration
To verify that the integration works, select an audience within your platform that you can qualify for. Trigger the procedure to create a corresponding custom attribute and audience.
Verify that the custom attribute creation has worked by going to https://app.optimizely.com/v2/projects/{{ project_id }}/audiences/attributes. The newly created custom attribute should display in the list.
Verify that the audience creation has worked by going to https://app.optimizely.com/v2/projects/{{ project_id }}/audiences. The newly created audience should display in the list. You can edit the audience to confirm that it uses the correct custom attribute as a condition.
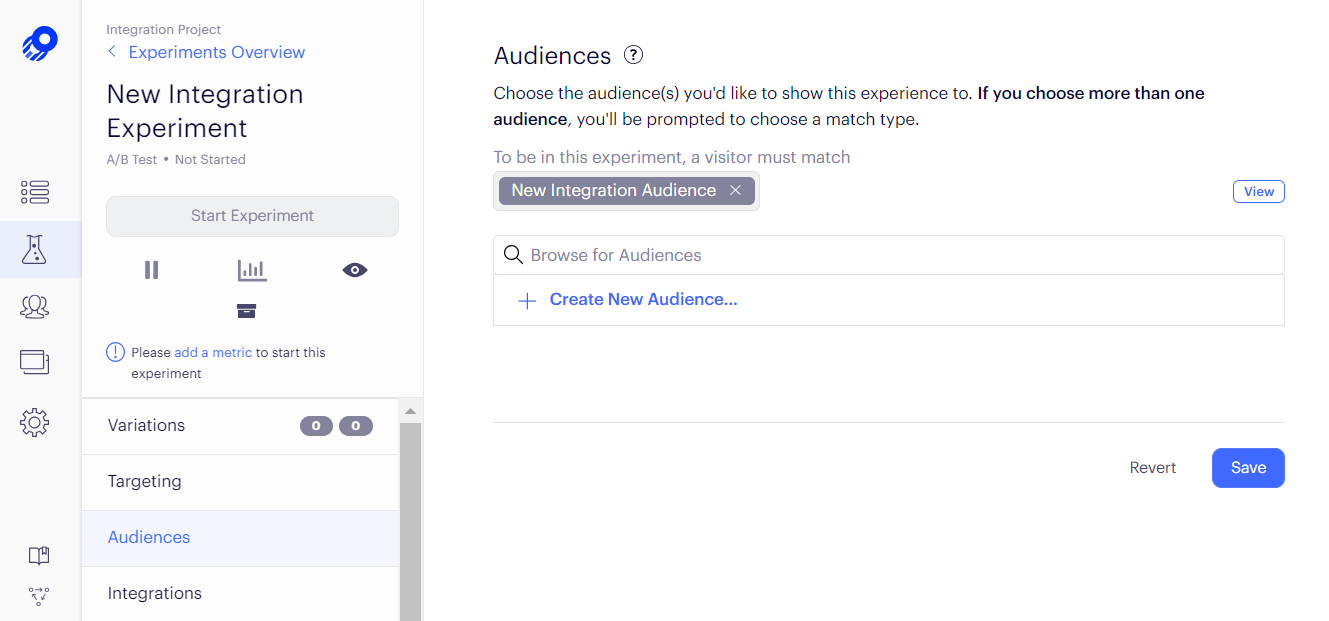
When you have verified the successful creation of a custom attribute and audience, create and start an experiment that uses the audience. Go to your Experiments dashboard and create a new experiment. As part of the experiment configuration, select your newly created audience. Build a simple variation and start the experiment.
Go to the test page you created and qualify for the audience. Verify you are targeted by the experiment by observing the variation change or by enabling console logging.
If you are not targeted as expected, execute [`optimizely.get("visitor").custom`](ref: visitor) in the developer console to see an array of custom attributes that are set in your session. If your custom attribute does not display as expected, check the JavaScript your integration uses to set custom attribute values.
Snippet apps
Snippet apps let you implement the Optimizely Web Experimentation functionality on your website without the help of a developer to add the Optimizely snippet.
Prerequisites
Your platform is able to programmatically modify HTML templates.
Register your app
You must use OAuth 2.0 to authenticate with the Optimizely REST API. This lets you provide a seamless experience to users in your application who want to install the Optimizely snippet. Learn how to connect to Optimizely using OAuth 2.0.
Create a configuration form
Within your platform, add a form for installing Optimizely in a place only Administrators have access to. The configuration form should consist of a button to authenticate with Optimizely using OAuth and a selector for selecting the project that the user wants to install on their website.
After connecting with Optimizely, you can use the REST API to get all the projects connected to the account that the user is authenticated with. To get all the project names and their corresponding project IDs, use the list-projects REST API call.
Implement the snippet in the head section of every page
Write custom code that automatically adds the Optimizely snippet to every page using the project ID that was chosen by the user.
The following example shows how that code would be configured in WordPress:
/**
 * Generates the Optimizely script tag.
 * @param int $project_code
 * @return string
 */
function optimizely_generate_script( $project_id ) {
  return '<script src="//cdn.optimizely.com/js/' . abs( floatval( $project_id ) ) . '.js"></script>';
}

/**
 * Force Optimizely to load first in the head tag.
 */
function optimizely_add_script() {
  $project_id = get_option( 'optimizely_project_id' );
  if ( ! empty( $project_id ) ) {
    // This cannot be escaped since optimizely_generate_script returns a script tag.
    // The output of this script is fully escaped within the function below
    echo optimizely_generate_script( $project_id );
  }
}
add_action( 'wp_head', 'optimizely_add_script', -1000 );
See the WordPress documentation.
Test your integration
To verify that the snippet integration is working correctly, use the snippet integration form to add a snippet to a test page. If you've gone through all the steps of your form, the Optimizely snippet should be installed on the page. Verify that the snippet integration is working correctly by going to the test page on the website and opening the JavaScript console. When you execute window["optimizely"].get('data').projectId, Optimizely Web Experimentation should return the project ID that's installed on the page.
Updated 2 months ago