Bring your own Cloudflare Zone
Describes how to connect your Cloudflare Zone to Optimizely DXP Cloud Services to use more of Cloudflare's advanced capabilities.
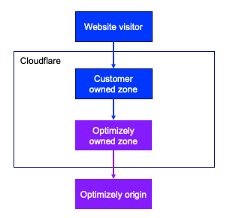
Optimizely Digital Experience Platform (DXP) Cloud Services uses Cloudflare for CDN and WAF capabilities for environments by default. However, you can bring your own Cloudflare zone through a configuration called Orange-to-Orange (O2O), which serializes Cloudflare zones. This lets you use more of Cloudflare’s advanced capabilities, such as Bot Management, Workers, and R2 Storage.
ImportantYou should use Cloudflare as the preferred CDN for this strategy because it ensures optimal performance and minimizes potential issues. While you may use another CDN, Cloudflare has consistently proven to be the most reliable choice for seamless integration and efficiency. Using anything other than Cloudflare could result in issues that Optimizely cannot troubleshoot and therefore is not supported. A WAF bypass on a third party CDN will not prevent potential problems.
- Have a Cloudflare account with an active zone that matches your domain name (note: it is not supported to have two Cloudflare for SaaS zones in an orange-to-orange setup).
- Have a DXP Cloud Services account with an active project that matches your domain name.
- Review Cloudflare’s product compatibility for O2O.
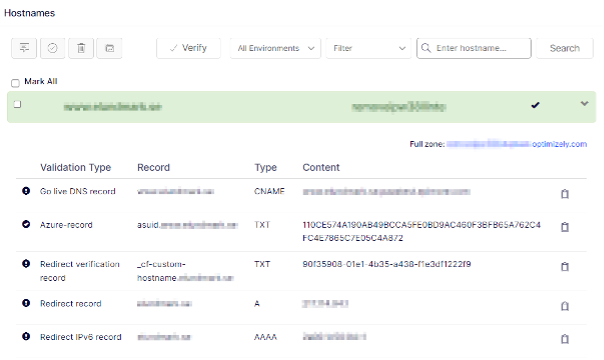
- Configure the domain in DXP Cloud Services to support O2O. To check if your hostname supports O2O, go to the Hostnames tab in the Management Portal and click on the hostname you want to use. If the zone name ends with
dxp.optimizely.com, your hostname supports O2O. If not, contact the Support team to migrate your hostname.
Steps
- Add your domain name as described in Go live. Use the external domain name, such as
www.domain.com. - Modify the target before going live and configuring the CNAME. O2O CNAMEs should target the name of your zone in DXP Cloud Services.
Example:www.domain.com IN CNAME appname123.dxp.optimizely.com
NoteIt may take a couple of minutes for HTTP validation to complete to provision the SSL certificate for the domain name.
Updated 19 days ago