Search Management Portal
Use Search Management Portal to monitor search performance, manage pinned results, and configure synonyms across your Optimizely Graph instances.
BetaSearch Management Portal is in beta. You will have access to this feature if you have all of the following:
- Opti ID and access to Admin Center to enable it
- Graph
- A version of Content Management System.
Search Management Portal is a centralized admin dashboard for managing search experiences across your Optimizely Graph instances. Use the portal to monitor search performance, curate results for specific queries, and define synonym relationships that expand query matching.
Access the Search Management portal
Open Search Management portal from the Optimizely global navigation bar.
- Sign in to your Optimizely account.
- Click Graph in the global navigation bar.
- Click your tenant (also called a Graph instance).
NoteIf Graph is not visible, contact Optimizely support to confirm Opti ID access. Alternatively, contact your Admin Center administrator to request Graph tenant access
Go to the portal
Search Management Portal organizes features into two areas in the navigation panel.
- Health & Monitoring – Contains the Overview page, which is the search analytics dashboard.
- Search Tools – Contains Pinned Results for curating search result ordering and Synonyms for managing search term relationships.
Overview dashboard
The Overview dashboard displays search analytics and performance metrics through an embedded analytics interface. Search hit tracking must first be enabled on your site for results to be available on this dashboard. The Overview dashboard is the default landing page after you sign in.
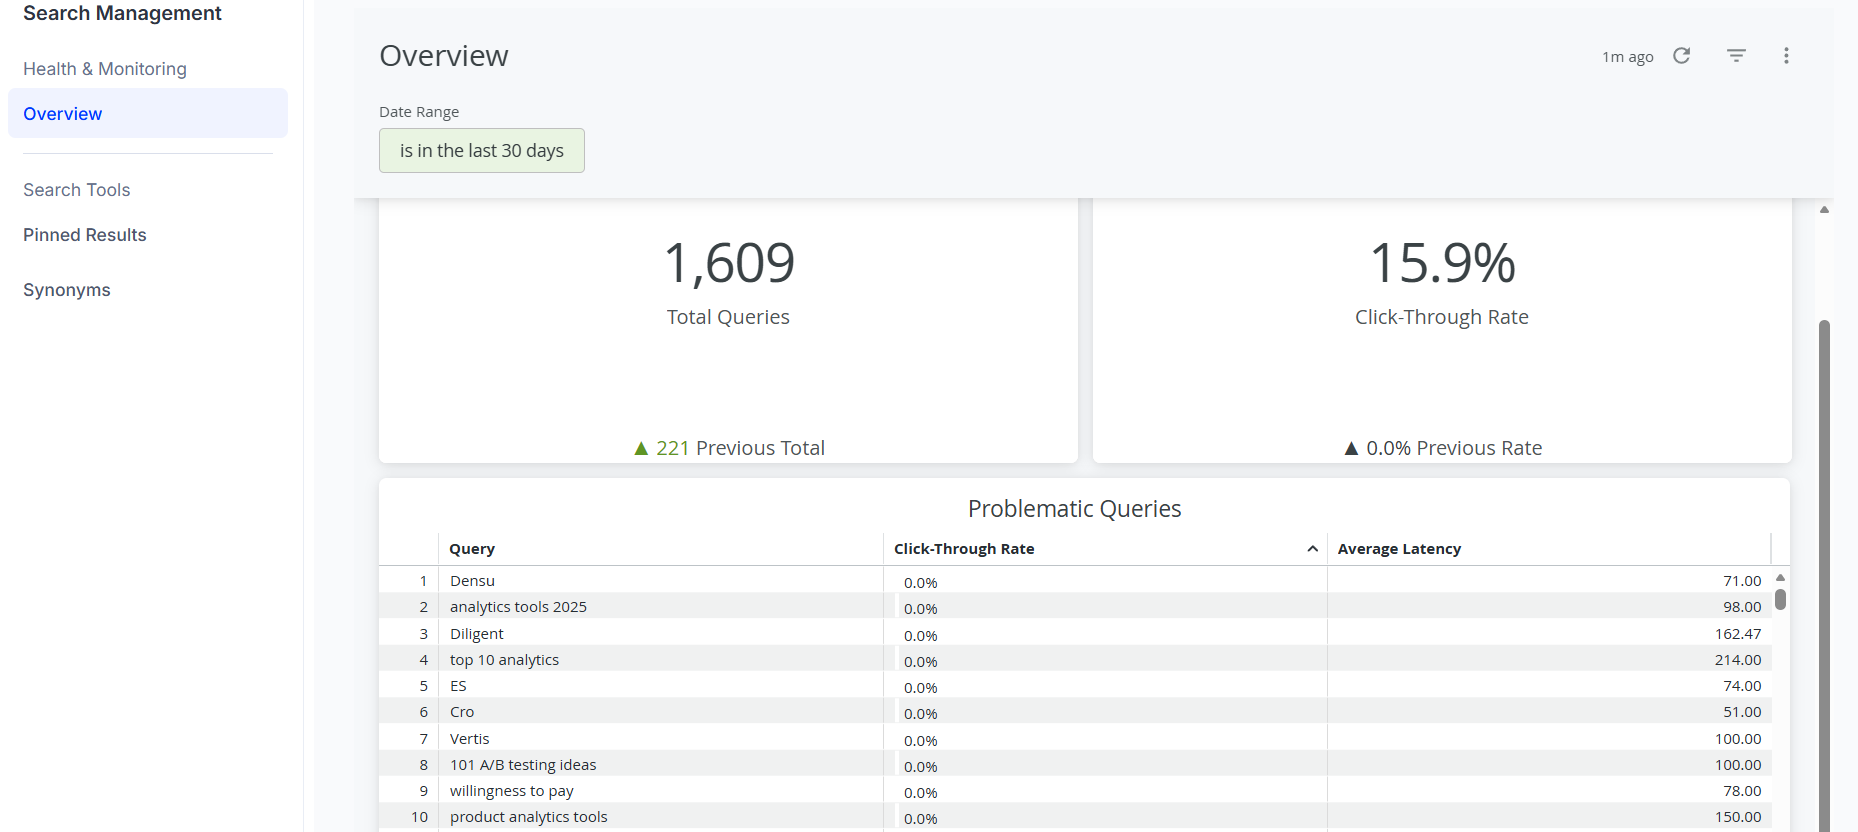
Available metrics
The dashboard displays the following metrics for the selected date range.
- Total Queries – Aggregate count of search queries submitted during the selected date range.
- Click-Through Rate – Percentage of searches that resulted in a click. Use this metric to gauge search effectiveness.
- Problematic Queries – Table of queries with low or no click-through rates. Use this table to identify optimization opportunities. To sort the table by query term or click-through rate, select the column header.
Filter data by date range
Use the date range filter to analyze a specific time period.
- Click Date range filter. The default range is the previous seven days.
- Choose a predefined range or enter custom dates.
- Click on an area outside the filter to apply the date range.
The dashboard updates all metrics automatically.
Refresh data
Click Refresh to reload the latest analytics data. The timestamp shows when data was last updated.
Pinned results
Pinned results (formerly best bets) lock specific content to the top of search results for targeted queries. Use pinned results to promote featured content, surface seasonal products, or display high-priority pages for important queries.
How pinned results work
When a query matches a pinned result, the pinned content displays at the top of search results in the priority order you defined. Users see a consistent, curated experience for the queries you have configured. Learn more about pinned results.
Set up pinned results
The Search Management portal lets content marketers curate pinned results from the portal. Before they can do so, a developer must create a pinned results collection in Optimizely Graph. The search query must then reference that collection ID.
Complete the following setup steps in order.
- Confirm that an administrator has granted Graph access in Admin Center.
- Enable search hit tracking so that performance data displays on the Overview dashboard. Learn more about search and hit tracking
- Create a pinned results collection. For implementation details, see pinned results.
- Query the collection
ID. If your Graph instance contains multiple pinned results collections, the portal will use the first collection returned by the query. - Update your search query to include the collection
ID.
After these steps are complete, content marketers can create, update, and delete pinned results from the portal as described in the following sections.
Create a pinned result
- Under Search Tools, click Pinned Results.
- Click + Create Pinned Results.
- Complete the following fields:
- Search Phrases – Enter the queries that trigger this pin, separated by commas.
- Destination – Select the content you want to pin.
- Language – Enter the target language code (for example,
en-US).
- Click Create.
The pinned result takes effect immediately.
Update a pinned result
- Click More options for the pinned result you want to change.
- Click Edit.
- Modify the fields as needed.
- Click Save Changes.
Changes take effect immediately.
Delete a pinned result
WarningDeleting a pinned result cannot be undone.
- Click More options of your desired pinned result.
- Click Remove.
- Confirm the deletion.
Synonyms
Synonyms expand search query matching by defining relationships between terms. Use synonyms to map equivalent phrasings, technical and common names, or product variations so that different queries return the same relevant results.
How synonyms work
Search Management Portal supports two synonym types.
- One-way synonym – A query for the source term also returns results for the target terms, but not the reverse. For example, the rule
H2O => waterreturns water results for H2O searches. Searches for water do not return H2O results. - Two-way synonym – A query for any term in the group returns results for every term in the group. For example, the rule
sofa, couchreturns sofa results for couch searches and couch results for sofa searches
Set up synonyms
The Search Management portal lets content marketers manage synonyms from the portal. Before they can do so, a developer must add synonym support to your search query. For implementation details, see synonyms.
After the search query supports synonyms, content marketers can create, update, and delete synonyms from the portal as described in the following sections.
Create a synonym
- Under Search Tools, click Synonyms.
- Click + Create Synonym.
- Complete the following fields:
- Terms – Enter the term you want to create a synonym for.
- Synonyms – Enter synonyms.
- Type – Select One-way or Two-way.
- Language – Select the language for this synonym rule.
- Click Create.
Synonyms take effect within minutes.
Update a synonym
- Click More options for the synonym you want to change.
- Click Edit.
- Modify the fields as needed.
- Click Save Changes.
Updates propagate within minutes.
Delete a synonym
- Click More options of your desired pinned result.
- Click Remove.
- Confirm the deletion.
Updated 2 minutes ago