Configure Search & Navigation
Configure Optimizely Search & Navigation. Establish search functionality for your website.
To configure and use Optimizely Search & Navigation, follow these steps detailed in the subsequent sections:
- Configure a development environment with everything you need using Visual Studio, create an account, and set up a Developer Service with an index.
- Create a CMS project in Visual Studio, and add the Optimizely Content Management System (CMS) integration for Optimizely Search & Navigation from the Optimizely NuGet feed.
- Create the basic search functionality on your website to be used when building CMS-specific search features.
- Add more search features such as tracking and viewing statistics, paging, best bets, and facets.
NoteOptimizely Search & Navigation was formerly known as Episerver Find.
Configure your development environment
Install Optimizely Content Management System (CMS) through Visual Studio and the Optimizely Visual Extensions to get a sample website running to develop. See Set up your development environment. You also need an index to use Optimizely Search & Navigation on a website.
- Create an account – Go to the Optimizely Search & Navigation site to register and create an account for a demo index. After signing up, you receive an email to verify your email address. See Order Optimizely Search & Navigation (Find), to order an index for production environments.
- Add a Developer Service – On the Developer Demo Services site, go to the My Services section and select Add Developer Service. Enter an index name, optionally one or two languages for stemming (content in other languages is indexed), and click Create Service. Your service is created and ready to use within a minute, and you can see everything you need to start using Optimizely Search & Navigation.

NoteIf you are multiple developers sharing an index, see Reindexing a shared index how to manage reindexing without affecting the data of other developers.
Create your project
- If you already have a website to which you want to add Optimizely Search & Navigation, go to Add Optimizely Search & Navigation to the website.
- CMS 12 and Commerce Connect 14 – Install Optimizely (ASP.NET Core) and select Alloy (MVC) to create a sample website based on MVC. Then go to Add Optimizely Search & Navigation to the website.
- CMS 11 and Commerce Connect 13 – Install CMS 11 and Commerce 13 and select Alloy (MVC) to create a sample website based on MVC. Then go to Configure Optimizely Search & Navigation for the website. (Skip the next section.)
Let the installation finalize, and open the website in a browser to ensure it works properly.
Add Search & Navigation to the website
Add the Optimizely NuGet feed as a package source for the website for which you want to add Optimizely Search & Navigation. The CMS 12 sample site automatically adds the NuGet feed.
- In Visual Studio, use Solution Explorer to open the website.
- Right-click on References, and select Manage NuGet Packages, Online and EPiServer.
- Locate the
EPiServer.Find.Cmspackage and click Install.
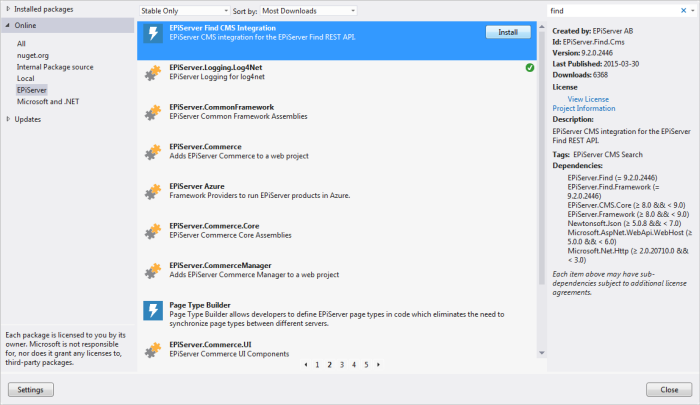
- Verify that Search & Navigation components are added under your project References.
Configure Search & Navigation for the website
- Log into your account on the Search & Navigation site, go to My Services, and click index Details.
- Copy the configuration code snippet displayed for the
web.configfile. - Go to your solution in Visual Studio, open the
appsettings.jsonfile, and paste the configuration code into the relevant sections. The code to paste looks something like this:Also, enter{ "EPiServer": { "Find": { "ServiceUrl": "https://demo01.find.episerver.net/RXQGZ5QpXU9cuRSN2181hqA77ZFrUq2e/", "DefaultIndex": "yourname_indexname" } } }AddFind() Startup.cs. You can also configure the index usingFindOptionsfrom code.services.Configure<EPiServer.Find.FindOptions>(options => { options.DefaultIndex = "INDEX"; options.ServiceUrl = "URL"; }); services.AddCms(); services.AddFind(); - Rebuild the project and verify that the site is running properly.
To ensure maximum availability and scaling flexibility, Search & Navigation uses dynamic IP ranges. For example, if you require whitelisting of IP addresses in the firewall, make sure that your firewall supports domain-based whitelisting.
Index the website
- Log into the site.
- Go to CMS admin view.
- Select Find Indexing Job and click Start Manually. This action indexes the site content. You do not need to set up the Scheduled job for indexing to run automatically because content changes are instantly indexed.
- Go to CMS edit view > Find > Overview > Explore to view the index. For the sample site, you see something like this:
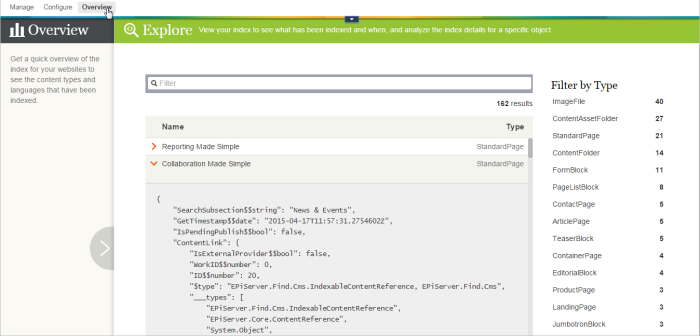
If multiple sites are associated with the index, objects from other sites may appear.
Create the basic search
NoteIf you selected the Episerver Find option while installing CMS, you can skip this step.
When you created your project, you prepared the site for Optimizely Search & Navigation, but the CMS still uses Optimizely Search. In this step, you plug in Optimizely Search & Navigation and add basic free text search. Optimizely Search & Navigation bases search features on the Client class and the IClient interface manages operations like indexing objects, getting documents, deleting documents, and searching. You can also use Unified Search, which lets you index and query objects of existing classes.
Create a search page type
In this example, you use the sample site, which already has a SearchPage (MVC). In Visual Studio, you can find the SearchPage content type in the sample site project, under Models/Pages. If your site does not have a search page, you need to create one.
Create a view and a controller for the search page
Implement a basic, free-text search based on Unified Search.
-
Create a view model for the Optimizely Search & Navigation search, inheriting from the
PageViewModel, and usingUnifiedSearchResultsfor returning search hits objects with selected properties such as title and URL. The view model can look something like this:namespace MyFindWebsite.Models.ViewModels { public class FindSearchPageViewModel: PageViewModel<SearchPage> { public FindSearchPageViewModel(SearchPage currentPage, string searchQuery): base(currentPage) { SearchQuery = searchQuery; } public string SearchQuery { get; private set; } public UnifiedSearchResults Results { get; set; } } } -
Create a default page controller for the search page, which overrides the current one (which uses the built-in search) and uses
SearchClientfor the actual search.namespace MyFindWebsite.Controllers { [TemplateDescriptor(Default = true)] public class FindSearchPageController: PageController<SearchPage> { public ActionResult Index(SearchPage currentPage, string q) { var model = new FindSearchPageViewModel(currentPage, q); if (String.IsNullOrEmpty(q)) { return View(model); } var unifiedSearch = SearchClient.Instance.UnifiedSearchFor(q); model.Results = unifiedSearch.GetResult(); return View(model); } } } -
Finally, create the view (using the new view model), which renders search results based on data sent from the controller. In this example, the view uses the layout provided in the sample site. You add a search box and a search button. The search page displays the entered query, the number of retrieved results, and the results. The view looks something like this:
@model MyFindWebsite.Models.ViewModels.FindSearchPageViewModel @{ ViewBag.Title = "Index"; Layout = "~/Views/Shared/Layouts/_TwoPlusOne.cshtml"; } @using (Html.BeginForm(FormMethod.Post)) { <input type="text" tabindex="1" name="q" value ="@Model.SearchQuery" /> <input type="submit" tabindex="2" class="btn" value="Search" /> } @if (Model.Results != null) { <p>Your search for <i>@Model.SearchQuery</i> resulted in @Model.Results.Count() hits</p> <div class="listResult"> <ul> @foreach (var item in Model.Results) { <li> <h4><a href="@item.Url">@item.Title</a></h4> @item.Excerpt </li> } </ul> </div> } -
Rebuild your project and verify that you can perform a free text search on your website using Optimizely Search & Navigation.
NoteBy default, only 10 search results appear on a page. To change this value, use the Take method.
Add search functionality
This step assumes that you have a working website with Optimizely Search & Navigation and basic search functionality installed.
NoteYou need to enable features like statistics, Best bets, and synonyms, which are not enabled by default.
- Search statistics – Provides an API for tracking searches, spelling suggestions, and related queries. If you are using Unified Search, add a Track statement to a search query to enable the accumulation of statistics.

- Pagination (Skip and Take) – The default number of returned search results is limited to 10. Using the
SkipandTakemethods, you can override this and define the total number of search results returned and how many should show on the search page with pagination. - Highlighting – Highlighting matching search keywords is helpful when evaluating search results. You can request highlights as part of projection expressions passed to the
Selectmethod. - Unified Search – Register a highlighted excerpt for a specific document type.
- Blocks – Smaller content items you can add to a page and reuse on the website. Blocks do not have a URL and are not indexed because blocks display in a page context. However, there are methods to achieve content area indexing and control the indexing of specific block types.
- Filters – Queries and filters make up search requests, and filtering narrows search results.
- Facets – Use facets to present aggregated data based on a search query. When searching a product catalog, you can, for instance, let the website visitor restrict results based on product types or price ranges. You can combine facets with filters.
- Best Bets – Let search administrators promote selected content from the Optimizely Search & Navigation admin view. Best bets display at the top of the search results as they apply higher boosting. You can add best bets through the
ApplyBestBetsextension method using Unified Search or applying the method to indexed arbitrary types. - Synonyms – Synonyms are useful when you want the search to cover more phrases and return more relevant search hits. Also, visitors may use different terms to describe the same content. Add synonyms to search results with the
UsingSynonymsextension method. - Diacritic character – A symbol added to a letter to change the sound values of that letter, for example, å, ä, ö. When submitting a free text search that contains diacritic characters, Optimizely Search & Navigation results include the diacritic and non-diacritic versions of the same character. For instance, the free text search 'Ånge' returns Ange, Änge, etc. You can configure the search to return results with only the submitted diacritic characters. See also Reserved characters.
- When you create the Optimizely Search & Navigation index, include the language that provides the diacritic character (for example, Swedish).
- Add that language to the search query. For example:
(SearchClient.Instance.Search<PageData>(Language.Swedish)...
Updated 5 days ago