Write a function
Write a function for a sample Connect Platform for Optimizely Data Platform (ODP) app that subscribes to events and interacts with ODP APIs.
Note
A function in Connect Platform for Optimizely Data Platform (ODP) is a webhook.
Before writing a function that subscribes to events and interacts with ODP APIs, you must first:
- Complete the prerequisites
- Scaffold the app and define the schema
- Publish to the ODP sandbox
- Configure and authenticate the app using an app settings form
For this sample app, you need to be notified when order details are written to an Azure container so that you can import the data into ODP. Use Azure EventGrid to trigger the notification, then send that notification to a Connect Platform for ODP function, which is a webhook exposed over an HTTP interface.
Add dependencies
To interact with an Azure storage account, use the Azure SDK for JavaScript middleware library again:
npm install @azure/storage-blob
yarn
Define data types
Define the data types for the JSON data you expect the app to handle in the src/data/DataFiles.ts file:
export interface OrderItem {
  product_id: string;
  quantity: number;
  price: number;
  discount: number;
  subtotal: number;
}

export interface OrderInfo {
  order_id: string;
  price_total: number;
  customer_email: string;
  customer_loyalty_card_id: string;
  customer_loyalty_card_creation_date: number;
  offline_store_id: string;
  items: OrderItem[];
}
And in the src/data/StorageEvents.ts file:
export enum EventType {
  SubscriptionValidationEvent = 'Microsoft.EventGrid.SubscriptionValidationEvent'
}

export interface StorageEvent {
  id: string;
  topic: string;
  subject: string;
  data: StorageEventData | SubscriptionValidationEvent;
  dataVersion: string;
  metadataVersion: string;
  eventType: string;
}

export interface StorageEventData {
  api: string;
  clientRequestId: string;
  requestId: string;
  eTag: string;
  contentType: string;
  contentLength: number;
  blobType: string;
  url: string;
  sequencer: string;
  storageDiagnostics: StorageDiagnostics;
}

export interface SubscriptionValidationEvent {
  validationCode: string;
  validationUrl: string;
}

interface StorageDiagnostics {
  batchId: string;
}
Read blobs from Azure
Add the functionality to read blobs from Azure to a helper class in the src/lib/Azure/OrderInfoClient.ts file:
import {BlobServiceClient, ContainerClient} from '@azure/storage-blob';
import {Credentials, StorageAccountSettings} from '../../data/Azure';
import {ClientSecretCredential} from '@azure/identity';
import {OrderInfo} from '../../data/DataFiles';

export class AzureOrderInfoClient {
  private orderInfoContainerClient: ContainerClient;

  public constructor(credentials: Credentials, settings: StorageAccountSettings) {
    const csc = new ClientSecretCredential(credentials.tenantId, credentials.clientId, credentials.clientSecret);
    const blobServiceClient = new BlobServiceClient(`https://${settings.accountName}.blob.core.windows.net`, csc);
    this.orderInfoContainerClient = blobServiceClient.getContainerClient(settings.orderContainer);
  }

  public async getOrderInfoBlob(url: string): Promise<OrderInfo> {
    const blobName = new URL(url).pathname.substring(`/${this.orderInfoContainerClient.containerName}/`.length);
    const blob = await this.orderInfoContainerClient
      .getBlobClient(blobName)
      .downloadToBuffer();
    return JSON.parse(blob.toString());
  }
}
And provide an instantiator in the Azure namespace in the src/lib/Azure/Azure.ts file:
import {logger, storage} from '@zaiusinc/app-sdk';
import {Credentials, StorageAccountSettings} from '../../data/Azure';
import {AzureOrderInfoClient} from "./OrderInfoClient";
/* ... */
export namespace Azure {
  /* ... */
  export async function createOrderInfoClient() {
    const credentials = await storage.settings.get<Credentials>('credentials');
    if (!await validateCredentials(credentials)) {
      logger.error('Invalid credentials.');
      throw new Error('Invalid Azure credentials.');
    }
    const settings = await storage.settings.get<StorageAccountSettings>('settings');

    return new AzureOrderInfoClient(credentials, settings);
  }
}
Define the function
Before implementing the function, define it in the app.yml file. The following definition configures a function named storage_event. The code of the function is then defined in the src/functions/StorageEventHandler.ts file, as specified by the entry_point value.
functions:
  storage_event:
    entry_point: StorageEventHandler
    description: Handles events received from Azure EventGrid.
Implement the function code
Function implementation lives inside the perform method. Here is the outline of the function in the src/functions/StorageEventHandler.ts file with all necessary imports:
import * as App from '@zaiusinc/app-sdk';
import {StorageEvent, StorageEventData, SubscriptionValidationEvent} from '../data/StorageEvents';
import {logger} from '@zaiusinc/app-sdk';
import {OrderInfo} from '../data/DataFiles';
import {Azure} from '../lib/Azure/Azure';
import {CustomerPayload, EventPayload, z} from '@zaiusinc/node-sdk';

export class StorageEventHandler extends App.Function {
  public async perform(): Promise<App.Response> {
    // implementation goes here
  }
}
You can read incoming request data from this.request. For more information on this.request, see the Connect Platform App SDK developer documentation. Additionally, use the App.Response() method to provide a valid HTTP response when the function has finished processing.
The perform method should start by processing incoming request data. You can do a range of validation here, such as confirming the HTTP method is correct, but for the purpose of this sample app, return a 400 HTTP response code if the request body is missing. Define all of this in the src/functions/StorageEventHandler.ts file:
public async perform(): Promise<App.Response> {
  let event: StorageEvent;
  try {
    event = this.request.bodyJSON[0];
  } catch (error) {
    return new App.Response(400, 'Invalid request');
  }
When subscribing to EventGrid, Azure sends a SubscriptionValidationEvent event alongside a validation code, which you need to acknowledge and return. Add this to the src/functions/StorageEventHandler.ts file:
Note
You will register the webhook in EventGrid in a later step.
  if (event.eventType === 'Microsoft.EventGrid.SubscriptionValidationEvent') {
    logger.info('SubscriptionValidation event received');
    const eventData = event.data as SubscriptionValidationEvent;

    return new App.Response(200, {validationResponse: eventData.validationCode});
  }
Next, you need the function to handle the BlobCreated event, which it receives when a client uploads order info to their container. Pull the blob contents using the fetchBlob method you wrote earlier. Add this to the src/functions/StorageEventHandler.ts file:
  } else if (event.eventType === 'Microsoft.Storage.BlobCreated') {
    logger.info('BlobCreated event received');
    const eventData = event.data as StorageEventData;

    // Pull the blob's contents from the Azure Container
    let blob: OrderInfo;
    try {
      const azure = await Azure.createOrderInfoClient();
      blob = await azure.getOrderInfoBlob(eventData.url);
    } catch (error) {
      logger.error('Error reading blob', error);
      return new App.Response(500);
    }
  }
With the Connect Platform Node SDK, populate a CustomerPayload object and use z.customer(payload) to write the customer data into ODP. You can provide email and clubcard as identifiers. Add this to the src/functions/StorageEventHandler.ts file:
  // Write the customer to ODP
  const customerPayload: CustomerPayload = {
    identifiers: {
      email: blob.customer_email,
      ocp_quickstart_clubcard_id: blob.customer_loyalty_card_id
    },
    attributes: {
      ocp_quickstart_clubcard_creation_date: blob.customer_loyalty_card_creation_date
    }
  };

  logger.debug('Writing customer to ODP', customerPayload);

  try {
    await z.customer(customerPayload);
  } catch (error) {
    logger.error('Error writing customer', customerPayload, error);
    return new App.Response(500);
  }
Use an ODP event to record the order itself. This should include customer information too. Add this to the src/functions/StorageEventHandler.ts file:
  // Write the order to ODP
  const eventPayload: EventPayload = {
    type: 'order',
    action: 'purchase',
    identifiers: {
      email: blob.customer_email
    },
    data: {
      order: {
        order_id: blob.order_id,
        total: blob.price_total,
        ocp_quickstart_offline_store_id: blob.offline_store_id,
        items: blob.items.map((item) => ({
          product_id: item.product_id,
          price: item.price,
          quantity: item.quantity,
          subtotal: item.subtotal,
          discount: item.discount
        }))
      }
    }
  };

  logger.debug('Writing event to ODP', eventPayload);

  try {
    await z.event(eventPayload);
  } catch (error) {
    logger.error('Error writing event', eventPayload, error);
    return new App.Response(500);
  }
Finally, wrap up the BlobCreated handler with a 200 HTTP response code, as well as respond to unsupported events with a 400 HTTP response code. Add this to the src/functions/StorageEventHandler.ts file:
    return new App.Response(200);
  } else {
    logger.error('Unknown event type', event);
    return new App.Response(400, 'Invalid request');
  }
}
You should now have a perform method that validates input, responds to EventGrid subscription validation events, handles BlobCreated events by fetching the blob from Azure, and writes customer and order information into ODP.
Register webhook in Azure EventGrid
In the previous step, you saved the Azure configuration to app storage. After you have a function defined, amend that code to immediately register the webhook in Azure EventGrid. Add this to the src/lifecycle/Lifecycle.ts file:
case 'save_settings':
  logger.info('Saving settings and registering Webhook');
  const settings = {
    accountName: formData.accountName,
    resourceGroup: formData.resourceGroup,
    orderContainer: formData.orderContainer,
    offlineStoreContainer: formData.offlineStoreContainer
  } as StorageAccountSettings;

  if (await Azure.installWebhook(settings)) {
    await storage.settings.put('settings', settings);
    result.addToast('success', 'Settings and Webhook have been successfully stored.');
  } else {
    result.addToast('danger', 'Storing of settings and Webhook has failed. Check your settings and try again.');
  }
  break;
The Azure.installWebhook() method uses the Connect Platform App SDK FunctionApi to read the function's URL out at runtime for the current app installation. You can use this to create an EventSubscription event in Azure EventGrid. The function will be under the storage_event key, as defined in the app.yml file. Add this to the src/lib/Azure/Azure.ts file:
import { functions, logger, storage } from '@zaiusinc/app-sdk';
import { Credentials, StorageAccountSettings } from '../../data/Azure';
import { ClientSecretCredential } from '@azure/identity';
import { EventGridManagementClient, EventSubscription } from '@azure/arm-eventgrid';
import { AzureOrderInfoClient } from './OrderInfoClient';
import { BlobServiceClient } from '@azure/storage-blob';
/* ... */
export async function installWebhook(settings: StorageAccountSettings) {
  const credentials = await storage.settings.get<Credentials>('credentials');

  if (!credentials || !settings) {
    logger.warn('Credentials or settings not found.');
    return false;
  }

  const csc = new ClientSecretCredential(credentials.tenantId, credentials.clientId, credentials.clientSecret);
  const blobServiceClient = new BlobServiceClient(`https://${settings.accountName}.blob.core.windows.net`, csc);
  const containerClient = blobServiceClient.getContainerClient(settings.orderContainer);

  try {
    if (!await containerClient.exists()) {
      logger.warn('Could not find storage container for orders.');
      return false;
    }
  } catch (e) {
    logger.warn('Could validate storage container for orders exists.', e);
    return false;
  }

  const eventSubscription: EventSubscription = {
    destination: {
      endpointType: 'WebHook',
      endpointUrl: (await functions.getEndpoints())['storage_event']
    },
    eventDeliverySchema: 'EventGridSchema'
  };

  const scope = `/subscriptions/${credentials.subscriptionId}/resourceGroups/${settings.resourceGroup}/` +
    `providers/Microsoft.Storage/storageAccounts/${settings.accountName}`;
  const eventgridClient = new EventGridManagementClient(csc, credentials.subscriptionId);
  await eventgridClient.eventSubscriptions.beginCreateOrUpdate(
    scope,
    'ocp-quickstart-azure-sync-webhoook-subscription',
    eventSubscription
  );

  return true;
}
Test the function
Now you can build, publish, and test the webhook. Use the --bump-dev-version and --publish flags to do everything in one step. Run the following command in the Connect Platform for ODP command-line interface (CLI):
ocp app prepare --bump-dev-version --publish
The app should already be installed in your ODP account from a previous step, and since you are only bumping the dev version, the update should take place automatically. You can confirm this by running ocp directory list-installs ocp_quickstart in the Connect Platform for ODP CLI.
Register the webhook
After you upgrade the sandbox installation, but the webhook is not registered yet, submit the settings again to trigger the new code. Because you are running a dev version and the app is installed only to your ODP sandbox account, you can do this manually through the ODP App Directory:
Note
If your app had already been publicly released and installed into client accounts, it would be better to use the
onUpgradelifecycle callback. This allows you to register the webhooks in EventGrid automatically as part of the upgrade's roll out.
- In ODP, go to the App Directory.
- Open the app detail view of your app, and click the Settings tab.
- Expand the Azure Storage Information section.
- Click Save Settings.
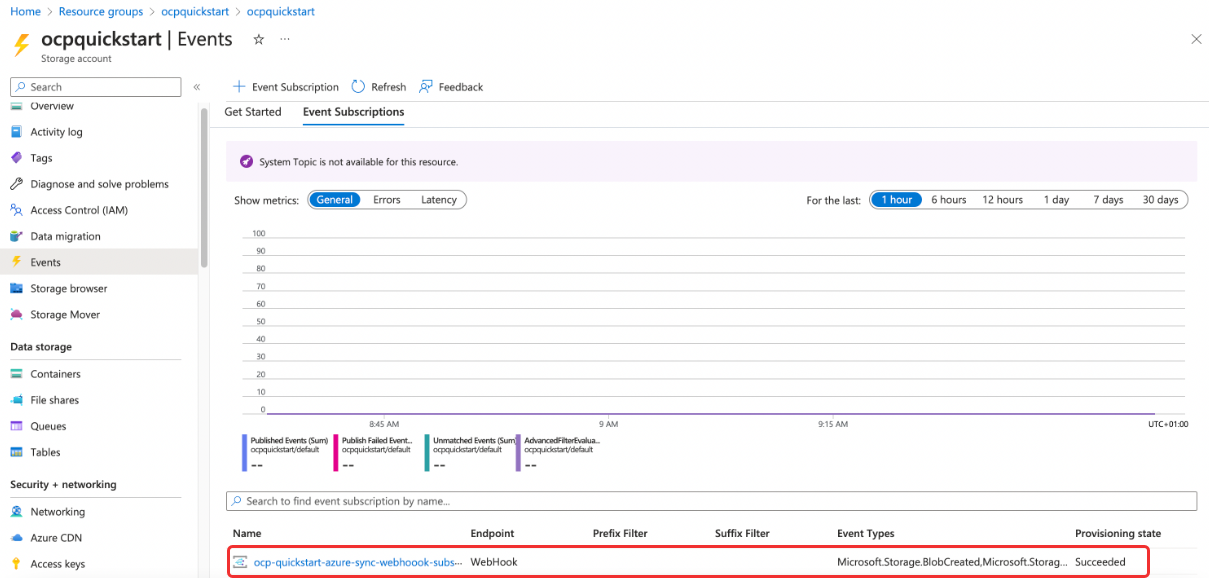
This should save settings and register the webhook. To verify it, in the Azure portal, find your storage account and go to Events > Event Subscriptions. You should see the following new event you just registered.

You can also validate that everything worked as expected using the logs in the Connect Platform for ODP CLI:
$ ocp app logs --appId=ocp_quickstart --trackerId=<TRACKER-ID>

2023-05-17T08:33:13.984Z INFO  Saving settings and registering Webhook
2023-05-17T08:33:17.771Z INFO  SubscriptionValidation event received
The form data was submitted and processed, then, after a short wait, Azure EventGrid sent a validation event to the function.
Test the integration
You have now configured the app to receive events from the storage container using Azure EventGrid. You have also installed and run the app in your ODP sandbox account. For an end-to-end test, you need to construct an OrderInfo JSON file.
{
  "created_at": 1682427298,
  "customer_email": "[email protected]",
  "customer_loyalty_card_creation_date": 1679748898,
  "customer_loyalty_card_id": "loyalty_id_1",
  "offline_store_id": "offline_store_1",
  "order_id": "order_id_1",
  "items": [
    {
      "product_id": "product_id_1",
      "price": 33,
      "quantity": 3,
      "subtotal": 99,
      "discount": 0.0
    }
  ],
  "price_total": 99
}
Upload this file to the Azure storage account container you configured in the app settings form. You can do this through the Azure portal. EventGrid should then notify the function about the upload, which in turn will write the customer and order events to ODP. You can check the logs in the Connect Platform for ODP CLI to confirm this:
> ocp app logs --appId=ocp_quickstart --trackerId=<TRACKER-ID>

2023-05-17T08:43:47.192Z INFO  BlobCreated event received
2023-05-17T08:43:49.241Z DEBUG Writing customer to ODP {
  identifiers: { email: '[email protected]', ocp_quickstart_clubcard_id: 'loyalty_id_1' },
  attributes: { ocp_quickstart_clubcard_creation_date: 1679748898 }
}
2023-05-17T08:43:49.285Z DEBUG Writing event to ODP {
  type: 'order',
  action: 'purchase',
  identifiers: { email: '[email protected]' },
  data: {
    order: {
      order_id: 'order_id_1',
      total: 99,
      ocp_quickstart_offline_store_id: 'offline_store_1',
      items: [
        {
          product_id: 'product_id_1',
          price: 33,
          quantity: 3,
          subtotal: 99,
          discount: 0
        }
      ]
    }
  }
}
You can also check the customer profile in ODP to verify the data made it to ODP:
- Go to Customers > Profiles.
- Search for the email address that is associated with the Azure event.
- Click the Name/ID to view the customer profile.
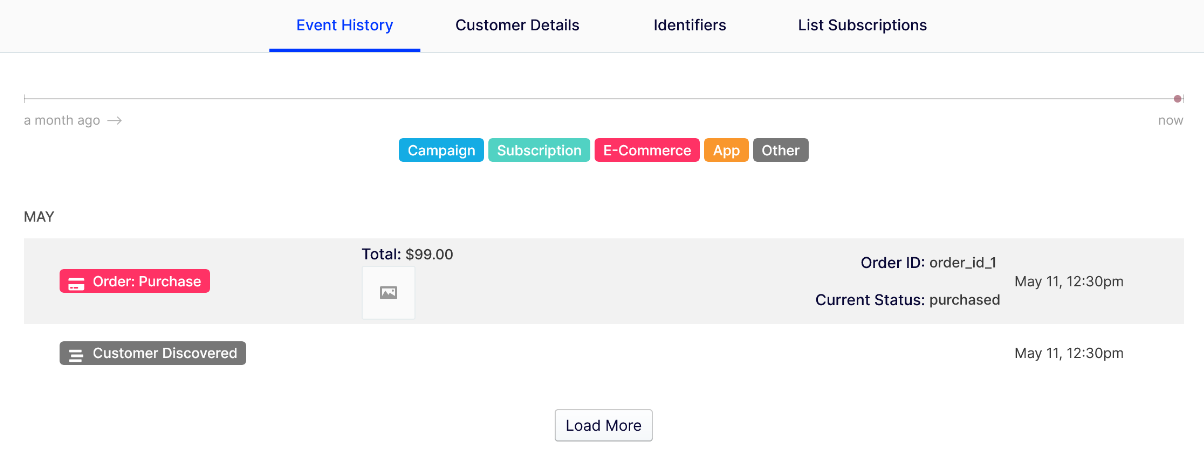
You should see the following events in the Event History tab of the customer profile:

You are now ready to write your first job.
Updated about 1 month ago