
Write a job
Write a job for a sample Optimizely Connect Platform (OCP) app to process data from an Azure storage account and import it into OCP.
Before writing a job that processes data from an Azure storage account and imports it into OPTIHUB, you must first:
- Complete the prerequisites
- Scaffold the app and define the schema
- Publish to the OPTIHUB sandbox
- Configure and authenticate the app using an app settings form
- Write a function that subscribes to events and interacts with OPTIHUB APIs
Provide description of what you will accomplish for the sample app on this page. For example:
Create a job that incrementally retrieves data from a file containing offline stores in an Azure storage container and imports it into OPTIHUB. You will learn how to:
- Schedule a job
- Structure a job to be interruptible
- Define and handle job state
- Prepare and process job execution
- Trigger a job manually
For information on jobs and their functionalities, see the OCP jobs developer documentation.
Define data types
If necessary for the sample app, explain and provide code for defining data types. For example:
Define the data types to use in the src/data/Azure.ts file. The StorageFile data type represents the data that the app imports into OPTIHUB from the Azure storage account.
export interface StorageFile extends ValueHash {
  name: string;
  lastModified: number;
}
Use the OfflineStore data type to represent the data read from the Azure storage container. The OdpOfflineStore extends the ObjectPayload, and represents the data sent to OPTIHUB. Add this to the src/data/OfflineStore.ts file:
import { ObjectPayload } from '@zaiusinc/node-sdk';

export interface OfflineStore {
  id: string;
  name: string;
  location: string;
}

export interface OdpOfflineStore extends ObjectPayload {
  ocp_quickstart_offline_store_id: string;
  offline_store_name: string;
  offline_store_location: string;
}
Define a new job
Explain what the job will handle and provide code snippet for the job definition. For example:
Optimizely Connect Platform (OCP) provides job functionality to support incremental or historical imports/exports. Start by defining a new job in the app.yml file:
jobs:
  offline_store_import:
    entry_point: OfflineStoreImportJob
    description: Import offline stores from Azure Storage Account
    cron: 0 0 6 * * ?
The entry_point parameter defines the name of the file where you implemented the job and the cron parameter defines the schedule of the job. In this case, the job lives in the src/jobs/OfflineStoreImportJob.ts file and runs every day at 6:00 AM.
Define and handle job state
Break the job up into chunks for easier explanation of what each part of the job code does. Thoroughly explain each part of the job and why its necessary for the app. For example:
When importing large amounts of data, it is important to consider how to divide the work up into smaller chunks, for example, setup, paginating through a result set, and then cleanup. By thinking of a job as a state machine, you can better keep track of its progress, as well as incur less risk should anything fail.
For the OfflineStoreImportJob, implement the following three states:
enum JobState {
  FETCH_OFFLINE_STORE_FILES,
  IMPORT_OFFLINE_STORE_FILES,
  COMPLETE
}
These states help manage the different stages of the job and ensure that the job can resume, if necessary.
Begin this job with a call to prepare, which should initialize and return job state. This state will then be passed to (and returned by) each call of process.
interface OfflineStoreImportJobStatus extends App.JobStatus {
  state: {
    files: StorageFile[];
    lastFileTimestamp: number;
    count: number;
    jobState: JobState;
  };
}
See below for a description of each property in this state:
files– Contains the files that the app needs to import. During theFETCH_OFFLINE_STORE_FILESstate, these files are queried from the storage container configured in Configure and authenticate the app.lastFileTimestamp– The timestamp of the last file that the app processed. It is persisted between job runs and is used to avoid processing files that the app has already imported.count– Represents the number of entries imported in the current run. Used for reporting purposes.jobState– Represents the current state of the job.
Define code for the job
Provide the job structure code. For example:
Implement a job by extending the job class from the OCP App SDK. Define the job's structure in the src/jobs/OfflineStoreImportJob.ts file:
NoteRequired imports are included.
import * as App from '@zaiusinc/app-sdk';
import {OdpOfflineStore} from '../data/OfflineStore';
import {Batcher, logger, notifications, storage, ValueHash} from '@zaiusinc/app-sdk';
import {Azure} from '../lib/Azure/Azure';
import {StorageFile} from '../data/Azure';
import {AzureOfflineStoreClient} from '../lib/Azure/OfflineStoreClient';
import {z} from '@zaiusinc/node-sdk';

export class OfflineStoreImportJob extends App.Job {
  private azure!: AzureOfflineStoreClient;
  private batcher: Batcher<OdpOfflineStore> = new Batcher(async (i) => await this.storeBatcher(i), 100);

  public async prepare(params: ValueHash, status?: OfflineStoreImportJobStatus): Promise<OfflineStoreImportJobStatus> {
    // Job preparation goes here
  }

  public async perform(status: OfflineStoreImportJobStatus): Promise<OfflineStoreImportJobStatus> {
    // Job invocation goes here
  }

  private async storeBatcher(store: any) {
    await z.object('ocp_quickstart_offline_stores', store);
  }
}
Prepare job execution
Provide code to handle the job execution. For example:
Job execution starts with a call to the prepare method, where you can perform checks and setup, and return the initial job state.
public async prepare(params: ValueHash, status?: OfflineStoreImportJobStatus): Promise<OfflineStoreImportJobStatus> {
  logger.info('Preparing Offline Store Import:', params, 'and status', status);

  try {
    this.azure = await Azure.createOfflineStoreClient();
  } catch (error) {
    logger.error('Error creating offline store client', error);

    // Mark the job as complete so that we don't continue.
    return {complete: true} as OfflineStoreImportJobStatus;
  }

  if (status) {
    // when resuming, we will be provided the last state where we left off
    // Long running jobs are more likely to be forced to pause and resume
    // Shorter jobs are less likely, but may still be resumed
    return status;
  }
  const lastFileTimestamp = (await storage.kvStore.get('lastFileImport')).timestamp as number || 0;
  return {
    state: {
      lastFileTimestamp,
      count: 0,
      files: [],
      jobState: JobState.FETCH_OFFLINE_STORE_FILES
    },
    complete: false
  };
}
In the prepare stage, you initialize the Azure client, read out the timestamp of the file that was last processed from the key value store, and initialize the OfflineStoreImportStatus.
Query files from an Azure storage account and import data
Next, implement the perform method of the job. This method acts as a state machine, performing different actions for each JobState you have defined previously. Invoke this method repeatedly until the job is considered complete. To indicate the completion of the job, set the status.complete flag to true.
Populate files to import
In the next 3 sections (or however main it takes for your sample app), explain and provide code for the entire job. Again, break this into parts for easier explanation and demonstration of putting the job together. For example:
In the FETCH_OFFLINE_STORE_FILES state, populate the files property with all files that the app has not processed since the last time the job ran. Then, set the jobState property to IMPORT_OFFLINE_STORE_FILES.
public async perform(status: OfflineStoreImportJobStatus): Promise<OfflineStoreImportJobStatus> {
  const state = status.state;
  switch (state.jobState) {
  case JobState.FETCH_OFFLINE_STORE_FILES:
    logger.info('Fetching names of offline store files');
    try {
      const files = await this.azure.listOfflineStoreBlobs();
      logger.debug('Found offline store files', files);
      const storesFilesToImport = files.filter((f) =>
        f.lastModified && f.lastModified > new Date(state.lastFileTimestamp).getTime()
      );
      logger.info('Found files to be imported: ', storesFilesToImport.map((s) => s.name));
      state.files = storesFilesToImport;
      state.jobState = JobState.IMPORT_OFFLINE_STORE_FILES;
    } catch (error: any) {
      logger.error('Failed to fetch names of offline store files', error);
      await notifications.error(
        'Offline Store Import',
        'Failed to fetch offline store blobs',
        `Reason: ${error}`
      );
      status.complete = true;
    }
    break;
  }
  return status;
}
To support this operation, add the ability to list blobs in your Azure storage container to the AzureOfflineStoreClient helper class:
import {Credentials, StorageAccountSettings, StorageFile} from '../../data/Azure';
import {ClientSecretCredential} from '@azure/identity';
import {BlobServiceClient, ContainerClient} from '@azure/storage-blob';

export class AzureOfflineStoreClient {
  private offlineStoreContainerClient: ContainerClient;

  public constructor(credentials: Credentials, settings: StorageAccountSettings) {
    const csc = new ClientSecretCredential(credentials.tenantId, credentials.clientId, credentials.clientSecret);
    const blobServiceClient = new BlobServiceClient(`https://${settings.accountName}.blob.core.windows.net`, csc);
    this.offlineStoreContainerClient = blobServiceClient.getContainerClient(settings.offlineStoreContainer);
  }

  public async listOfflineStoreBlobs(): Promise<StorageFile[]> {
    const blobs: StorageFile[] = [];
    for await (const blob of this.offlineStoreContainerClient.listBlobsFlat()) {
      blobs.push({name: blob.name, lastModified: blob.properties.lastModified.getTime()});
    }
    return blobs.sort((a, b) => a.lastModified - b.lastModified);
  }
}
Import data from files
In the previous step, you transitioned the job into the IMPORT_OFFLINE_STORE_FILES state. Next, process a single file, reading it from the Azure storage container and writing its contents to OPTIHUB in batches. When there are no more files left, transition the job to COMPLETE.
    case JobState.IMPORT_OFFLINE_STORE_FILES:
    logger.info('Importing offline stores from files');
    const file = state.files.pop();
    if (!file) {
      state.jobState = JobState.COMPLETE;
      break;
    }

    try {
      logger.info('Downloading and importing offline store file: ', file.name);
      const stores = JSON.parse(await this.azure.getOfflineStoreBlob(file.name)) as OfflineStore[];
      for (const store of stores) {
        logger.debug('Importing offline store', store);
        await this.batcher.append(this.offlineStoreTransform(store));
        state.count++;
      }
      await this.batcher.flush();
      await storage.kvStore.put('lastFileImport', {timestamp: file.lastModified});
    } catch (error: any) {
      logger.error(`Failed to import stores from file: ${file.name}`, error);
      await notifications.error(
        'Offline Store Import',
        'Failed to fetch offline store blobs',
        `Reason: ${error}`
      );
      status.complete = true;
    }
    break;
To support this operation, add the ability to download a blob—from an Azure storage container to your helper class—to the lib/Azure/OfflineStoreClient.ts file:
public async getOfflineStoreBlob(name: string) {
  const response = await this.offlineStoreContainerClient.getBlobClient(name).downloadToBuffer();
  return response.toString();
}
Provide an instantiator in your Azure namespace to the src/lib/Azure/Azure.ts file:
import {AzureOfflineStoreClient} from './OfflineStoreClient';
/* ... */
export namespace Azure {
  export async function createOfflineStoreClient() {
    const credentials = await storage.settings.get<Credentials>('credentials');
    if (!await validateCredentials(credentials)) {
      logger.error('Invalid credentials.');
      throw new Error('Invalid Azure credentials.');
    }
    const settings = await storage.settings.get<StorageAccountSettings>('settings');

    return new AzureOfflineStoreClient(credentials, settings);
  }
Define job completion
Finally, handle the COMPLETE state. In this state, flush the batcher to ensure that all records have been sent to the OPTIHUB API. Also, use notifications to inform users about the success or failure of a job. Notifications are sent to the Account Settings > Activity Log page in OPTIHUB using the OCP App SDK notifier interface. This lets the app user see the status of jobs and take appropriate action. Lastly, set the status.complete flag to true to indicate that the job is complete.
    case JobState.COMPLETE:
      logger.info(`Offline Store Import complete, imported ${state.count} offline stores`);
      try {
        await this.batcher.flush();
      } catch (error: any) {
        logger.error('Failed to flush final batch', error);
      }

      await notifications.info(
        'Offline Store Import',
        'Imported data',
        `Imported ${state.count} offline stores`
      );
      status.complete = true;
      break;
    }
Test the job
Describe how to test the job and provide code and CLI commands for building the app and triggering the job. Include results of the test so they know what to expect. For example:
To test your job implementation, upload some data to your Azure storage container. The following example shows a dataset that you can upload to the offline stores container:
[
  {"id": "7651b3f5-5d5d-4e32-a651-7b47c029ce8f", "name": "Shop Emporium", "location": "New York City"},
  {"id": "a6cbf16e-f9d9-4c27-b2b2-11c8d7d68ddc", "name": "WooCommerce World", "location": "London"},
  {"id": "f42a8c78-40fc-4611-b3b3-b54c63eb068a", "name": "BigCommerce Bazaar", "location": "Paris"},
  {"id": "7d04b3f3-8861-433f-8e7e-02cda2f7d19e", "name": "Magento Market", "location": "Tokyo"},
  {"id": "4f4ca1aa-835e-4a26-8d1b-29c2b7d5b5e2", "name": "Squarespace Square", "location": "San Francisco"},
  {"id": "92652336-5f2a-4760-a6e3-3e1a6a1bb8ec", "name": "Volusion Village", "location": "Sydney"},
  {"id": "efb4e0bf-48e8-4d9c-9ce2-6a5574668d34", "name": "PrestaShop Place", "location": "Berlin"},
  {"id": "e50b90c1-8f7f-44e6-ae7b-b2c63e585f61", "name": "3dcart Corner", "location": "Toronto"},
  {"id": "48c9a384-57d7-44a6-a086-614d2c414138", "name": "OpenCart Outlet", "location": "Moscow"},
  {"id": "c13c6b17-b6c8-45d2-a270-98f9327b9c63", "name": "Weebly World", "location": "Hong Kong"}
]
You can use the Azure Portal or Azure Storage Explorer to upload the data to the storage container.
NoteYou can split this data into multiple files to test incremental updates.
Next, build, publish, and test the job. Use the --bump-dev-version and --publish flags to do everything in one step. Run the following command in the OCP command-line interface (CLI):
ocp app prepare --bump-dev-version --publishThe app should already be installed in your OPTIHUB account from a previous step, and since you are only incrementing the dev version, the update should take place automatically. You can confirm this by running ocp directory list-installs ocp_quickstart in the OCP CLI.
OCP executes the job at 6:00 AM UTC every day. For testing purposes, manually trigger the job using the OCP CLI:
ocp jobs trigger ocp_quickstart offline_store_import [trackerId]The above command initiates the job right away. To check the history of job runs, run the following command in the OCP CLI:
$ ocp jobs list ocp_quickstart

Job ID                                      Version            Job Function                Tracker ID        Status          Created At                  Updated At                  Duration
********-****-****-****-************        1.0.0-dev.4        offline_store_import        [trackerId]       RUNNING         2023-05-17T10:07:13Z        2023-05-17T10:07:13Z        18.178s
This command provides the ID of the job run. To view the logs for a specific job run, you can run the following command in the OCP CLI:
$ ocp app logs --jobId=[id]

2023-05-17T10:07:25.844Z INFO  Preparing Offline Store Import: {} and status
2023-05-17T10:07:27.671Z INFO  Fetching names of offline store files
2023-05-17T10:07:28.691Z DEBUG Found offline store files [
  {
    name: 'quickstart_test_offlinestores.json',
    lastModified: 1684317162000
  }
]
2023-05-17T10:07:28.693Z INFO  Found files to be imported:  [ 'quickstart_test_offlinestores.json' ]
2023-05-17T10:07:28.703Z INFO  Importing offline stores from files
2023-05-17T10:07:28.703Z INFO  Downloading and importing offline store file:  quickstart_test_offlinestores.json
2023-05-17T10:07:28.865Z DEBUG Importing offline store {
  id: '7651b3f5-5d5d-4e32-a651-7b47c029ce8f',
  name: 'Shop Emporium',
  location: 'New York City'
}
2023-05-17T10:07:28.865Z DEBUG Importing offline store {
  id: 'a6cbf16e-f9d9-4c27-b2b2-11c8d7d68ddc',
  name: 'WooCommerce World',
  location: 'London'
}
...
2023-05-17T10:07:28.905Z INFO  Importing offline stores from files
2023-05-17T10:07:28.914Z INFO  Offline Store Import complete, imported 10 offline stores
These commands let you test the implementation of the OfflineStoreImportJob and debug any issues that arise.
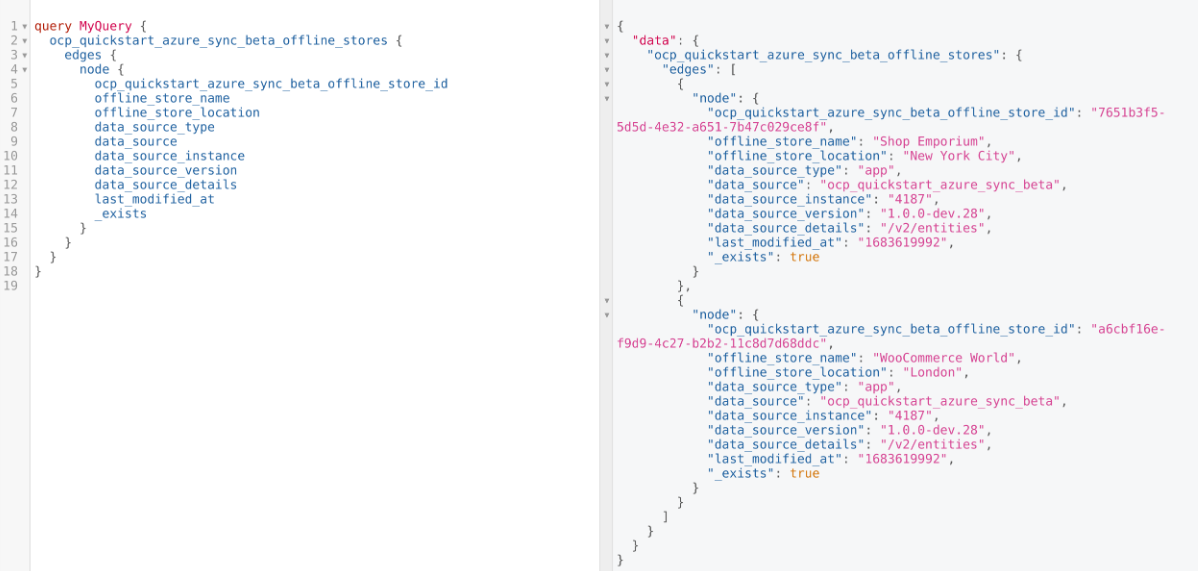
To confirm the successful import of offline stores, use the ODP GraphQL Explorer:
- In ODP, go to Account Settings > APIs > GraphQL Explorer.
- Select your custom object from the Explorer pane on the left.
- Execute the pre-generated query to view the imported offline stores.
If the import was successful, you should see the imported offline stores in the results, similar to the following:
Next, you can publish the app to the OPTIHUB App Directory.
Updated about 2 months ago