Data sync source
Develop an Optimizely Connect Platform (OCP) app to enable custom data sources for users within the OCP Sync Manager.
You can add a custom source to your Optimizely Connect Platform (OCP) app by completing the following steps:
- Declare sources in the app manifest file
app.yml. - Declare the following schema for your sources. You can only declare one schema per source.
src/sources/schema/*.ymlorsrc/sources/{SchemaFunction}.ts
- Implement the logic to emit data to sources using the
sources.emit()API from any function or job.
Prerequisite
To add a custom source, register and scaffold your app.
Declare sources in the app manifest file
You can define multiple sources within a single app. You must declare all sources in the sources section of the app.yml manifest file. Each source must have its own schema.
description– A human-readable explanation of the source's purpose.schema– A string referencing a static schema name or an object withentry_pointfor dynamic schemas.
See the following example sources section:
sources:
  wordpress_post_sync:
    description: Sync Posts from WordPress
    schema: post
  wordpress_comment_sync:
    description: Sync Comments from WordPress
    schema:
      entry_point: WordpressCommentSchema
NoteYou no longer need to define
function,lifecycle, orjobsdirectly within each source. Instead, use regular functions and jobs with thesources.emit()API to emit data to your sources.
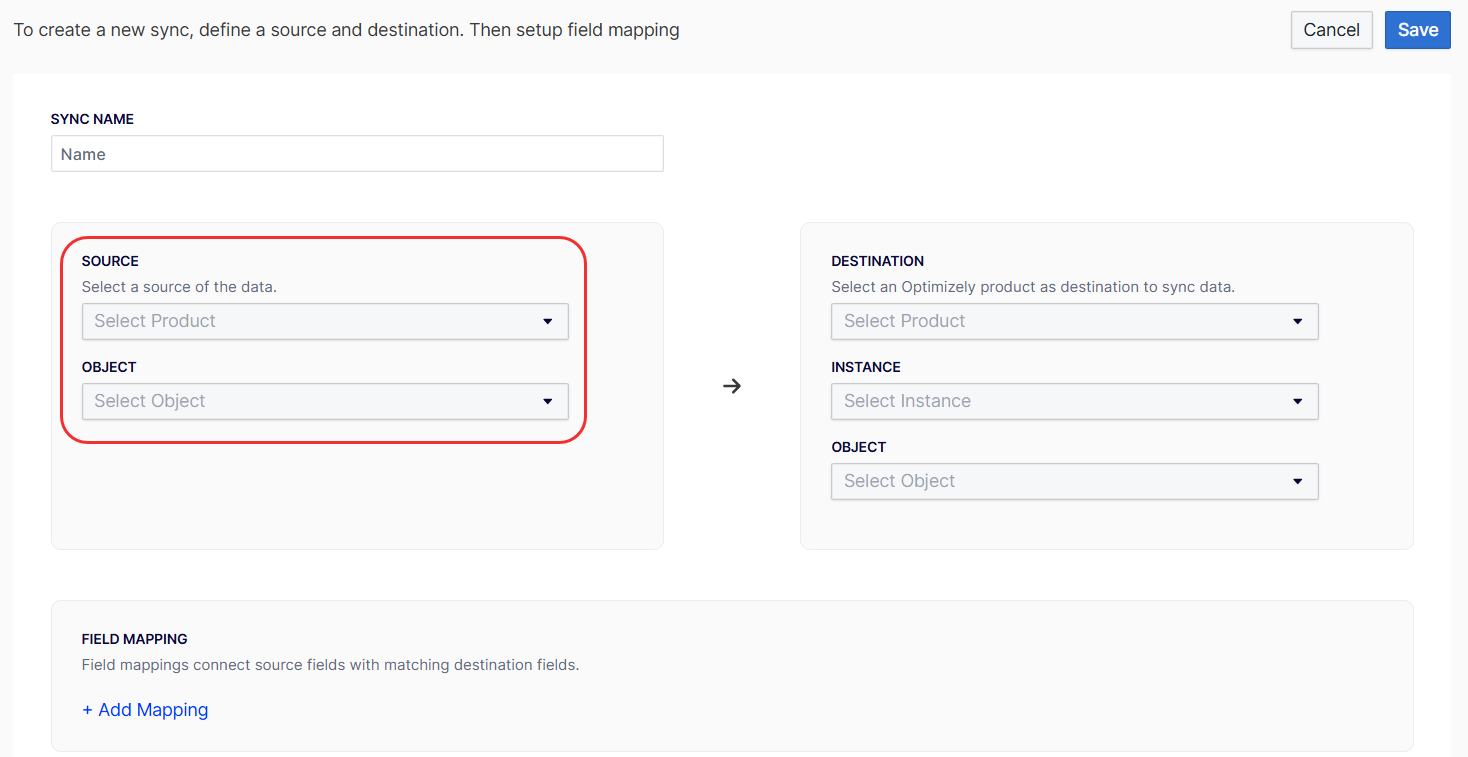
To view the defined sources when creating a new data sync, complete the following steps after installing the OCP app:
- Log in to the app.
- Go to Data Setup > Sync Manager.
- Click New Sync.
- Expand the Object drop-down list.
Schema
The schema defines the structure of data transferred from your app to the data sync. This source schema configures the field mappings during data sync.
Type definitions
A source schema supports primitive types, arrays, and custom types.
- Primitive types – Basic data types, including the following:
string– Text data.boolean– True or false values.integer– Whole numbers (also aliased asint).decimal– Floating-point numbers (also aliased asfloat).
- Array types – Collections using bracket syntax
[type], including the following:[string],[integer],[boolean],[decimal]– Arrays of primitive types[CustomTypeName]– Arrays of custom type objects
- Custom types – Reusable structured data types you can reference across multiple fields. These are useful for complex, nested data structures.
Structure
A schema consists of fields and custom types. Fields support primitive data types and reference custom types that you define.
Schema-level properties
name– The unique identifier corresponding to theschemavalue in the manifest.display_name– The user-friendly name for the schema.description– A brief explanation of the schema's purpose.fields– An array containing the definitions of all fields within the schema.custom_types– (Optional) An array of reusable custom type definitions.
Field properties
name– The field's unique identifier.display_name– The user-friendly field name.description– A brief explanation of the field's purpose.type– The field's data type. This can be a primitive type, an array, or a reference to a custom type.primary– (Optional) A boolean value that designates the field as a unique identifier. This property is only applicable to primitive types.
Custom type properties
name– The unique identifier for the custom type.display_name– The user-friendly name for the custom type.description– An explanation of what the custom type represents.fields– An array containing field definitions, structured identically to schema fields.
Type descriptions and examples
| Type syntax | Description | Example |
|---|---|---|
string | Single text value. | "Product Name" |
[string] | Array of text values. | ["tag1", "tag2"] |
integer | Single whole number. | 42 |
[integer] | Array of whole numbers. | [1, 2, 3] |
boolean | True or false value. | true |
[boolean] | Array of booleans. | [true, false] |
decimal | Decimal number. | 19.99 |
[decimal] | Array of decimals. | [9.99, 19.99] |
ExampleCustomType | Custom type object. | {id: 1, name: "..."} |
[ExampleCustomType] | Array of custom objects. | [{...}, {...}] |
When to use arrays and custom types
When designing your schema, consider the following guidelines for using arrays and custom types:
Arrays – Use arrays when a field needs to contain multiple values of the same type, including the following:
- Lists of primitive values, for example, tags, IDs, or prices.
- Collections of structured objects.
Custom types – Use custom types when you have reusable structured data that benefits from a defined schema, including the following:
- Nested objects with multiple fields.
- Data structures used in multiple locations across your content.
- Complex hierarchical models.
Practical applications
This section outlines specific scenarios where you can effectively use arrays and custom types in data modeling.
Arrays of primitive types
- Tags or categories – Use
[string]for product tags, article categories, or keywords to allow for multiple assignments. - Related identifiers – Use
[string]or[integer]for related product IDs or category IDs. - Multi-value attributes – Use
[string]for attributes like colors, sizes, or other selections that have multiple values. - Price history – Store historical pricing data using
[decimal]to maintain a chronological record. - Feature flags – Use
[boolean]arrays for managing feature flags that vary by region or product variant.
Custom types
- Reusable address or contact information – Define a custom type once for consistent use across billing, shipping, or warehouse details.
- Pricing structures – Create custom types to model complex pricing tiers, discounts, or promotional offers.
- User or author profiles – Define comprehensive user information that is consistently applied in various contexts.
- Nested product variations – Model intricate product variants, options, or configurations with a structured custom type.
- Hierarchical categories – Define category structures with multiple levels.
Best practices
Adhere to the following best practices to ensure efficient and maintainable data structures when working with arrays and custom types:
- Select the appropriate type – Consider the following:
- Use primitive arrays like
[string]or[integer]for simple lists of values. - Use custom types when objects contain multiple related fields.
- Use primitive arrays like
- Use descriptive names – Ensure that all field and custom type names clearly convey their purpose and content.
- Define once and reference everywhere – Define custom types once and reference them across your data model to prevent duplication and ensure consistency.
- Keep types focused – Design each custom type to represent a single, cohesive concept, enhancing clarity and modularity.
- Document relationships – Provide comprehensive descriptions that explain how different fields and types interrelate.
- Evaluate performance implications – Be mindful that excessively large arrays can affect data processing performance.
Declare the schema
The schema defines the data structure that your app processes. These definitions display options within data sync field mappings. OCP uses the properties defined in your schema when calling your source class method.
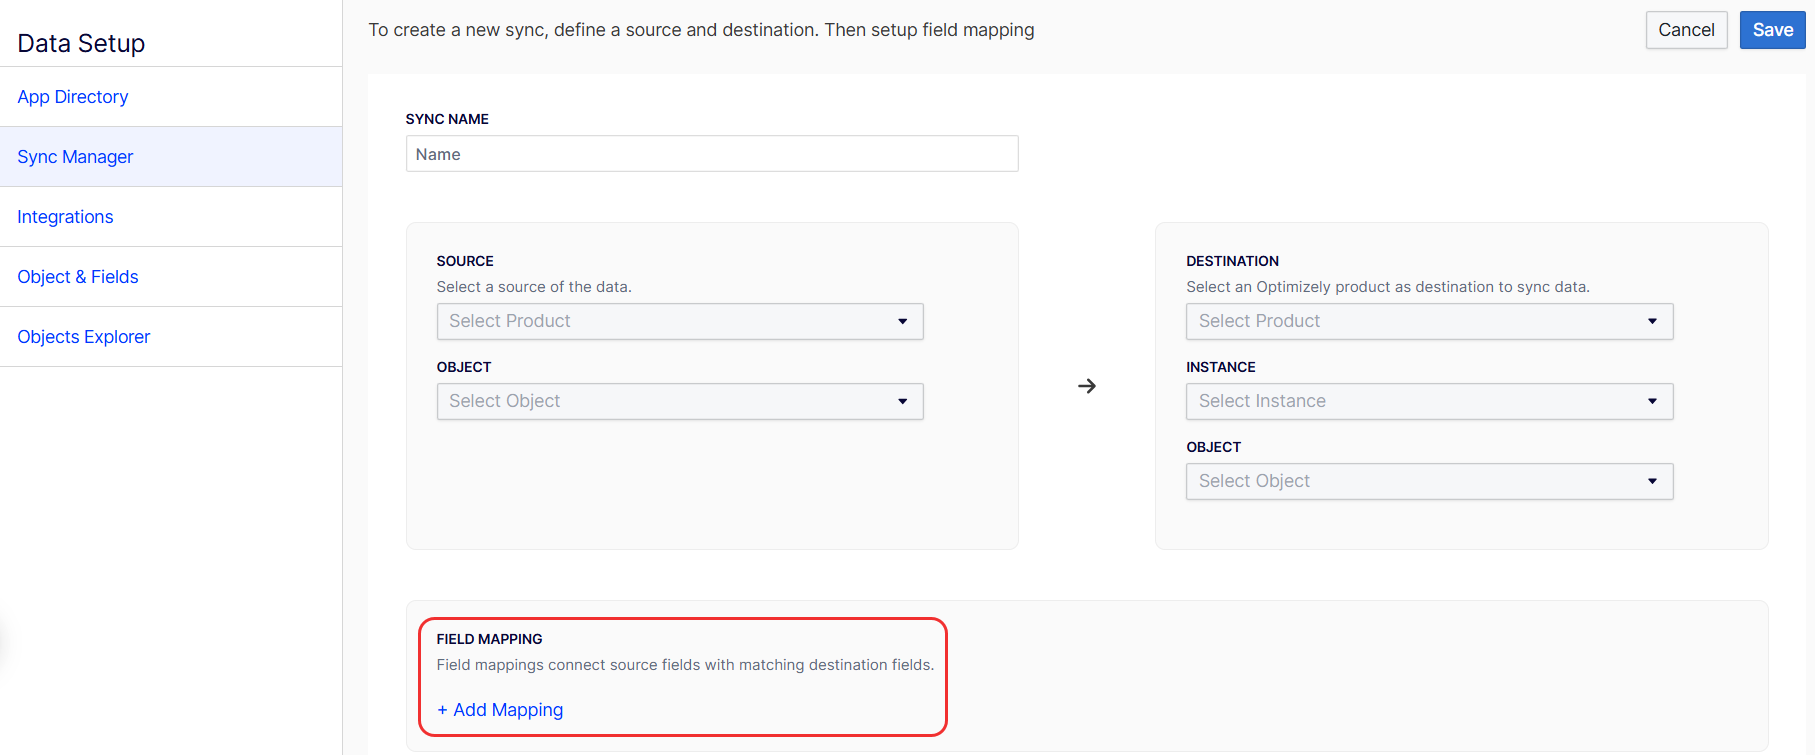
To map fields, complete the following:
- Log in to the app.
- Go to Data Setup > Sync Manager.
- Click New Sync.
- Click Field Mapping > Add Mapping to connect source fields with matching destination fields.
You can choose between a static or dynamic schema based on your data's characteristics.
- Static schema – Use a static schema when your data structure is fixed and known in advance, all sources of a particular type share an identical structure, and you want to define the schema declaratively without code.
- Dynamic schema – Use a dynamic schema when you need to retrieve schema information from external systems or when different instances of the same source have different fields
Declare static schema
You must create a corresponding .yml file in src/sources/schema for each schema field you defined in the app.yml file.
See the following example of a post.yml schema:
name: post
display_name: Post
description: External post information
fields:
  - name: external_id
    type: string
    display_name: External ID
    description: Primary identifier in external system
    primary: true
  - name: post_title
    type: string
    display_name: Post Title
    description: The title of the post
  - name: tags
    type: "[string]"
    display_name: Tags
    description: Post tags
  - name: related_post_ids
    type: "[string]"
    display_name: Related Posts
    description: IDs of related posts
  - name: author
    type: Author
    display_name: Author
    description: Post author information
  - name: contributors
    type: "[Author]"
    display_name: Contributors
    description: Additional contributors to the post
custom_types:
  - name: Author
    display_name: Author
    description: Author profile information
    fields:
      - name: author_id
        type: string
        display_name: Author ID
        description: Unique author identifier
      - name: name
        type: string
        display_name: Name
        description: Author's full name
      - name: email
        type: string
        display_name: Email
        description: Author's email address
Declare dynamic schema
You must create and export a class in src/sources/ that extends SourceSchemaFunction. The class name must correspond with the schema entry_point in the app manifest. Implement the getSourcesSchema() method, which returns a SourceSchema object.
See the following example of the app manifest:
sources:
  wordpress_post_sync:
    ...
    schema:
      entry_point: WordpressPostSchema
    ...
See the following example implementation:
import * as App from '@zaiusinc/app-sdk';

export class WordPressPostSchema extends App.SourceSchemaFunction {
  public async getSourcesSchema(): Promise<App.SourceSchema> {
    try {
      // Fetch a sample post from WordPress API
      const response = await fetch(`${this.config.wordpressUrl}/wp-json/wp/v2/posts?per_page=1`);
      const posts = await response.json();

      // Use the sample post to build our schema
      const samplePost = posts[0];

      // Build schema fields based on sample data
      const fields = [
        // Always include ID as primary field
        {
          name: 'id',
          type: 'string',
          display_name: 'Post ID',
          description: 'WordPress post identifier',
          primary: true,
        },
      ];

      // Add fields based on what is in the sample post
      if (samplePost.title) {
        fields.push({
          name: 'title',
          type: 'string',
          display_name: 'Title',
          description: 'Post title',
        });
      }

      if (samplePost.content) {
        fields.push({
          name: 'content',
          type: 'string',
          display_name: 'Content',
          description: 'Post content',
        });
      }

      if (samplePost.tags && Array.isArray(samplePost.tags)) {
        fields.push({
          name: 'tags',
          type: '[string]',
          display_name: 'Tags',
          description: 'Post tags',
        });
      }

      if (samplePost.author) {
        fields.push({
          name: 'author',
          type: 'Author',
          display_name: 'Author',
          description: 'Post author information',
        });
      }

      if (samplePost.comments && Array.isArray(samplePost.comments)) {
        fields.push({
          name: 'comments',
          type: '[Comment]',
          display_name: 'Comments',
          description: 'Post comments',
        });
      }

      // Define custom types
      const customTypes = [];

      if (samplePost.author) {
        customTypes.push({
          name: 'Author',
          display_name: 'Author',
          description: 'WordPress author information',
          fields: [
            {
              name: 'id',
              type: 'integer',
              display_name: 'Author ID',
              description: 'WordPress author identifier',
            },
            {
              name: 'name',
              type: 'string',
              display_name: 'Name',
              description: 'Author display name',
            },
            {
              name: 'email',
              type: 'string',
              display_name: 'Email',
              description: 'Author email address',
            },
          ],
        });
      }

      if (samplePost.comments && Array.isArray(samplePost.comments)) {
        customTypes.push({
          name: 'Comment',
          display_name: 'Comment',
          description: 'WordPress comment data',
          fields: [
            {
              name: 'id',
              type: 'integer',
              display_name: 'Comment ID',
              description: 'WordPress comment identifier',
            },
            {
              name: 'author_name',
              type: 'string',
              display_name: 'Commenter Name',
              description: 'Name of the commenter',
            },
            {
              name: 'content',
              type: 'string',
              display_name: 'Comment Text',
              description: 'Comment content',
            },
            {
              name: 'approved',
              type: 'boolean',
              display_name: 'Approved',
              description: 'Whether the comment is approved',
            },
          ],
        });
      }

      return {
        name: 'wordpress_post',
        display_name: 'WordPress Post',
        description: 'Blog posts from WordPress with author and comment data',
        fields: fields,
        custom_types: customTypes.length > 0 ? customTypes : undefined,
      };
    } catch (error) {
      // Fallback schema if API request fails
      return {
        name: 'wordpress_post',
        display_name: 'WordPress Post',
        description: 'Blog posts from WordPress',
        fields: [
          {
            name: 'id',
            type: 'string',
            display_name: 'Post ID',
            description: 'WordPress post identifier',
            primary: true,
          },
        ],
      };
    }
  }
}
Implement the logic
Use the sources.emit() API to emit data to your sources from any regular function or job.
Emit data using sources.emit()
sources.emit()The sources.emit() function lets you emit data to any source defined in your app manifest from any function or job context.
API signature
See the following example of an API signature:
import { sources } from '@zaiusinc/app-sdk';

await sources.emit<T>(sourceName: string, data: SourceData<T>): Promise<SourceResponse>;sourceName– The name of the source as declared in yourapp.ymlfile, for example,'wordpress_post_sync'.data– An object containing the data to emit, corresponding to your source schema.
Optimizely fans out the data to all active data syncs configured for the app source.
Configure a webhook function using the push model
Use a regular function to receive incoming webhook data and emit it to your source.
App manifest (app.yml)
See the following example:
sources:
  wordpress_post_sync:
    description: Sync Posts from WordPress
    schema: post

functions:
  wordpress_webhook:
    entry_point: WordpressWebhook
    description: Receives WordPress post webhooks
Function implementation (src/functions/WordpressWebhook.ts)
See the following example:
import { Function, Request, Response, sources, logger } from '@zaiusinc/app-sdk';

interface PostData {
  id: string;
  title: string;
  content?: string;
  author?: string;
}

export class WordpressWebhook extends Function {
  public constructor(request: Request) {
    super(request);
  }

  public async perform(): Promise<Response> {
    try {
      const webhookData = this.request.bodyJSON;
      logger.info('Received WordPress webhook', webhookData);

      // Transform data to match your schema
      const postData: PostData = {
        id: webhookData.id,
        title: webhookData.title.rendered,
      };

      // Emit the data to the source
      await sources.emit<PostData>('wordpress_post_sync', { data: postData });

      return new Response(200, { message: 'Success' });
    } catch (error) {
      logger.error('Failed to process webhook', error);
      return new Response(500, { message: error.message });
    }
  }
}
Implement a job using the pull model
Use a regular job to pull data from external systems and emit it to your source.
App manifest (app.yml)
See the following example:
sources:
  wordpress_post_sync:
    description: Sync Posts from WordPress
    schema: post

jobs:
  wordpress_sync:
    entry_point: WordpressSyncJob
    description: Syncs WordPress posts on a schedule
    cron: 0 0 * * * ?
Job implementation (src/jobs/WordpressSyncJob.ts)
See the following example:
import { Job, JobStatus, ValueHash, sources, logger } from '@zaiusinc/app-sdk';

enum JobStep {
  FETCH = 'FETCH',
  DONE = 'DONE',
}

interface SyncJobStatus extends JobStatus {
  state: {
    step: JobStep;
    page: number;
    hasMore: boolean;
  };
}

export class WordpressSyncJob extends Job {
  public async prepare(
    params: ValueHash,
    status?: SyncJobStatus,
    resuming?: boolean
  ): Promise<SyncJobStatus> {
    if (resuming && status) {
      return status;
    }

    return {
      state: {
        step: JobStep.FETCH,
        page: 0,
        hasMore: true,
      },
      complete: false,
    };
  }

  public async perform(status: SyncJobStatus): Promise<SyncJobStatus> {
    switch (status.state.step) {
      case JobStep.FETCH:
        if (!status.state.hasMore) {
          status.state.step = JobStep.DONE;
          break;
        }

        // Fetch a batch of posts from WordPress API
        const response = await this.fetchPostsPage(status.state.page);

        // Emit each post to the source
        for (const post of response.posts) {
          await sources.emit('wordpress_post_sync', { data: post });
        }

        status.state.page += 1;
        status.state.hasMore = response.hasMore;
        break;

      case JobStep.DONE:
        logger.info('WordPress sync complete');
        status.complete = true;
        break;
    }

    return status;
  }

  private async fetchPostsPage(page: number): Promise<{ posts: any[]; hasMore: boolean }> {
    // Implement your API call here
    return { posts: [], hasMore: false };
  }
}
For information on jobs and their best practices, see Jobs.
Emit to multiple sources
A key benefit of the sources.emit() API is that a single function or job can emit data to multiple sources. See the following example:
// Emit to different sources based on the data type
await sources.emit('wordpress_post_sync', { data: postData });
await sources.emit('wordpress_comment_sync', { data: commentData });
Handling delete operations
Sources can emit delete events to notify downstream data syncs that a record should be deleted. The data sync service automatically handles routing these delete events to configured destinations.
Emitting delete events
To emit a delete event, include the _isDeleted field set to true in your data object. You must also include the primary key identifier.
TypeScript interface example:
interface MyData {
  product_id: string;  // Primary key
  _isDeleted?: boolean;  // Delete flag
}
Emitting a delete event from a function:
import { Function, Request, Response, sources } from '@zaiusinc/app-sdk';

interface ProductData {
  product_id: string;
  _isDeleted?: boolean;
}

export class ProductWebhook extends Function {
  public async perform(): Promise<Response> {
    const webhookData = this.request.bodyJSON;

    // Emit delete event when product is deleted
    if (webhookData.action === 'delete') {
      await sources.emit<ProductData>('product_sync', {
        data: {
          product_id: webhookData.id,
          _isDeleted: true
        }
      });
    } else {
      // Emit regular update/create event
      await sources.emit<ProductData>('product_sync', {
        data: {
          product_id: webhookData.id,
          name: webhookData.name,
          price: webhookData.price
          // No _isDeleted field for regular events
        }
      });
    }

    return new Response(200, { message: 'Success' });
  }
}
Emitting a delete event from a job:
import { Job, JobStatus, sources } from '@zaiusinc/app-sdk';

export class ProductSyncJob extends Job {
  public async perform(status: JobStatus): Promise<JobStatus> {
    // Fetch deleted products from external API
    const deletedProducts = await this.fetchDeletedProducts();

    // Emit delete events
    for (const product of deletedProducts) {
      await sources.emit('product_sync', {
        data: {
          product_id: product.id,
          _isDeleted: true
        }
      });
    }

    status.complete = true;
    return status;
  }
}
Important notes
- Primary key required: Always include the primary key field when emitting delete events. The data sync service needs this to identify which record to delete.
- Minimal data: You only need to include the primary key and
_isDeletedflag. Other fields are ignored for delete events. - Automatic routing: The data sync service automatically routes delete events to configured destinations. You don't need to handle destination-specific logic - just emit the delete event and the service takes care of the rest.
Best practices
When designing your function, consider the following best practices to ensure robustness and efficiency:
- Small work units – Design the
perform()method to handle small, discrete units of work. - Stateful design – Store all necessary state in the
stateobject to enable resumption. - Error handling – Implement comprehensive error handling with appropriate
try-catchblocks. This ensures that jobs fail gracefully and return relevant HTTP status codes. - Interruptibility– Use
performInterruptibleTask()andsleep()for operations that require extended processing time. - Progress tracking – Update the
stateobject with progress information, providing visibility into job advancement.
Handle errors
Use the following guidelines when managing errors:
- HTTP status codes – Use appropriate HTTP status codes in your
Responseobjects to accurately reflect the request outcome. - Detailed error messages – Provide clear and detailed error messages to facilitate debugging and troubleshooting.
- Implement
try-catchblocks – Implement appropriatetry-catchblocks within your functions to gracefully handle exceptions and prevent unexpected terminations.
Complete and publish your app
Legacy approach (deprecated)
DeprecatedThe following classes are deprecated and will be removed in a future version of the SDK:
SourceFunctionSourceJobSourceLifecycleSourceJobStatus,SourceJobInvocation,SourceSleepOptionsUse regular functions and jobs with the
sources.emit()API instead. See the Implement the logic section above for the recommended approach.
The legacy approach required defining source-specific entry points in the app manifest and using specialized classes that were tightly coupled to individual data syncs.
Legacy app manifest structure
See the following example of the legacy app manifest structure:
# DEPRECATED - Do not use for new apps
sources:
  wordpress_post_sync:
    description: Sync Posts from WordPress
    schema: post
    function:
      entry_point: WordpressPostSource
    lifecycle:
      entry_point: WordpressPostLifecycle
    jobs:
      post_sync:
        entry_point: WordpressPostSyncJob
        description: Performs synchronization of posts
Legacy SourceLifecycle class
SourceLifecycle classThe SourceLifecycle class managed webhook registration and cleanup for each data sync. This is not required as you can manage webhooks at the app level using the standard Lifecycle class.
// DEPRECATED - Use standard Lifecycle class instead
import * as App from '@zaiusinc/app-sdk';

export class WordpressPostLifecycle extends App.SourceLifecycle {
  public async onSourceCreate(): Promise<App.SourceCreateResponse> {
    // Called when a data sync is created
    return { success: true };
  }

  public async onSourceUpdate(): Promise<App.SourceUpdateResponse> {
    // Called when a data sync is updated
    return { success: true };
  }

  public async onSourceDelete(): Promise<App.SourceDeleteResponse> {
    // Called when a data sync is deleted
    return { success: true };
  }

  public async onSourceEnable(): Promise<App.SourceEnableResponse> {
    // Called when a data sync is enabled
    return { success: true };
  }

  public async onSourcePause(): Promise<App.SourcePauseResponse> {
    // Called when a data sync is paused
    return { success: true };
  }
}
Legacy SourceFunction class
SourceFunction classThe SourceFunction class handled webhooks in a source-specific context. This is not required as you can use a regular Function with sources.emit().
// DEPRECATED - Use regular Function with sources.emit() instead
import * as App from '@zaiusinc/app-sdk';

export class WordpressPostSource extends App.SourceFunction {
  public async perform(): Promise<App.Response> {
    const webhookData = this.request.body;

    // this.source.emit() was the old way to emit data
    await this.source.emit({ data: webhookData });

    return new App.Response(200, 'Success');
  }
}
Legacy SourceJob class
SourceJob classThe SourceJob class ran jobs in a source-specific context. This is not required as you can use a regular Job with sources.emit().
// DEPRECATED - Use regular Job with sources.emit() instead
import * as App from '@zaiusinc/app-sdk';

export class WordpressPostSyncJob extends App.SourceJob {
  public async prepare(
    params: App.ValueHash,
    status?: App.SourceJobStatus,
    resuming?: boolean
  ): Promise<App.SourceJobStatus> {
    return { state: {}, complete: false };
  }

  public async perform(status: App.SourceJobStatus): Promise<App.SourceJobStatus> {
    // this.source.emit() was the old way to emit data
    await this.source.emit({ data: { id: '1', title: 'Post' } });

    status.complete = true;
    return status;
  }
}
Migration guide
To migrate from the legacy approach to the new sources.emit() API, complete the following steps:
-
Update your app manifest – Remove
function,lifecycle, andjobsfrom your source definitions. Define regular functions and jobs at the top level instead. -
Replace
SourceFunctionwithFunction– Create a regularFunctionclass and usesources.emit()to emit data.// Before (deprecated) await this.source.emit({ data: myData }); // After (recommended) await sources.emit('source_name', { data: myData }); -
Replace
SourceJobwithJob– Create a regularJobclass and usesources.emit().// Before (deprecated) await this.source.emit({ data: myData }); // After (recommended) await sources.emit('source_name', { data: myData }); -
Remove
SourceLifecycle– If you were using lifecycle hooks to register per-data-sync webhooks, complete the following:- Register a single webhook at the app level using the standard
Lifecycleclass. - Use the app's webhook URL directly without per-data-sync webhook management.
- Register a single webhook at the app level using the standard
Updated 3 months ago