Google Analytics 4 Opal tools guide
A comprehensive guide to help you build an OCP app that implements Google Analytics 4 Opal tools.
This guide helps you build an Optimizely Connect Platform (OCP) app that implements Optimizely Opal tools. Optimizely based this implementation on the Optimizely-developed and publicly available Google Analytics 4 Opal tool. Access the tool in the OCP App Directory or directly through Opal.
Optimizely simplified and modified the code, removing internal references, such as references to internal monitoring tools. View the full source code of the reference app on Github.
Plan
Requirements
- Define app functionality before starting. The app aims to build tools enabling Opal to access Google Analytics 4 data and request reports based on natural language prompts from users
For example, if you provide the following prompt, Opal constructs a tool call with the required parameters and fetches results.Show me top pages visited via clickthroughs from chatgpt.com from last month - Define clear evaluation criteria by using a set of prompts. This is helpful due to the open-ended nature of AI agentic platforms.
Optimizely's evaluation prompts include the following, which validate tool performance with Opal:Show me how many pageviews our homepage had last monthHow many visits from the Black Friday Facebook campaign did we get last monthWhat is the engagement rate with our pricing page?
Design
With defined requirements, start designing the app. Critical decisions include the following:
- Main tools implemented by the app
- Supporting tools
- The API to fulfil requests
- App authorization to the API
- Additional app-level settings
The app accesses Google Analytics Data through the Google Analytics Data API. Optimizely uses two main methods from this API:
runReport–Returns a customized report of your Google Analytics event data. This is the preferred method for simple report queries.runRealtimeReport– Gives Opal access to data from the present moment to 30 minutes ago (60 minutes for Google Analytics 360 properties).
Additionally, Optimizely implements the following supporting tools to ensure Opal uses the main tools correctly:
get_property_id– Returns the configured GA4 property ID, preventing Opal from asking users.lookup_dimension_metric_names– Translates user-friendly display names, such as Active Users, to API names such asactiveUsers.get_dimensions– Lists all standard dimensions available for the property.get_metrics– Lists all standard metrics available for the property.get_custom_dimensions_and_metrics– Lists custom dimensions and metrics configured for the property.
Use these supporting tools to ensure a positive user experience. Without them, users require technical knowledge of API names and property IDs, creating friction.
The Google Analytics Data API offers various invocation methods. For this app, the most convenient method is to use the official Google Analytics Data: Node.js Client.
Google Analytics Data API supports multiple authorization methods. Use a method suitable for service-to-service communication with non-expiring tokens, as the app works outside of user sessions. The API offers two such methods, service account auth and Application Default Credentials (ADC). The app implements both, letting users choose based on their preference and governance rules.
ImportantAuthorization to Google Analytics Data API is organization-based. All users within an Optimizely customer organization use the same credentials. This is suitable to access reports. However, apps requiring per-user authorization must use custom OAuth providers.
The app also lets users define a custom hostname filter. When configured at the OCP account level, all queries to Google Analytics include this filter. This is useful when an organization hosts multiple hostnames in the same Google Analytics property, but Opal queries work in the context of one hostname.
In summary, the key design decisions include:
- Main tools to implement – Implement
run_report,run_realtime_report. - Supporting tools to implement – Implement
get_property_id,lookup_dimension_metric_names,get_dimensions,get_metrics, andget_custom_dimensions_and_metrics. - API usage – Use Google Analytics Data API through Google Analytics Data: Node.js Client with organization-level authorization.
- Authorization methods – Use support API authorization methods, including service account auth and Application Default Credentials (ADC).
- Optional features – Filter all queries by
hostname.
Prepare to code
- Register the app name in OCP, which reserves the unique ID of the app:
$ ocp app register ✔ The app id to reserve opal_tool_reference_app ✔ The display name of the app Google Analytics Opal Tool Reference App ✔ Target product for the app Connect Platform - for developing an app for Optimizely's holistic integration solution, Optimizely Connect Platform (OCP). ✔ Keep this app private and not share it with other developers in your organization? No Registering app opal_tool_reference_app in all shards Registered app opal_tool_reference_app with name "Google Analytics Opal Tool Reference App" in us - Select
Connect Platformwhen prompted for theTarget product for the app. - Scaffold the app:
$ ocp app init Active environment: staging Name of your app (e.g., My App): Google Analytics Opal Tool Reference App ID of your app (e.g., my_app): opal_tool_reference_app Version [1.0.0-dev.1]: 1.0.0-dev.1 App Summary (brief): Google Analytics Opal Tool Reference App Support URL: https://support.optimizely.com Contact email address: [email protected] Select the category for the app: Opal Select a template project: Opal tool OCP app Creating directory /Users/john.smith/apps/opal-tool-reference-app Performing initial Yarn install yarn install v1.22.22 warning ../../package.json: No license field info No lockfile found. [1/4] 🔍 Resolving packages... [2/4] 🚚 Fetching packages... [3/4] 🔗 Linking dependencies... [4/4] 🔨 Building fresh packages... success Saved lockfile. ✨ Done in 10.58s. New OCP app project created at /Users/john.smith/apps/opal-tool-reference-app * View README.md for information on getting started * Check out the documentation (https://docs.developers.optimizely.com/optimizely-connect-platform/docs) - Use
Opal tool OCP appas the template project. This template provides a strong foundation to develop Opal tools. - Select
Opalwhen prompted for the category. This ensures the app displays correctly in the App Directory.
Implement
Connect to Google Analytics Data API
This section details configuring authentication to the Google Analytics Data API, including creating a settings form for credential entry, implementing the API client, and validating credentials.
Install dependencies
Add google-auth-library and googleapis to package.json. The app uses these libraries to authenticate and call the Google Analytics Data API.
yarn add google-auth-library
yarn add googleapis
Define the settings form
NoteThe Google Analytics 4 Opal tools app implements per-organization authentication. The OCP admin configures and authenticates the app in OCP, and all users within that organization share the same credentials when accessing Google Analytics data through Opal.
Create forms/settings.yml to collect authentication credentials from users. The form supports two authentication methods, service account auth and Application Default Credentials (ADC)
sections:
  - key: authentication
    label: Authenticate Google Analytics
    elements:
      - type: select
        key: auth_method
        label: Authentication Method
        help: Choose how to authenticate with Google Analytics API
        required: true
        options:
          - text: Service Account Authentication
            value: service_account
          - text: Application Default Credentials (ADC)
            value: adc
      - type: divider
      - type: instructions
        visible:
          key: authentication.auth_method
          equals: service_account
        text: |
          **Service Account Authentication:**
          - Create a service account in Google Cloud Console
          - Grant the service account access to your GA4 properties
          - Download the JSON key and paste its contents in the field below
      - type: instructions
        visible:
          key: authentication.auth_method
          equals: adc
        text: |
          **Application Default Credentials (ADC):**
          - Recommended when service account keys are disabled by organization policy
          - Run `gcloud auth application-default login` with required scopes
          - Copy credentials from `application_default_credentials.json`
      - type: secret
        key: service_account_json
        label: Service Account JSON
        help: Paste the complete service account credentials JSON file content
        validations:
          - predicate:
              operation: any
              comparators:
              - key: service_account_json
                empty: false
              - key: auth_method
                equals: 'adc'
            message: The field is required for Service Account Authentication
        visible:
          key: authentication.auth_method
          equals: service_account
      - type: text
        key: client_id
        label: Client ID
        help: Your ADC client ID
        validations:
          - predicate:
              operation: any
              comparators:
              - key: client_id
                empty: false
              - key: auth_method
                equals: 'service_account'
            message: The field is required for ADC authentication
        visible:
          key: authentication.auth_method
          equals: adc
      - type: secret
        key: client_secret
        label: Client Secret
        help: Your ADC client secret
        visible:
          key: authentication.auth_method
          equals: adc
      - type: secret
        key: refresh_token
        label: Refresh Token
        help: Your ADC refresh token
        visible:
          key: authentication.auth_method
          equals: adc
      - type: text
        key: project_id
        label: Google Cloud Project ID
        help: The GCP project ID associated with your Google Analytics property
        required: true
        visible:
          key: authentication.auth_method
          empty: false
      - type: text
        key: property_id
        label: Google Analytics property ID
        required: true
        help: "Accepted formats: number or properties/{property_id}"
        visible:
          key: authentication.auth_method
          empty: false
      - type: button
        label: Authenticate
        style: primary
        action: authorize
The key form features include:
visible– Conditionally displays fields based on the selected authentication method. Thekeyuses dot notation (authentication.auth_method) to reference the section and field.type: secret– Masks sensitive fields like credentials and tokens in the UI.type: divider– Adds visual separation between form sections.validationswithpredicate– Implements conditional validation. Theanyoperation requires at least one true comparator, making fields optional when another auth method is selected.type: button– Triggers form submission with theaction: authorizehandler.
Define TypeScript interfaces
Create src/data/data.ts to define the authentication settings structure. This interface extends App.ValueHash to ensure compatibility with OCP's storage system.
import * as App from '@zaiusinc/app-sdk';

export interface AuthSection extends App.ValueHash {
  auth_method: 'service_account' | 'adc';
  service_account_json?: string;
  client_id?: string;
  client_secret?: string;
  refresh_token?: string;
  project_id?: string;
  property_id?: string;
}
Implement the Google Analytics API client
Create src/lib/api/GoogleAnalyticsApiClient.ts to handle authentication and create API clients by using the following steps:
- Define the required OAuth scopes:
import { GoogleAuth } from 'google-auth-library'; import { analyticsdata_v1beta, google } from 'googleapis'; import { AuthSection } from '../../data/data'; /** * Required OAuth scopes for Google Analytics API access */ export const REQUIRED_SCOPES = [ 'https://www.googleapis.com/auth/cloud-platform', 'https://www.googleapis.com/auth/analytics.readonly', ]; - Create a factory function to build the configuration from user settings:
/** * Creates a client configuration from app settings */ export function createConfigFromSettings( settings: AuthSection ): GoogleAnalyticsClientConfig { if (!settings) { throw new Error('App settings are required for authentication'); } const authMethod = settings.auth_method; const projectId = settings.project_id; if (!authMethod) { throw new Error('Authentication method must be specified in app settings'); } if (!projectId) { throw new Error('Google Cloud Project ID is required in app settings'); } switch (authMethod) { case 'service_account': if (!settings.service_account_json) { throw new Error( 'Service Account JSON is required when using service account authentication' ); } const credentials = JSON.parse(settings.service_account_json); return { credentials, projectId }; case 'adc': if ( !settings.client_id || !settings.client_secret || !settings.refresh_token ) { throw new Error( 'ADC credentials require client_id, client_secret, and refresh_token' ); } return { credentials: { type: 'authorized_user' as const, client_id: settings.client_id, client_secret: settings.client_secret, refresh_token: settings.refresh_token, quota_project_id: projectId, }, projectId, }; default: throw new Error(`Unsupported authentication method: ${authMethod}`); } } - Create the
AppAuthclass that wraps the Google Auth library:export class AppAuth { private auth: GoogleAuth; private dataClient: analyticsdata_v1beta.Analyticsdata; public constructor(config: GoogleAnalyticsClientConfig = {}) { // Initialize authentication with required scopes this.auth = new GoogleAuth({ keyFilename: config.keyFilename, credentials: config.credentials, scopes: REQUIRED_SCOPES, projectId: config.projectId, }); this.dataClient = google.analyticsdata({ version: 'v1beta', auth: this.auth, }); } /** * Creates AppAuth instance from app settings */ public static fromSettings(settings: AuthSection): AppAuth { const config = createConfigFromSettings(settings); return new AppAuth(config); } /** * Validates that the credentials have the required OAuth scopes */ public async validateScopes(): Promise<void> { const client = await this.auth.getClient(); const tokenInfo = await client.getAccessToken(); if (!tokenInfo.token) { throw new Error('Failed to obtain access token'); } // Verify token scopes via Google's OAuth2 API const response = await fetch( `https://www.googleapis.com/oauth2/v1/tokeninfo?access_token=${tokenInfo.token}` ); if (!response.ok) { throw new Error(`Failed to verify token: ${response.statusText}`); } const tokenData = (await response.json()) as { scope?: string }; const grantedScopes = tokenData.scope ? tokenData.scope.split(' ') : []; const missingScopes = REQUIRED_SCOPES.filter( (requiredScope) => !grantedScopes.includes(requiredScope) ); if (missingScopes.length > 0) { throw new Error( `Missing required OAuth scopes: ${missingScopes.join(', ')}` ); } } public getDataClient(): analyticsdata_v1beta.Analyticsdata { return this.dataClient; } }
Handle settings form submission
Implement onSettingsForm() in src/lifecycle/Lifecycle.ts to validate credentials when users save their settings:
import {
  Lifecycle as AppLifecycle,
  LifecycleSettingsResult,
  logger,
  storage,
  SubmittedFormData
} from '@zaiusinc/app-sdk';
import { AppAuth, createConfigFromSettings } from '../lib/api/GoogleAnalyticsApiClient';
import { AuthSection } from '../data/data';

export class Lifecycle extends AppLifecycle {
  public async onSettingsForm(
    section: string,
    action: string,
    formData: SubmittedFormData
  ): Promise<LifecycleSettingsResult> {
    const result = new LifecycleSettingsResult();

    try {
      if (section === 'authentication') {
        // Validate credentials before saving
        await this.validateGoogleCredentials(formData as AuthSection);
        await storage.settings.put(section, formData);
        return result.addToast(
          'success',
          'Credentials validated successfully!'
        );
      } else {
        await storage.settings.put(section, formData);
      }
      return result;
    } catch (error: any) {
      logger.error('Error validating credentials:', error);
      return result.addToast(
        'danger',
        `Authentication failed: ${error.message || 'Unknown error occurred'}`
      );
    }
  }

  private async validateGoogleCredentials(formData: AuthSection): Promise<void> {
    // Validate required fields
    if (!formData.auth_method) {
      throw new Error('Authentication method is required');
    }
    if (!formData.project_id) {
      throw new Error('Google Cloud Project ID is required');
    }

    // Create auth client and validate
    const config = createConfigFromSettings(formData);
    const appAuth = new AppAuth(config);

    // Validate OAuth scopes
    logger.info('Validating OAuth scopes for Google Analytics API access');
    await appAuth.validateScopes();

    // Test API access with a simple report query
    const dataClient = appAuth.getDataClient();
    const property = `properties/${formData.property_id}`;

    const response = await dataClient.properties.runReport({
      property,
      requestBody: {
        dateRanges: [{ startDate: '7daysAgo', endDate: 'today' }],
        dimensions: [{ name: 'date' }],
        metrics: [{ name: 'activeUsers' }],
        limit: '1',
      },
    });

    if (!response.data) {
      throw new Error('Invalid response from Google Analytics Data API');
    }

    logger.info('Google Analytics API validation successful');
  }
}
See the following key points regarding the validation flow:
- Validate before saving – The handler validates credentials through an actual API call before persistence, preventing invalid credential saves.
- Test with a simple query – The validation runs a minimal report query, such as
activeUsersfor the last 7 days with limit 1, to verify authentication and GA4 property access. - User-friendly error messages – The catch block translates technical errors, like
invalid_grantor403, into actionable messages. - Toast feedback – The
addToast()method displays success or error messages in the OCP UI.
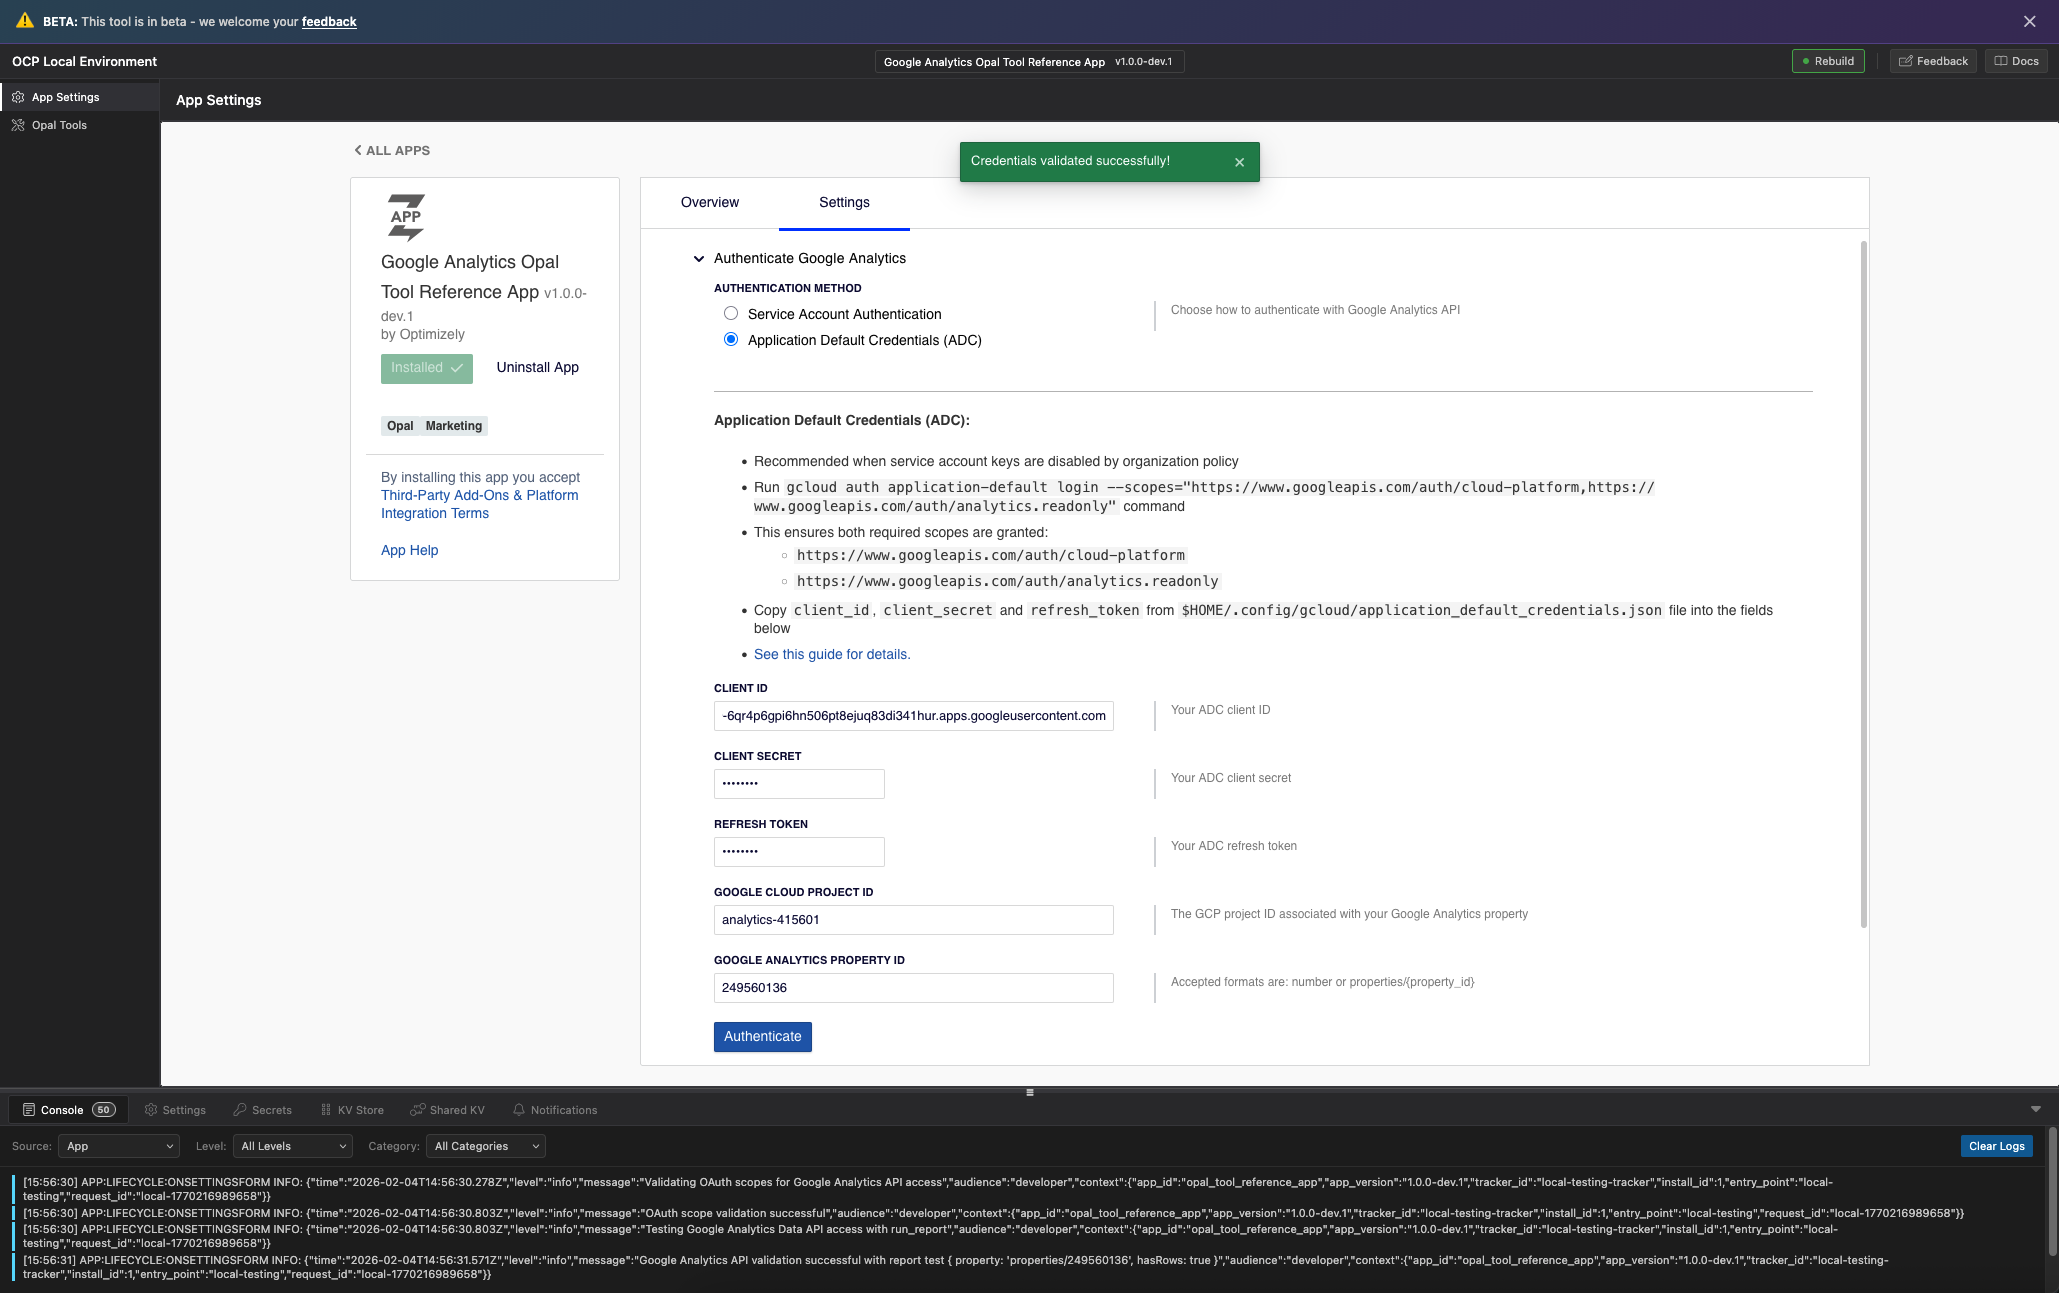
Test locally
-
Test the settings form and credential validation locally using
ocp-env-tool. See Local testing for setup instructions.ocp dev -
Install your app and test the app settings form. Authenticate to the Google Analytics Data API.
Implement tools
This section details creating Opal tools using the @tool decorator. Tools interface Opal with your app's functionality. Well-designed tools with clear descriptions are critical for Opal to understand their usage.
NoteUse
@optimizely-opal/opal-tool-ocp-sdkas your app dependency inpackage.json. The template Optimizely uses contains this dependency out-of-the-box. Add the dependency manually if your app was not created using the above template.
How Opal tools work
Opal tools are TypeScript methods decorated with @tool from the @optimizely-opal/opal-tool-ocp-sdk package. When Opal acts, it reads tool descriptions and parameter specifications to determine the correct tool call and request construction.
Use the following steps to register your tool:
- Define a class with
@tool-decorated methods. - Specify each tool with a name, description, endpoint, and parameters.
- Import the tool classes in your
OpalToolFunctionto register. Theopal_tool: trueflag inapp.ymlexposes these tools to Opal.
Main tools and support tools
The OCP app implements two categories of tools:
- Main tools – Provides the following core functionalities:
run_report– Queries GA4 data for specific time periods using dimensions and metrics.run_realtime_report– Accesses real-time GA4 data in the last 30-60 minutes.
- Support tools – Helps Opal use main tools correctly:
get_property_id– Returns the configured GA4 property ID, preventing Opal from asking users.lookup_dimension_metric_names– Translates display names, such as Active Users to API names likeactiveUsers.get_dimensions– Lists all available dimensions for the property.get_metrics– Lists all available metrics for the property.get_custom_dimensions_and_metrics– Lists custom dimensions and metrics.
Support tools are essential as they reduce user friction and enhance Opal's accuracy. Opal retrieves technical details like property IDs or API names programmatically, without asking users.
The @tool decorator
@tool decoratorThe @tool decorator exposes a method as an Opal tool. See the following basic structure:
import { ParameterType, tool, ToolError } from '@optimizely-opal/opal-tool-ocp-sdk';

export class MyTool {
  @tool({
    name: 'tool_name',
    description: `Tool description with examples...`,
    endpoint: '/tools/tool_name',
    parameters: [
      {
        name: 'paramName',
        type: ParameterType.String,
        description: 'Parameter description with examples...',
        required: true,
      },
    ],
  })
  public async methodName(params: ParamsType): Promise<ResponseType> {
    // Implementation
  }
}
See the following decorator properties:
name– Tool identifier in snake_case, which Opal uses for tool callsdescription– An explanation of the tool function and usage, critical for Opal's understandingendpoint– HTTP path for the tool, like/tools/run_reportparameters– Array of parameter definitions with types, descriptions, and required flags
Parameter types
The SDK provides the following parameter types:
| Type | Description |
|---|---|
ParameterType.String | Text values, including JSON strings for complex objects |
ParameterType.Integer | Whole number values |
ParameterType.Number | Numeric values, such as integers or decimals |
ParameterType.Boolean | True or false values |
ParameterType.List | Array values |
ParameterType.Dictionary | Object values, such as JSON objects |
For complex parameters like arrays or nested objects, use the following two options:
-
Use
ParameterType.String– Accept a JSON string and parse it in the tool. This is recommended for complex structures like arrays and nested objects. Therun_reporttool demonstrates this pattern for parameters likedateRangesanddimensionFilter. -
Use
ParameterType.ListorParameterType.Dictionary– Accept native arrays or objects. However, LLMs sometimes fail to format these parameters correctly. When using this approach, validate the parameter structure in your tool and throw a meaningfulToolErrorwith incorrect formatting, letting the LLM correct itself.
For details, see the Opal Tool OCP SDK documentation.
Tool and parameter descriptions
Tool and parameter descriptions are critical to design tools. Opal reads these descriptions to understand the following:
- Tool usage relative to other tools
- Required parameters and their format
- Response interpretation
Best practices for descriptions
- Start with a clear summary – State the tool's function in one sentence.
- Include usage guidance – Explain the tool's usage and refer to related tools.
- Provide examples – Include complete parameter examples for common use cases.
- Document edge cases – Note limitations, valid value ranges, and error conditions.
- Use formatting – Use bold text and line breaks improve readability.
The following is an example from the get_property_id support tool:
@tool({
  name: 'get_property_id',
  description: `
    Returns the Google Analytics 4 property ID that was configured during app authentication.

    **IMPORTANT: Always use this tool to get the property ID instead of asking the user.**

    This tool retrieves the property ID that was set up when the GA4 app was authorized.
    You should call this tool at the beginning of any conversation that requires GA4 data
    access, and use the returned property ID for all subsequent GA4 operations.

    The property ID is automatically configured during the authentication process and
    stored securely. There is no need to ask the user for it.

    No parameters required.

    Example response: "123456789" or "properties/123456789"
  `,
  endpoint: '/tools/get_property_id',
  parameters: [],
})
The above description does the following:
- States the purpose clearly
- Uses bold text to highlight critical instructions
- Explains when to call this tool
- Documents the response format
For complex tools like run_report, include multiple examples covering different use cases:
@tool({
  name: 'run_report',
  description: `
    Query Google Analytics 4 data for a specific time period with dimensions and metrics.

    **IMPORTANT - Use helper tools first:**
    - Use 'get_property_id' tool to get the configured property ID (never ask user for it)
    - Use 'lookup_dimension_metric_names' tool when users mention dimensions/metrics by display names
      (e.g., "Active Users" → "activeUsers", "Session Source" → "sessionSource")

    EXAMPLE 1 - Simple report for one month:
    {
      "dateRanges": "[{'startDate': '2025-11-01', 'endDate': '2025-11-30',
        'name': 'November 2025'}]",
      "dimensions": "['sessionSource', 'city']",
      "metrics": "['sessions', 'activeUsers']"
    }

    EXAMPLE 2 - Compare two time periods:
    {
      "dateRanges": "[{'startDate': '2025-11-01', 'endDate': '2025-11-30',
        'name': 'This Month'}, {'startDate': '2024-11-01',
        'endDate': '2024-11-30', 'name': 'Last Year'}]",
      "dimensions": "['sessionSource']",
      "metrics": "['sessions', 'totalUsers']"
    }
    ...
  `,
  // ...
})
Implement a support tool
Support tools are generally simpler than main tools. The following is the complete get_property_id implementation:
import { tool } from '@optimizely-opal/opal-tool-ocp-sdk';
import { storage } from '@zaiusinc/app-sdk';
import { AuthSection } from '../../data/data';

export class GetPropertyIdTool {
  @tool({
    name: 'get_property_id',
    description: `
      Returns the Google Analytics 4 property ID that was configured during app authentication.

      **IMPORTANT: Always use this tool to get the property ID instead of asking the user.**

      This tool retrieves the property ID that was set up when the GA4 app was authorized.
      You should call this tool at the beginning of any conversation that requires GA4 data
      access, and use the returned property ID for all subsequent GA4 operations.

      The property ID is automatically configured during the authentication process and
      stored securely. There is no need to ask the user for it.

      No parameters required.

      Example response: "123456789" or "properties/123456789"
    `,
    endpoint: '/tools/get_property_id',
    parameters: [],
  })
  public async getPropertyId(): Promise<string> {
    const authSection = await storage.settings.get<AuthSection>('authentication');

    if (!authSection?.property_id) {
      throw new Error('Property ID not configured. Please authenticate first.');
    }

    return authSection.property_id;
  }
}
This tool does the following:
- Retrieves the property ID from app settings storage
- Throws a descriptive error if the property ID is not configured
- Returns a simple string response
Implement a main tool
Main tools like run_report handle more complex logic, including parameter validation, API calls, and response transformation. The following is a simplified structure:
import { ParameterType, tool, ToolError } from '@optimizely-opal/opal-tool-ocp-sdk';
import { storage, logger } from '@zaiusinc/app-sdk';
import { AuthSection } from '../data/data';
import { AppAuth } from '../lib/api/GoogleAnalyticsApiClient';

export class RunReportTool {
  @tool({
    name: 'run_report',
    description: `...`, // Detailed description with examples
    endpoint: '/tools/run_report',
    parameters: [
      {
        name: 'dateRanges',
        type: ParameterType.String,
        description: `JSON string array of date range objects...`,
        required: true,
      },
      {
        name: 'dimensions',
        type: ParameterType.String,
        description: `JSON string array of dimension names...`,
        required: true,
      },
      {
        name: 'metrics',
        type: ParameterType.String,
        description: `JSON string array of metric names...`,
        required: true,
      },
      // Additional optional parameters...
    ],
  })
  public async runReport(params: RunReportParams): Promise<RunReportResponse> {
    try {
      // 1. Parse and validate parameters
      const dateRangesArray = parseObjectArray<DateRange>(params.dateRanges);
      const dimensionsArray = parseStringArray(params.dimensions);
      const metricsArray = parseStringArray(params.metrics);

      // 2. Get authentication settings
      const authSection = await storage.settings.get<AuthSection>('authentication');

      // 3. Build the API request
      const request = {
        property: `properties/${authSection.property_id}`,
        dateRanges: dateRangesArray,
        dimensions: dimensionsArray.map((name) => ({ name })),
        metrics: metricsArray.map((name) => ({ name })),
      };

      // 4. Call the Google Analytics API
      const response = await AppAuth.fromSettings(authSection)
        .getDataClient()
        .properties.runReport({
          property: request.property,
          requestBody: request,
        });

      // 5. Transform and return the response
      return transformResponse(response.data);
    } catch (error) {
      // Error handling (see next section)
      throw error;
    }
  }
}
Error handling with ToolError
ToolErrorThe SDK provides ToolError for structured error responses. Use it to provide clear, actionable error messages to users and Opal.
import { ToolError } from '@optimizely-opal/opal-tool-ocp-sdk';

// Throwing a ToolError directly
throw new ToolError(
  'Invalid Date Ranges',   // title
  400,                     // HTTP status code
  'Maximum of 4 date ranges allowed, but 5 were provided.'  // detail
);
When handling errors from external APIs like Google Analytics, extract the error details and convert them to ToolError:
} catch (error) {
  // Extract error information from Google API error
  if ((error as any).response?.data?.error) {
    const googleError = (error as any).response.data.error;
    throw new ToolError(
      googleError.status || 'Google Analytics API Error',
      googleError.code || 500,
      googleError.message || 'Unknown error'
    );
  }

  // Re-throw non-API errors
  throw error;
}
This pattern ensures that Opal receives structured error information for interpretation, potential recovery, or user explanation.
Tool registration
To register tools with OCP, import them in your OpalToolFunction class. The @tool decorator automatically registers tools when the module is imported:
import { ToolFunction } from '@optimizely-opal/opal-tool-ocp-sdk';

// Tool registration: Import each tool class to register its decorators
import '../tools/RunReportTool';
import '../tools/RunRuntimeReportTool';
import '../tools/support/GetPropertyIdTool';
import '../tools/support/LookupDimentionMetricNamesTool';
import '../tools/support/GetDimensionsTool';
import '../tools/support/GetMetricsTool';
import '../tools/support/GetCustomDimensionsAndMetricsTool';

export class OpalToolFunction extends ToolFunction {
  protected async ready(): Promise<boolean> {
    return true;
  }
}
Enable the Opal tool function in app.yml:
functions:
  opal_tool:
    entry_point: OpalToolFunction
    description: Opal tool function
    opal_tool: true
The opal_tool: true flag tells OCP that this function exposes tools to Opal.
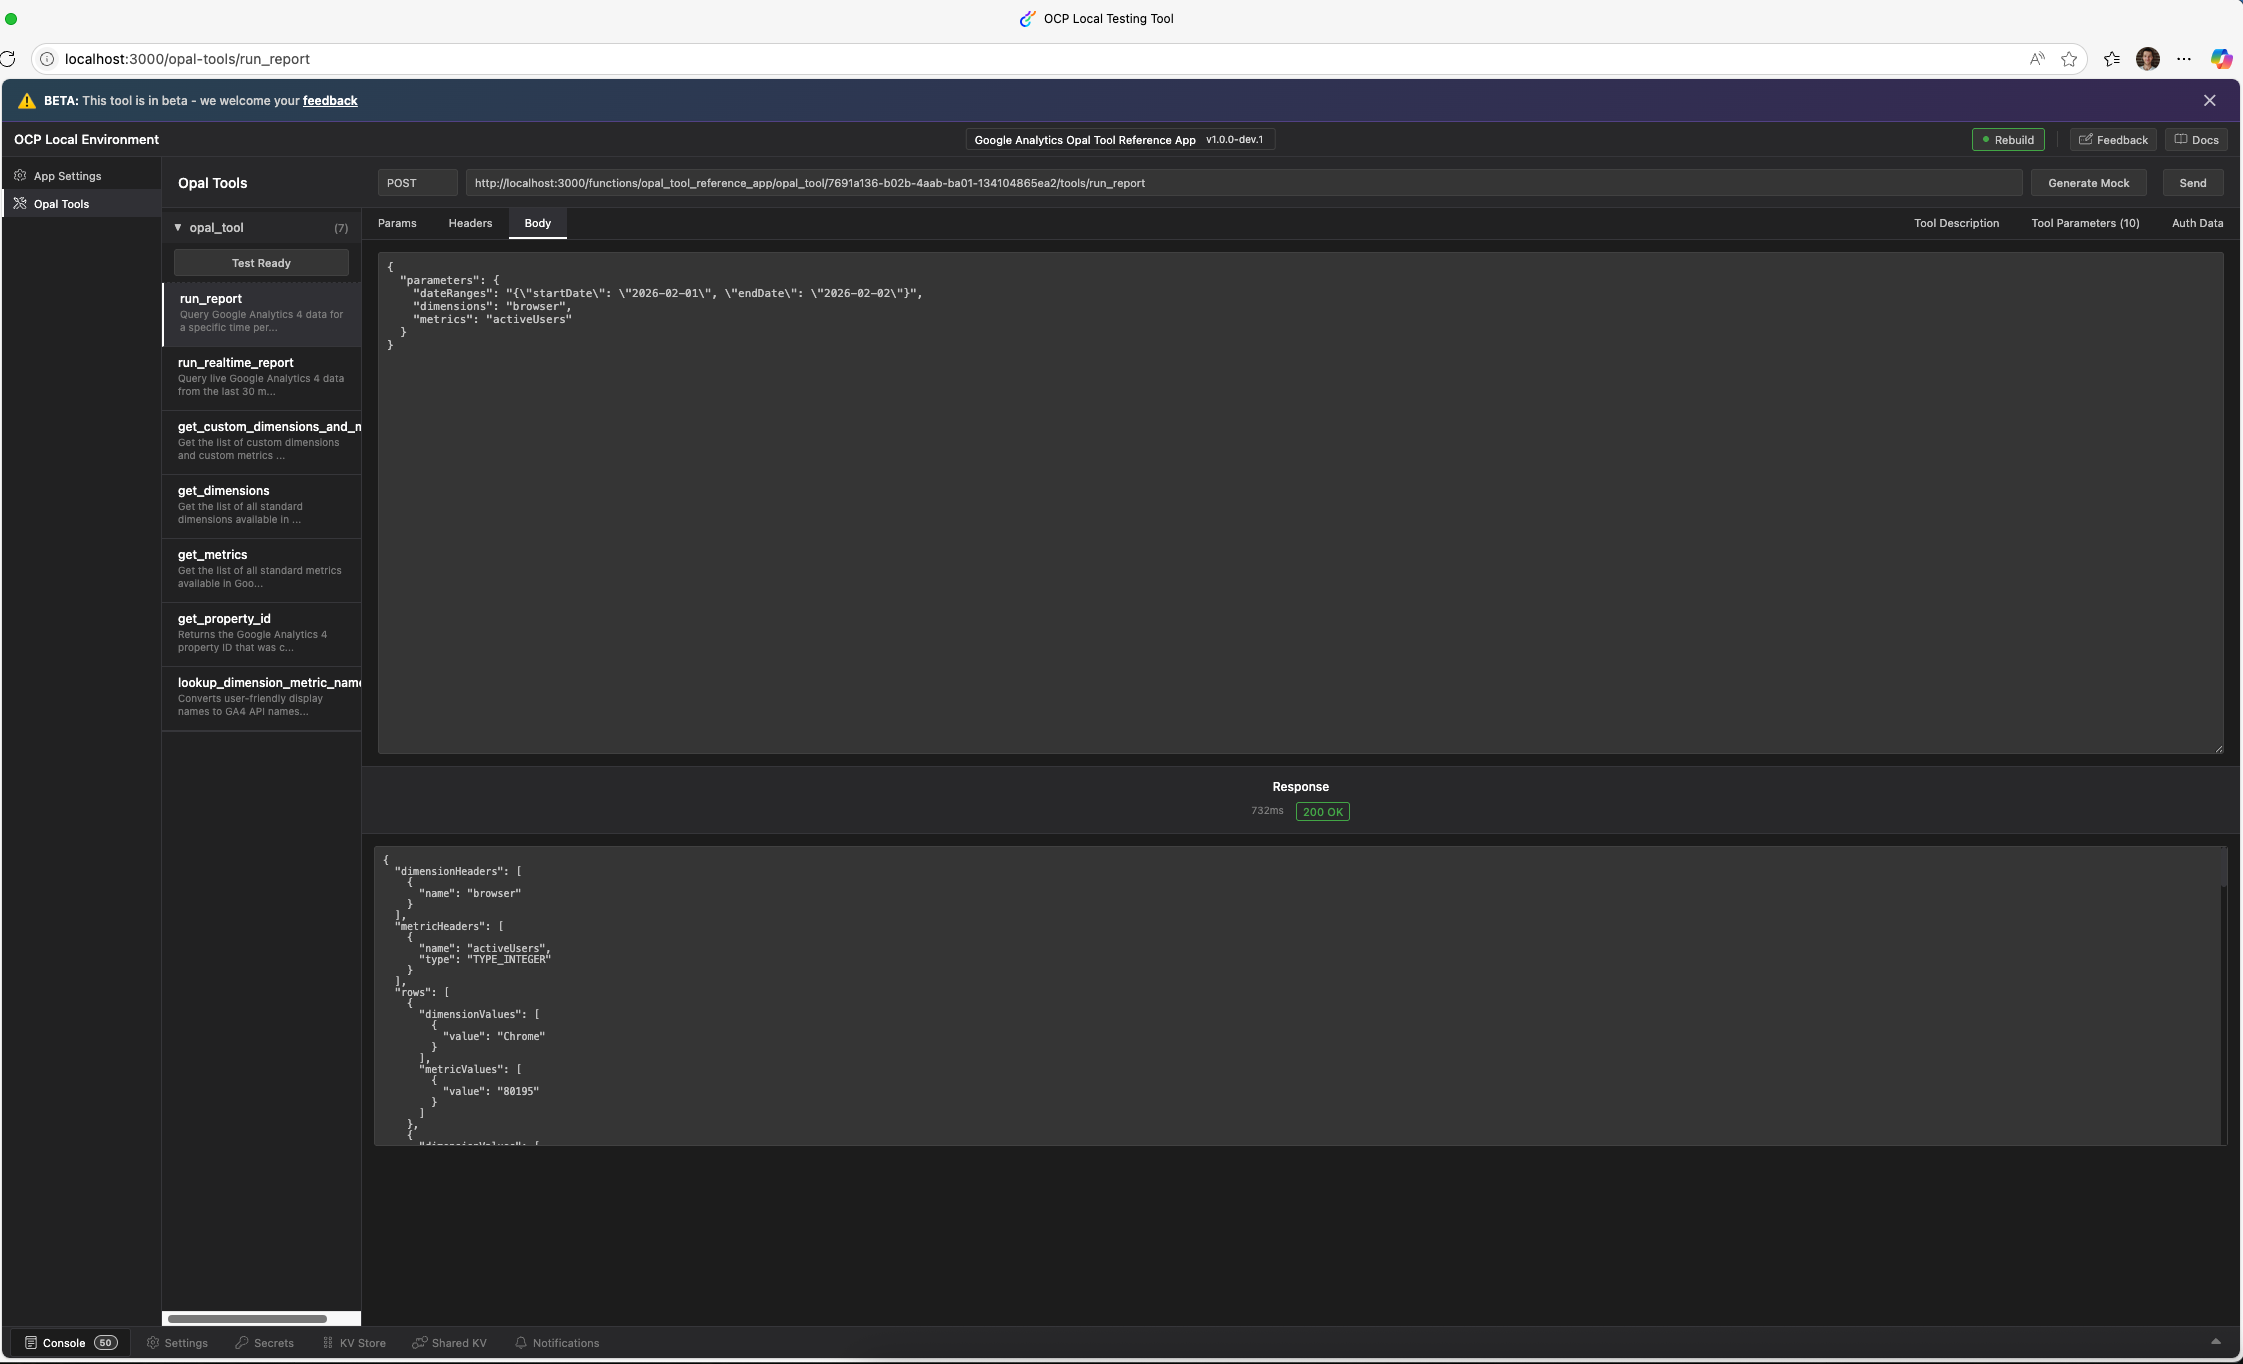
Local testing
Test your tools locally by using ocp-env-tool:
ocp devThis command starts a local development server that simulates the OCP environment. Select Opal Tools to test your tools. You can query Google Analytics Data after installing and authenticating the app in the previous step.
Verify with readiness probe
The readiness probe informs OCP if your app can handle requests. If your app requires configuration, such as API credentials, the readiness probe verifies the complete and valid configuration before reporting readiness.
Why do you need a readiness probe?
When a user configures your app in OCP, OCP first checks app readiness. If the readiness probe returns ready: false, OCP prevents users from adding your tools to Opal. OCP displays your provided message to inform the user of the missing information.
Implement the ready() method
Override the ready() method in your OpalToolFunction class to implement the readiness probe. The method returns a ReadyResponse object:
import { ToolFunction, ReadyResponse } from '@optimizely-opal/opal-tool-ocp-sdk';
import { storage } from '@zaiusinc/app-sdk';
import { AuthSection } from '../data/data';
import { constructPropertyResourceName } from '../lib/utils';
import { AppAuth } from '../lib/api/GoogleAnalyticsApiClient';

// Tool registration imports...
import '../tools/RunReportTool';
import '../tools/RunRuntimeReportTool';
import '../tools/support/GetPropertyIdTool';
// ... other tools

export class OpalToolFunction extends ToolFunction {

  protected override async ready(): Promise<ReadyResponse> {
    // 1. Check if authentication settings exist
    const authSection = await storage.settings.get<AuthSection>(
      'authentication'
    );
    if (authSection == null || !authSection.auth_method) {
      return { ready: false, reason: 'Authenticate to Google Analytics first.' };
    }

    try {
      // 2. Validate that credentials still work
      const property = constructPropertyResourceName(
        authSection.property_id || ''
      );

      const name = `${property}/metadata`;
      await AppAuth.fromSettings(authSection)
        .getDataClient()
        .properties.getMetadata({ name });

      return { ready: true };
    } catch (error: any) {
      console.error('Error fetching metadata:', error);
      return { ready: false, reason: 'Authentication not configured correctly: ' + error.message };
    }
  }

}
The ReadyResponse type has the following two forms:
{ ready: true }– The app is ready to handle requests{ ready: false, reason: string }– The app is not ready. The reason explains why.
What should you check in readiness probes?
A readiness probe verifies the following:
-
Required settings exist – Confirms that users have completed configuration. For example,
auth-methodis set. -
Credentials are valid – Makes a lightweight API call, like
getMetadata()to confirm credential functionality. -
Dependencies are available – Verify external services are reachable if your tools depend on them.
Readiness probe responses
Write clear, actionable reason messages. The reason displays to users attempting to use your tool before configuration:
| Scenario | Example reason |
|---|---|
| No configuration | "Authenticate to Google Analytics first." |
| Invalid credentials | "Authentication not configured correctly: invalid_grant" |
| Missing permissions | "The configured account lacks access to the GA4 property." |
| Service unavailable | "Google Analytics API is temporarily unavailable." |
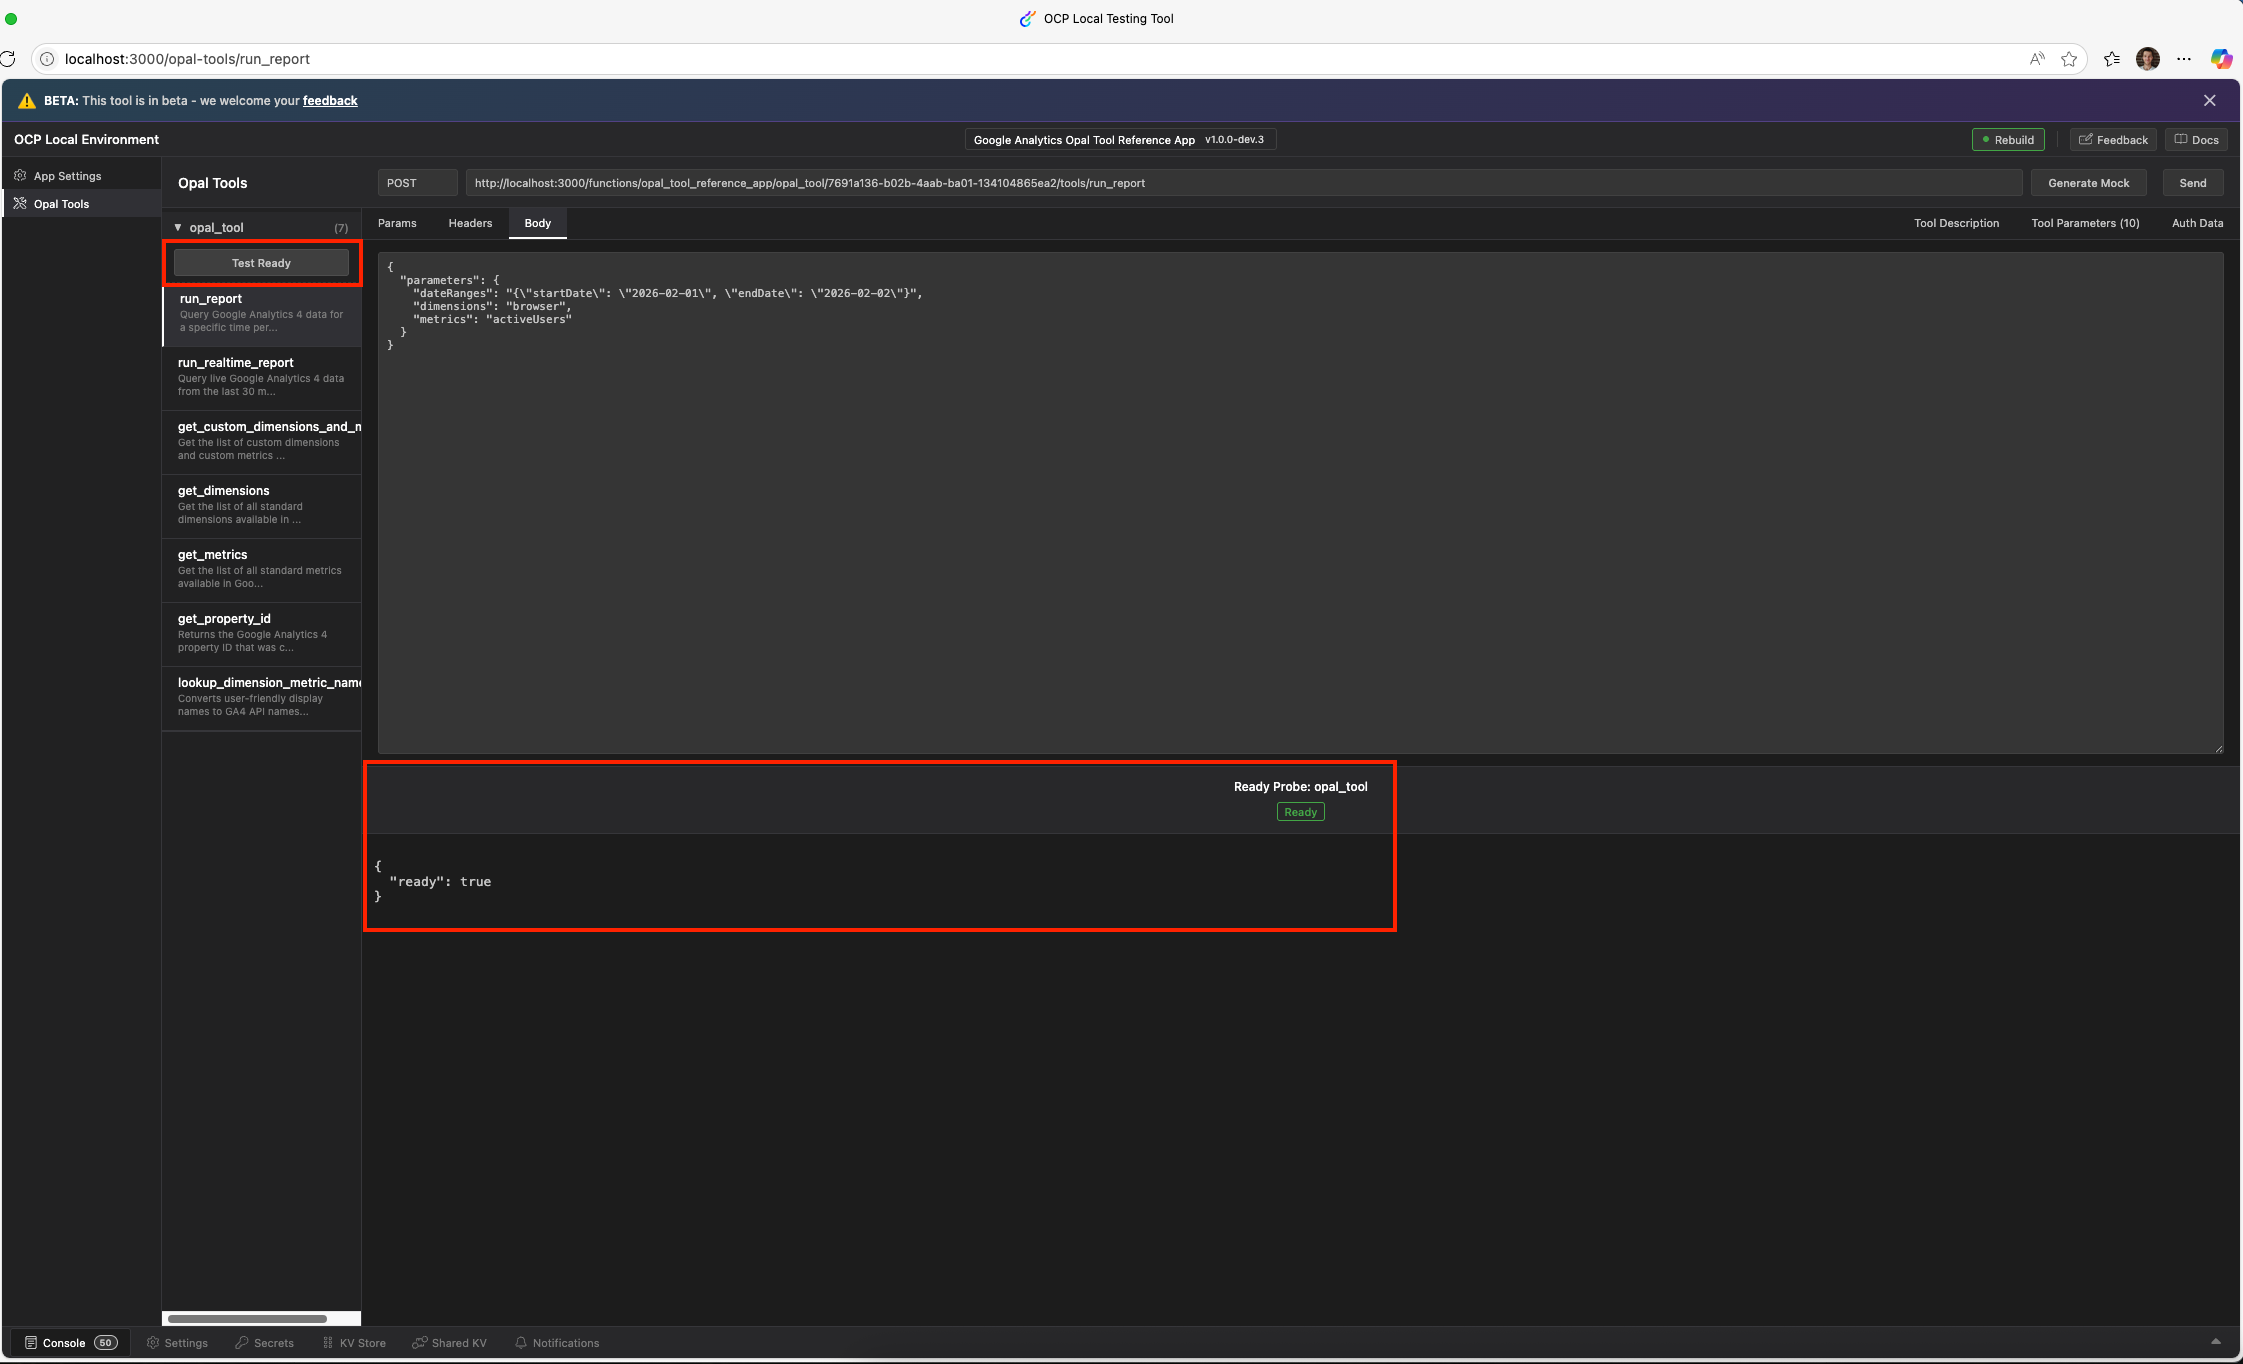
Local testing
You can test the readiness probe locally using ocp dev:
ocp devTo test the /ready endpoint directly:
Alternatively, test by removing or invalidating credentials in the app settings, and verify the readiness probe returns the expected error message.
Test in OCP sandbox account
Once the app is implemented and tested locally, publish a dev version of the app to OCP for sandbox instance testing.
- Ensure your app uses a dev version in
app.yml, such as1.0.0-dev.1, and run the following command. This command validates your app locally and publishes it to OCP.ocp app prepare --publish - Install the app to your sandbox OCP instance:
ocp directory install [email protected] <TRACKER_ID>
NoteUse
ocp accounts whoamicommand to see the list of OCP instances or tracker IDs you have access to.
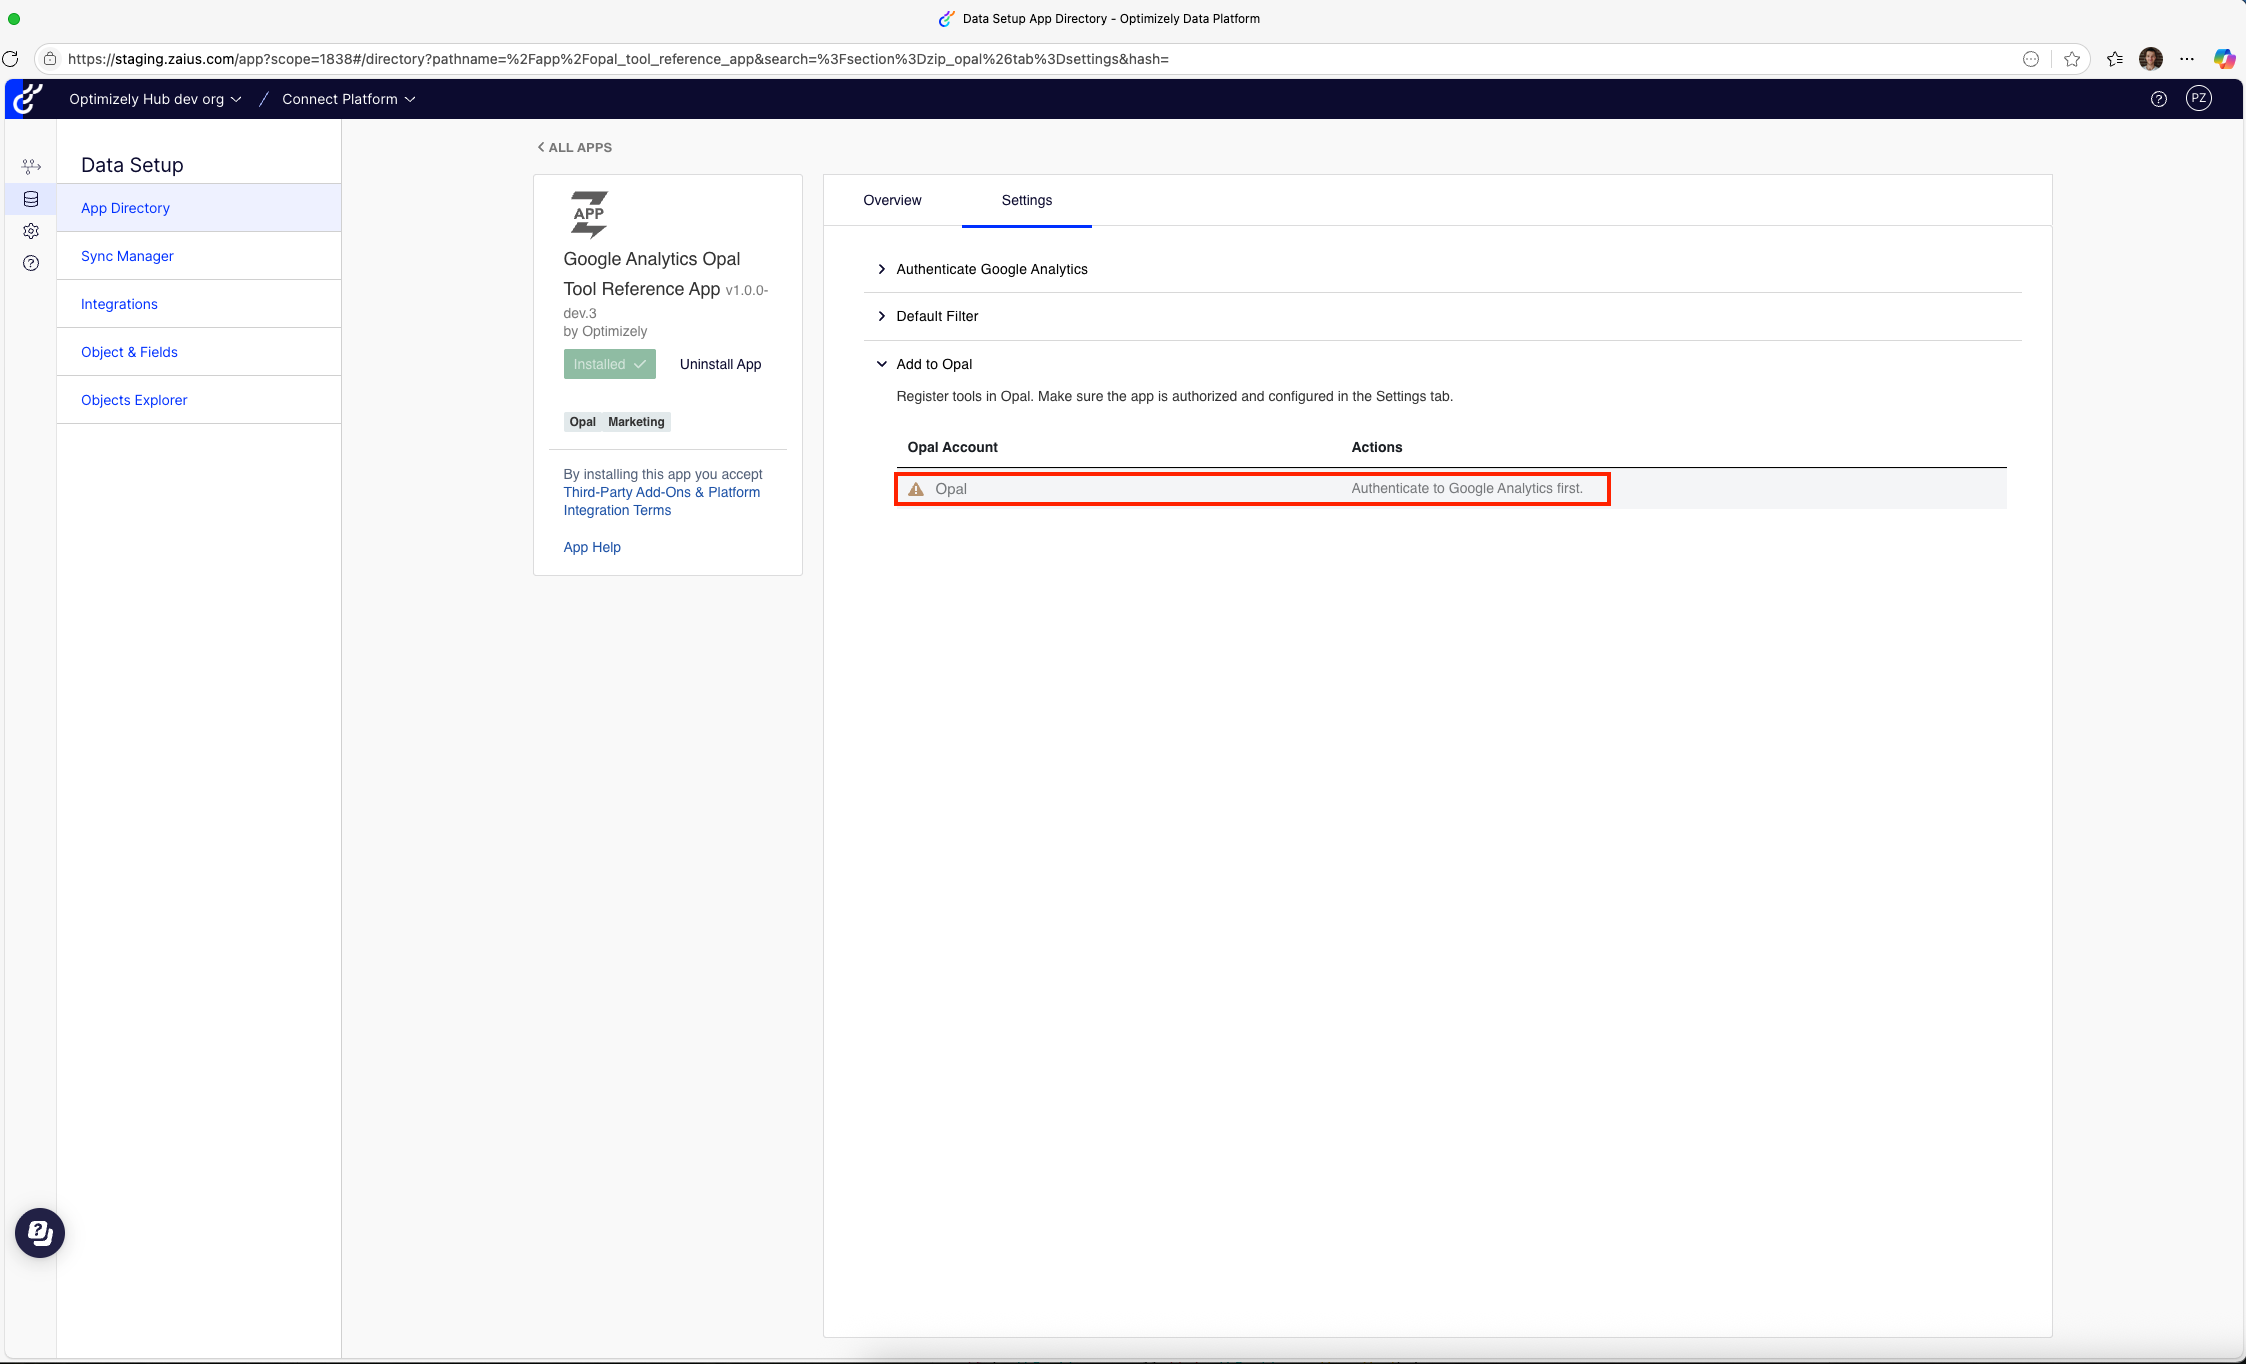
-
Your app displays in the App Directory of your sandbox OCP instance:
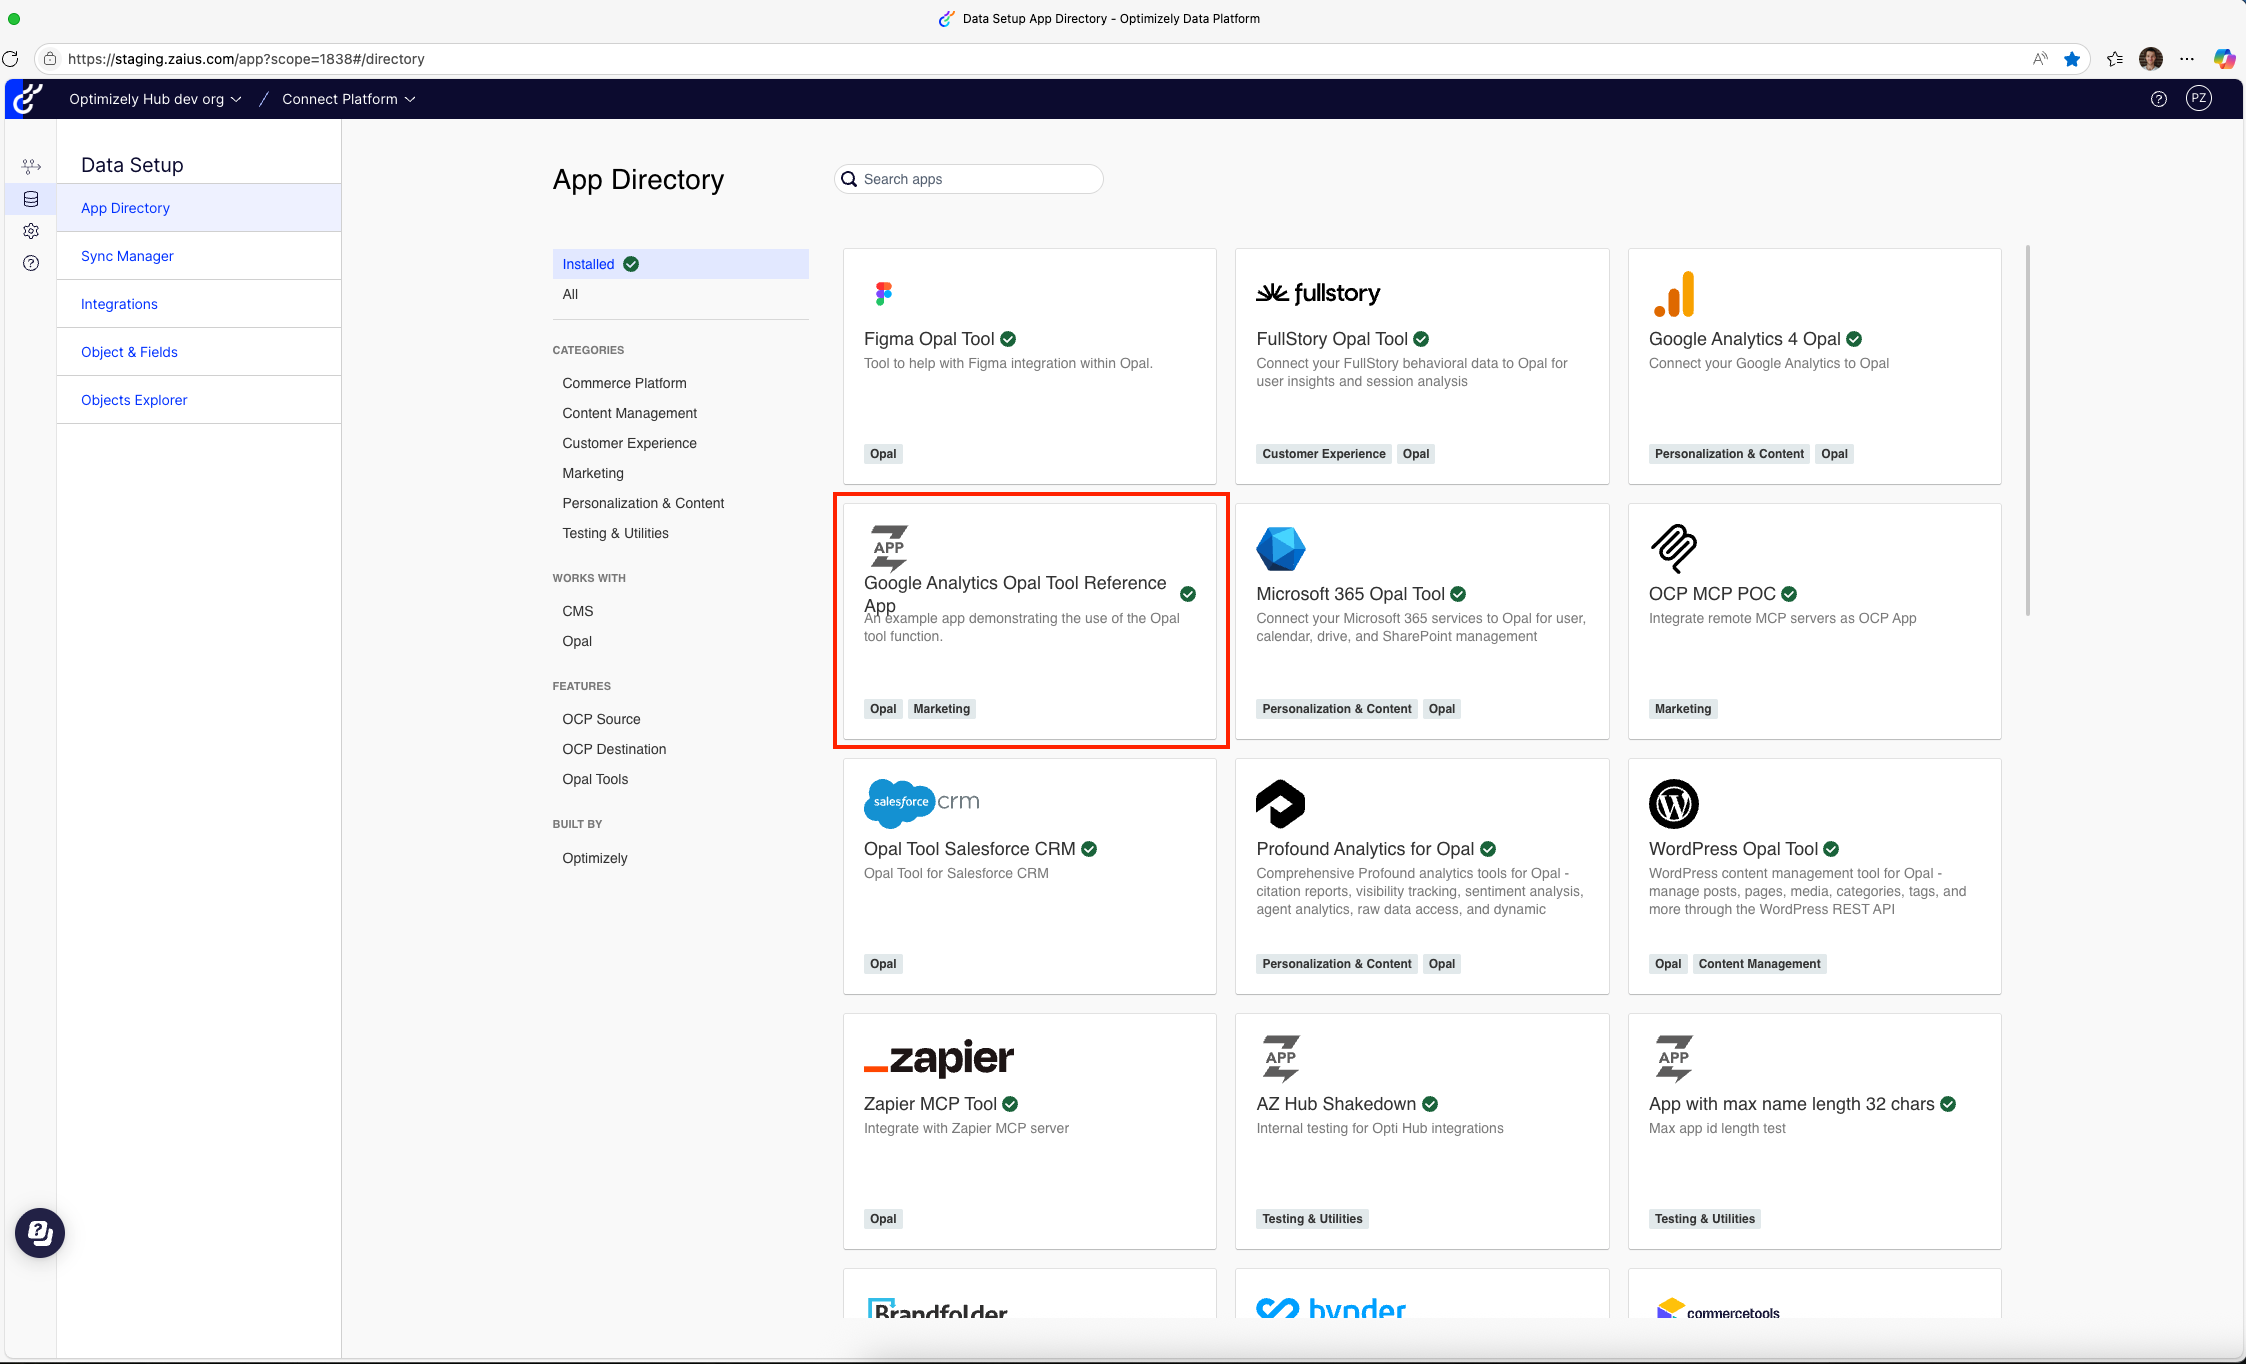
-
Configure your app and add your tools to Opal:
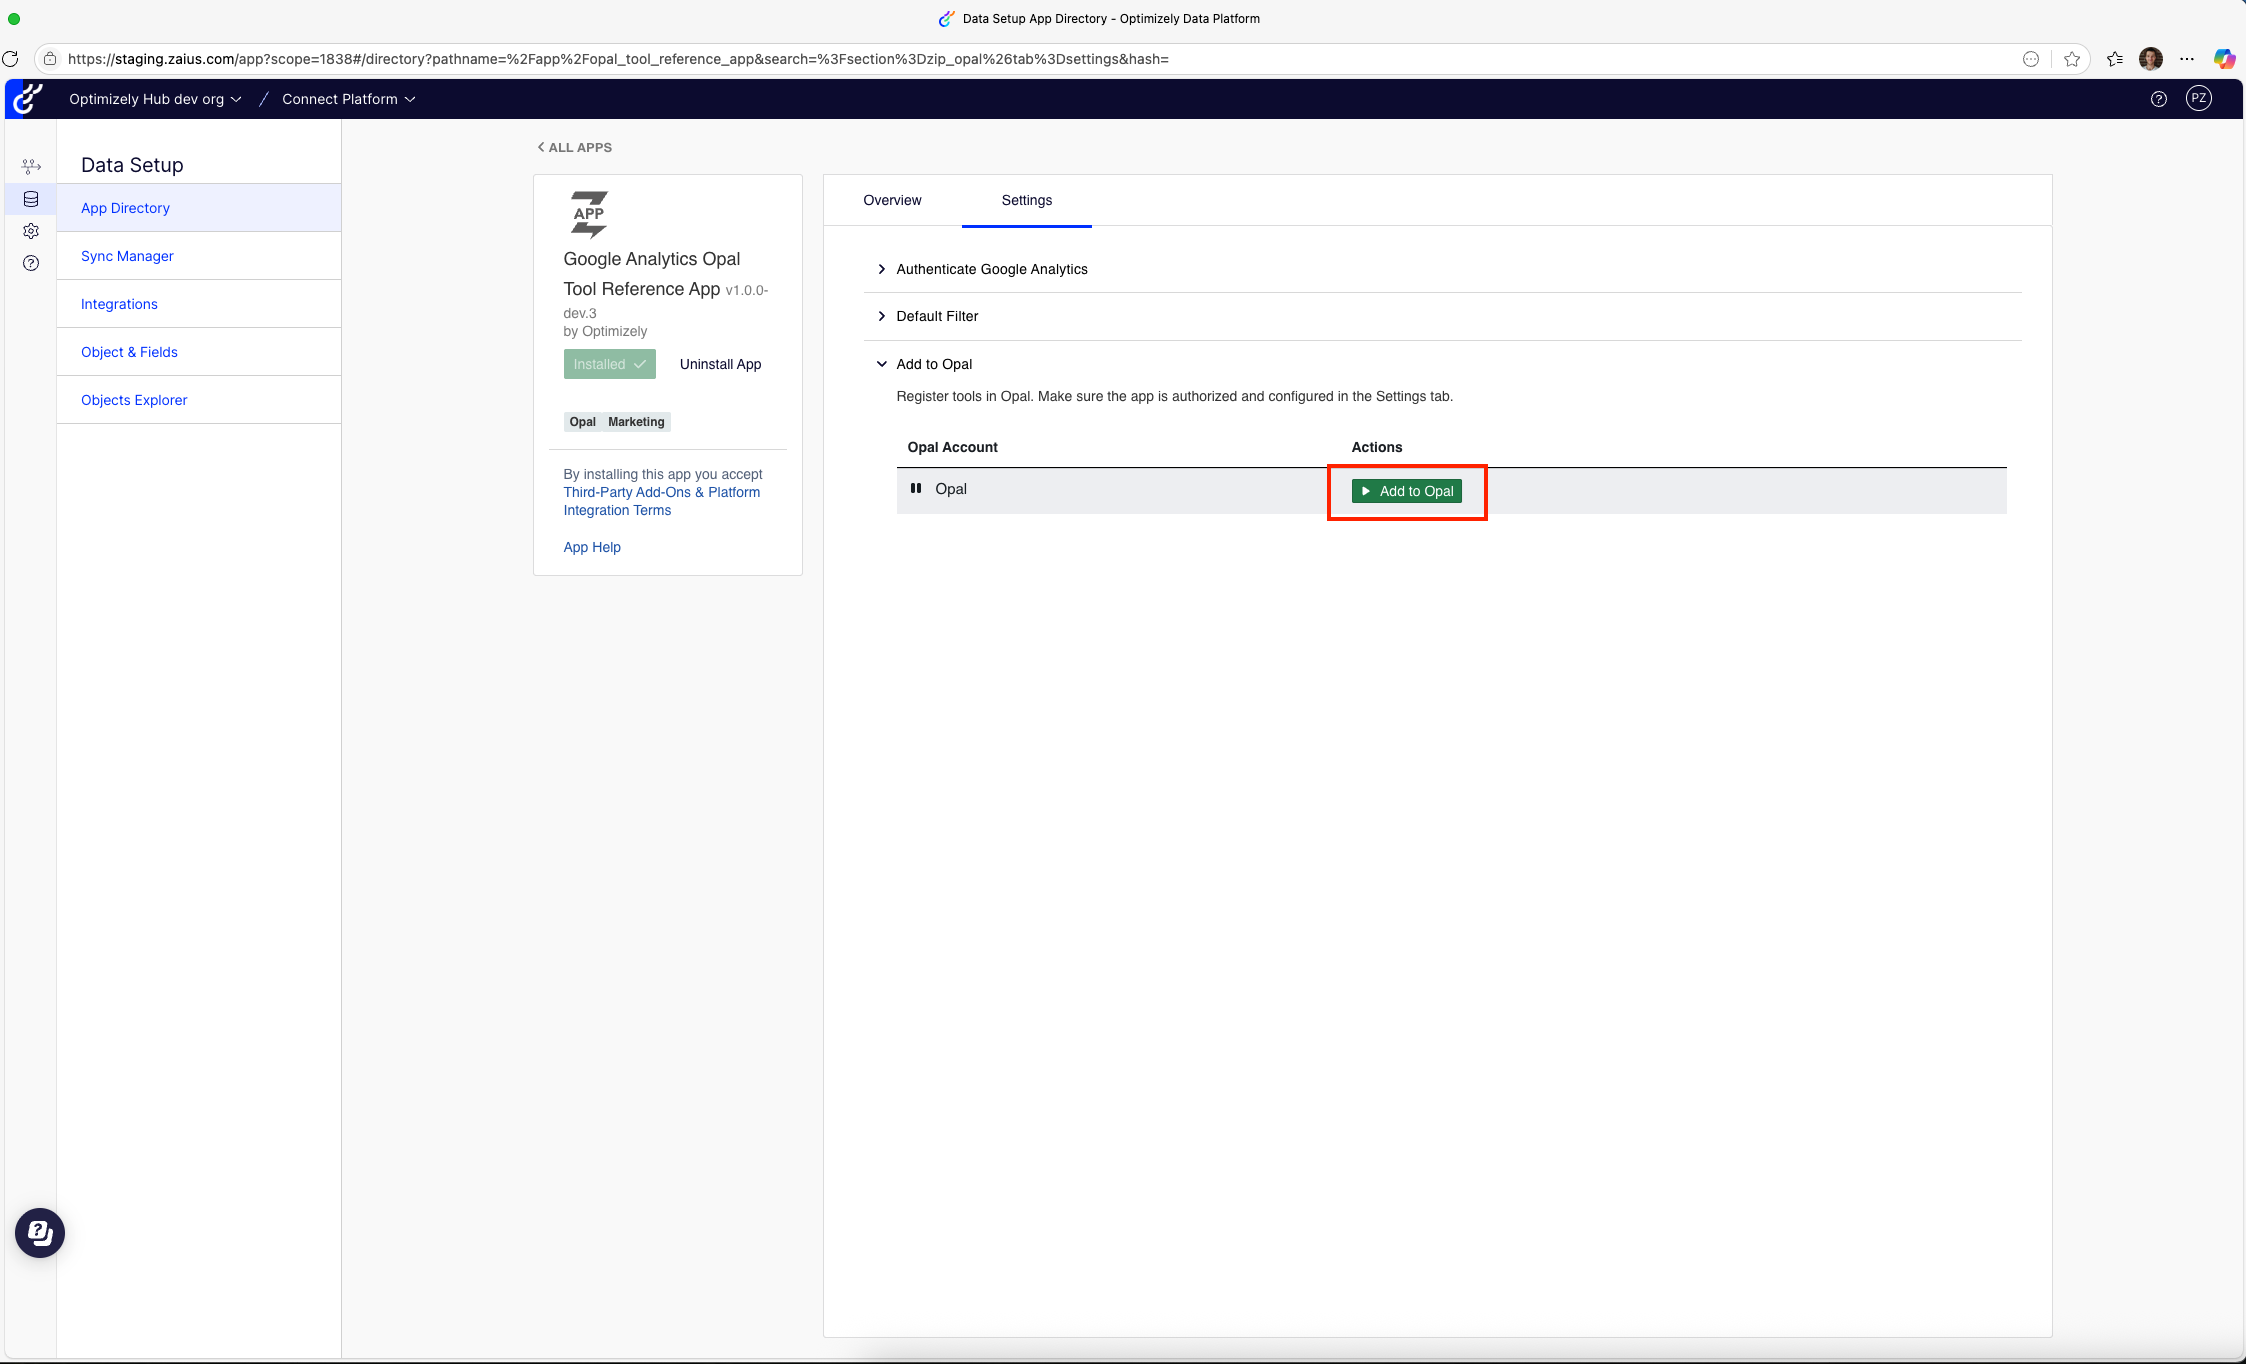
-
Begin testing your tools in Opal chats and agents.
Release production version
Release the tools to production when your tool performs functionally in the sandbox instance. You can use the following two methods:
- Release a private version – Your app is not accessible to Optimizely customers by default. You control access.
- Release a public version – Your app is accessible to all Optimizely customers in the OCP App Directory. Customers can install and configure it, and you can implement a custom authentication mechanism in the app settings form to control app usage.
Production checklist
Before releasing to production, ensure the following assets and metadata are complete:
Required assets
assets/icon.svg– App icon displayed in the App Directory (square, effective at small sizes)assets/logo.svg– App logo displayed in app settings (wider format)assets/directory/overview.md– Markdown description displayed on your app's App Directory page
Metadata in app.yml
display_name– User-friendly name for your appsummary– Brief, one-line descriptionsupport_url– Link to your support documentation or contact pagecontact_email– Email address for support inquiriescategories–Opaland other relevant categories likeMarketingorAnalyticsavailability–allfor public apps or allowed organizations
Code quality
- Remove debug logging and console statements.
- Handle all error cases with user-friendly messages.
- Test with various input combinations to ensure robustness.
Release to production
- To release a private production version of your app, add the
-privatesuffix to the version inapp.yml, like1.0.0-privateand runocp app prepare. - To release a public production version of your app, change the version of your app in
app.ymlto a normal semver version, like1.0.0and runocp app prepare.
NoteReleasing a production version requires a review by an Optimizely engineer. The
ocp app preparecommand creates a review automatically. Publish your app to OCP upon approval.
Summary
This guide covered building a complete Opal tool app for OCP, using Google Analytics 4 as a real-world example. Key concepts include:
Planning and design
- Define clear requirements and evaluation criteria before coding.
- Design main tools for core functionality and support tools for enhanced user experience.
- Choose appropriate authentication methods for your use case.
Implementation
- Create settings forms to collect and validate credentials.
- Use the
@tooldecorator to expose methods as Opal tools. - Write detailed tool and parameter descriptions, critical for Opal's understanding.
- Implement structured error handling with
ToolError. - Register tools in
OpalToolFunctionand enableopal_tool: trueinapp.yml.
Testing and deployment
- Test locally using
ocp devbefore publishing. - Publish dev versions for sandbox environment testing.
- Complete the checklist before releasing to production.
The full source code for this reference app is available in Github.
Updated 4 months ago