Install Content Recommendations
Describes the NuGet packages and initial configuration to set up Optimizely Content Recommendations integration for Optimizely Content Management System (CMS).
What is included in the integration NuGet package
- A UI module that integrates the Optimizely Content Recommendations dashboards and configuration in the Optimizely Platform navigation.
- Automatically adds visitor behavior tracking to pages, to build user behavior profiles that can give relevant content recommendations.
- A Content Recommendations block that editors can add to pages where they want content recommendations to appear.
Prerequisites
- A subscription to the Content Recommendations service and the appropriate configuration information for the environment (see Configuration section below), and user login credentials for the Content Recommendations UI.
- An Optimizely Content Management System (CMS) website implementation that uses RenderRequiredClientResources in the HTML head element. (This is where the tracking script will be injected.)
- The website implementation has been set up for Collecting metadata.
- The website is open to the public internet so the Content Recommendations service can reach it and index the site content.
ImportantBefore installing Content Recommendations, make sure you have widget deliveries set up. Otherwise, you will not see any widget deliveries in the drop-down widget selector.
Install
Install the EPiServer.Personalization.Content.UI package in your Optimizely solution. If you have already set up your NuGet feed, skip to Step 6.
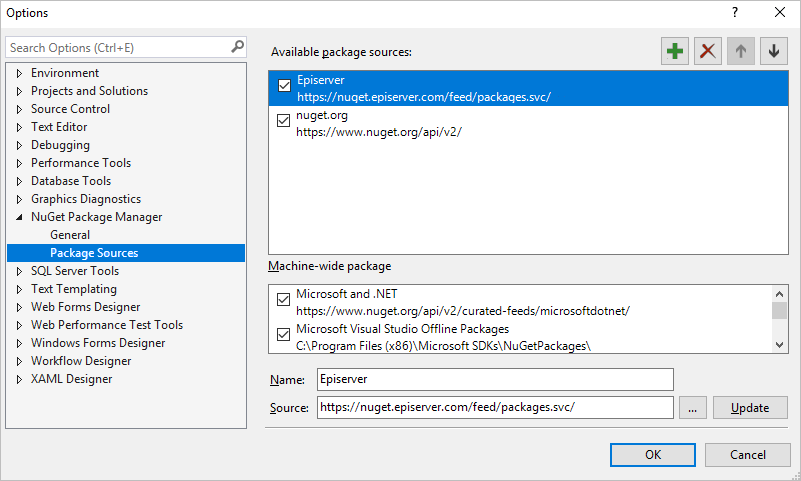
- In Visual Studio, select Tools > NuGet Package Manager > Package Manager Settings.
- Select Package Manager > Package Sources.
- Click Add (+) to add a new package source.
- Add Name as Episerver, and the package Source as
<https://nuget.optimizely.com/feed/packages.svc/>.

- Click OK.
Note
NuGet package manager has to be version 2.8.50126.477 or higher to install Optimizely packages.
- Open the solution file in Visual Studio and make sure the solution file is saved (required to make the NuGet tools available).
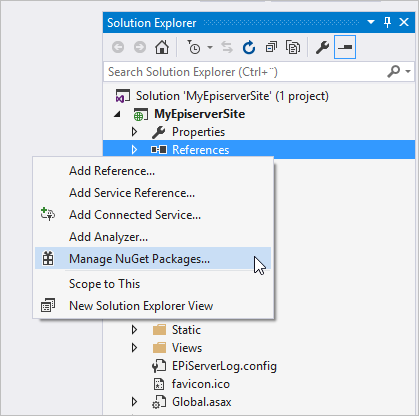
- In the Solution Explorer, right-click on References for the project, and select Manage NuGet Packages.

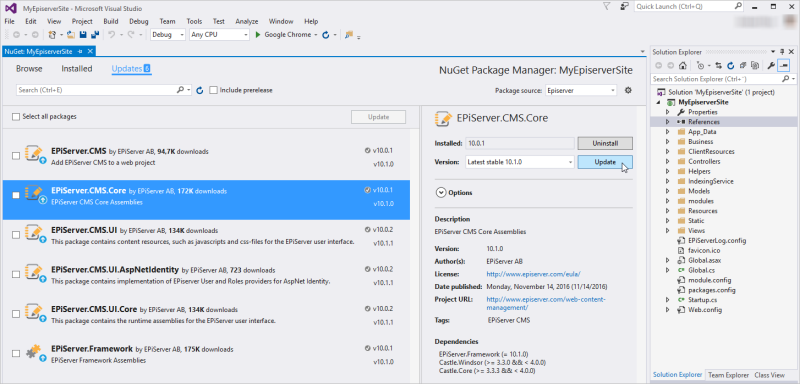
- Select Updates for the Optimizely package source, to locate available updates for your solution, and click Update for the desired packages.

- When the installation/update is completed, rebuild the solution.
Add the required configuration keys (see the Configuration section).
Configure
The following appsettings.json for CMS 12 and web.config for CMS 11 appSetting keys are used to set up the integration. For example:
"EPiServer" : {
  "ContentPersonalization" : {
     "Environment" : "instance.episerver.net",
     "ClientId"    : "1234567891015",
     "ClientName"  : "clientName",
     "ApiToken"    : "token"
  }
}
<!-- Optimizely Content Recommendations -->
<add key="episerver:personalization.content.Environment" value="xxxxxx.xxxxxxxxxx.net" />
<add key="episerver:personalization.content.ClientId" value="xxxxxxxxxxxxxxxxxxxxxxxx" />
<add key="episerver:personalization.content.ApiToken" value="xxxxxxxxxxxxxxxxxxxx" />
<add key="episerver:personalization.content.ClientName" value="" />| Key | Description |
|---|---|
| Environment - episerver:personalization.content.Environment | The environment for the account. For production environments this is idio.co but could be staging.idio.co for the environment, and so on. |
| ClientName - episerver:personalization.content.ClientName | n 0.3.0] <b> The friendly name of the client account in the service that is used to access the UI, such as _mywebsite_in https://manager.idio.co/mywebsite |
| ClientId - episerver:personalization.content.ClientId | The alphanumeric client identifier of the account in the service that is sent with the tracking script. |
| ApiToken - episerver:personalization.content.ApiToken | The token used to authenticate to the API endpoint that provides available recommendation widgets to the property on the Content Recommendations block. |
| episerver:personalization.content.DisableDefaultTracking | Optional. If set to true, the default tracking script is not rendered in the HTML head section. Use this if you want to customize the tracking script or already have the tracking script included and do not want to remove it. |
Updated about 2 months ago