
Publish to the ODP sandbox
Validate, prepare, publish, and install a sample Optimizely Connect Platform (OCP) app to your OCP sandbox account.
Before publishing and testing your app, you must first:
Do customers get an OPTIHUB sandbox? Make sure to update these instructions so that it's clear if they are doing all of this in production or a test environment.
In OPTIHUB, each app is published with a specific version. This quickstart guide uses the -dev tag version, which is designed for internal testing and development of apps. To learn more about versioning in OPTIHUB, see Update your app version.
Complete the following steps to validate, prepare, publish, and install the app to the OPTIHUB sandbox.
Step 1: Validate your app configuration
Provide the exact command they need to run to validate the app configuration. Or maybe you determine this isn't necessary and we can ommit it completely and just have them runprepare. For example:
Before you publish the app, first validate that the app is configured correctly with the following command in the OCP command-line interface (CLI):
ocp app validate
NoteIf you are confident that there are no issues with your app's code or settings, you can skip this step. The
preparestep runs the same validation.
Step 2: Prepare the app for publishing
Provide the exact CLI command to prepare the app for publishing. Include any troubleshooting steps if the build fails. For example:
After validating that your app is configured correctly, prepare the app for publishing with the following command, which packages the app's local files, uploads them to OCP, and builds the publishable app:
ocp app prepare
NoteYou can skip the next step (Publish the app) and automatically publish the app after it is prepared by adding the
--publishflag to thepreparecommand.ocp app prepare --publish
If a build fails, you can view the build logs to determine what caused the failure. Run the following command in the OCP CLI, replacing [BUILD_ID] with the ID of the failed build to view the corresponding logs:
ocp app logs --buildId=[BUILD_ID]Step 3: Publish the app
Provide the exact CLI command to publish the app, including what the results in the CLI should look like. For example:
NoteIf you added the
--publishflag to thepreparecommand above, you can skip this step.After you validate and prepare the app, publish it to the ODP App Directory with the following command:
ocp directory publish [email protected]After this step, the app version is available in the ODP App Directory and can take requests. For example:
ocp directory info ocp_quickstart
Active environment: production

  General

    id          ocp_quickstart
    name        OCP Quickstart
    created     2023-04-17T02:31:44Z

  Versions


    1.0.0-dev.1    PUBLISHED
Step 4: Install the app to ODP sandbox
Install the app to OPTIHUB. Be clear here if this is installed in a sandbox or prod. For example:
After you publish the app, find your Tracker ID in ODP and install your app in the ODP sandbox with the following command, replacing [TRACKER_ID]:
ocp directory install [email protected] [TRACKER_ID]Now you can view the app in the ODP sandbox. In the ODP app, go to the App Directory and locate your newly installed app.
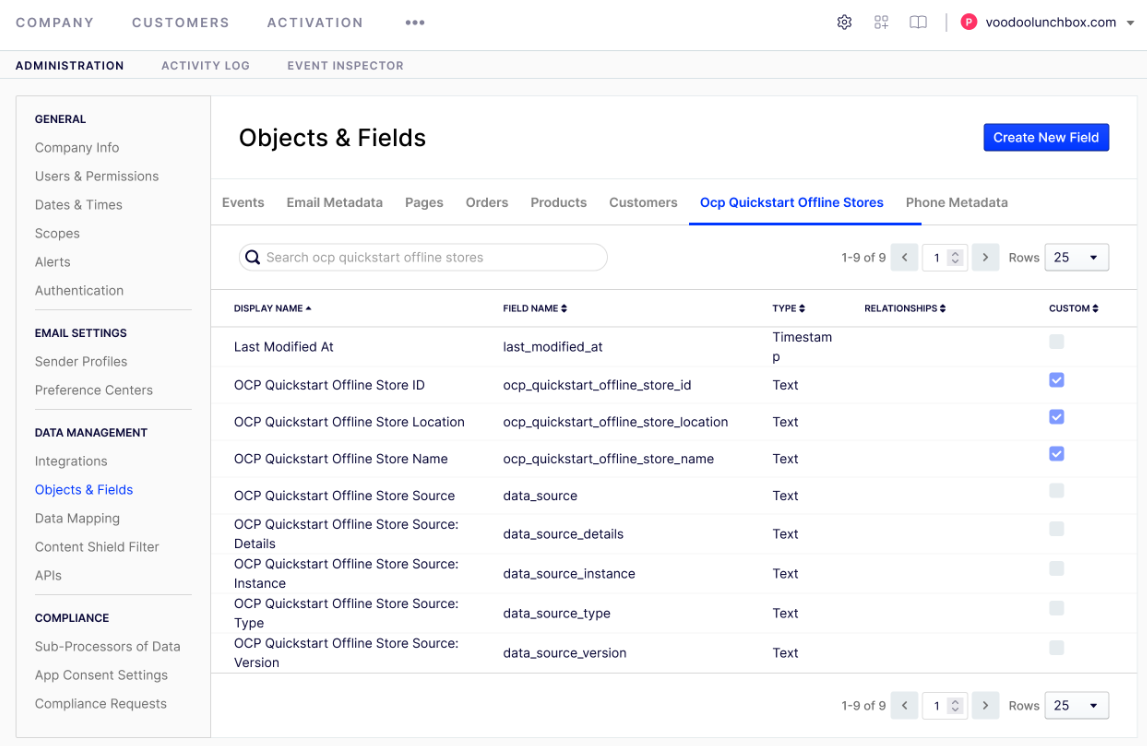
The app does not run any code yet, but you can see OCP added the object schema you created in the previous section (Initialize an app and define its schema). To view this object schema, in the ODP app, go to Account Settings > Objects & Fields.
Next, configure and authenticate the app using an app settings form.
Updated about 2 months ago