
Import data
Import data to Optimizely Connect Platform (OCP) so you can sync it with other Optimizely products.
Beta
Optimizely Connect Platform (OCP) is in beta and currently only works with Optimizely Graph in Optimizely Content Management System (CMS) (SaaS) and CMS (PaaS).
Before you can sync data between Optimizely Connect Platform (OCP) and other Optimizely products, you must import data to OCP using any of the following options.
Point-and-click apps
OCP includes point-and-click apps that enable you to connect your external systems to OCP using methods like OAuth, tokens, and API keys. Additionally, these apps contain configuration settings that can manipulate how the app behaves.
You can install the available OCP apps:
- Custom Endpoints – The OCP Custom Endpoints app lets you import data into OCP without using developer resources.
Important
Before you import a data using the Custom Endpoints app, you must first create the target objects and fields in the OCP database. See Add custom objects and fields.
Or you can build your own custom apps with the OCP developer platform, a TypeScript-based developer experience that includes tools, utilities, and hosting for building, distributing, and listing OCP apps.
Example point-and-click app
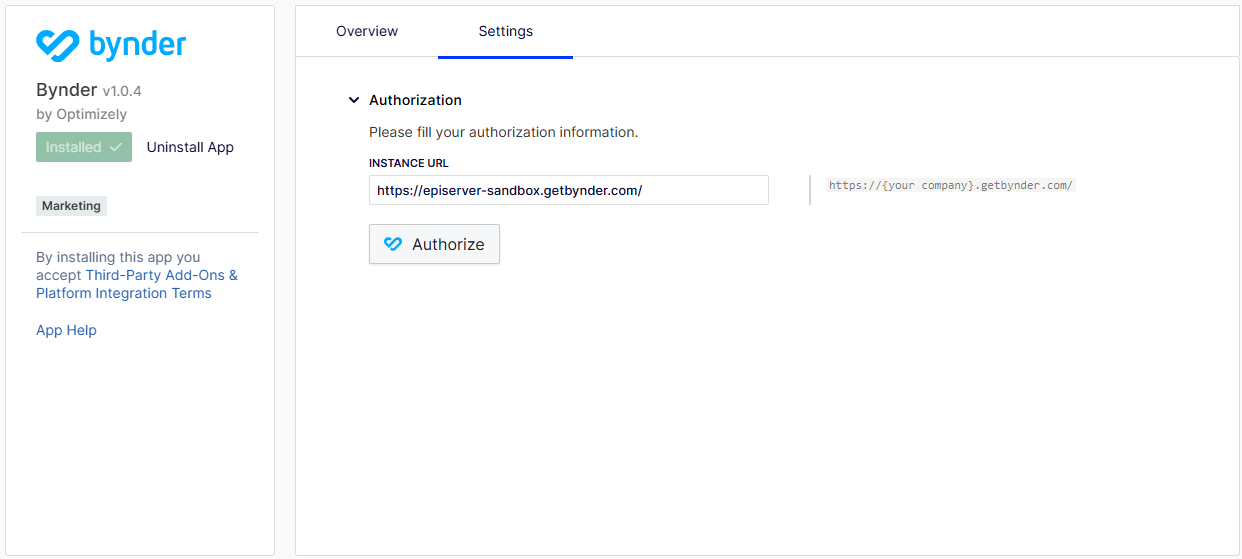
An example of an OCP app is the Bynder integration, which lets you connect your Bynder account to OCP and sync Bynder asset data. This app listing in the OCP App Directory is created using the OCP developer platform, where you develop the code that determines how the Settings tab of the app displays and functions.
To connect your OCP account with Bynder, you must install the app and complete the app settings.
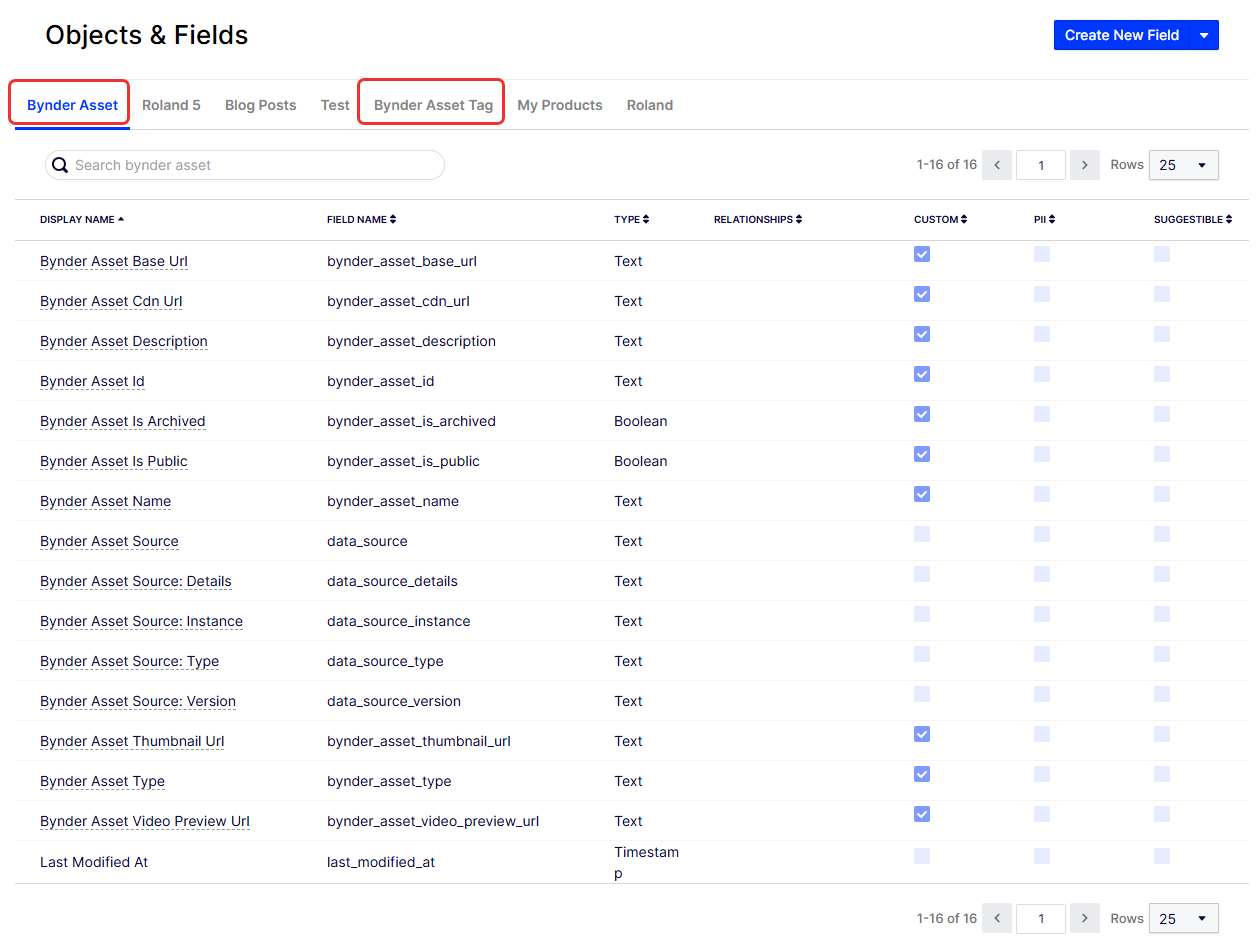
When you install the app, it adds the following to the OCP database:
- Two objects
- Fields for each object
- A relationship between the two objects that reflects how the data is structured in Bynder
After you authorize the app using OAuth per Bynder’s requirements, the Bynder asset data is downloaded to OCP, and future updates are synced through the supplied webhook URL.
CSV file import
Important
Before you import a CSV file, you must first create the target objects and fields in the OCP database. See Add custom objects and fields.
Each OCP account has a dedicated Amazon S3 bucket for ingesting and exporting data. You can leverage the bucket URLs and access keys to send CSV files at whatever cadence you want for immediate ingestion into the OCP database.
CSV file format requirements
- CSV UTF-8 file format
- The file name must use the following format:
zaius_<name_of_target_object>_<any_other_detail_you_want> - Column headers must match the internal name of fields on your target object (all lowercase and spaces replaced with underscores)
- Dates must be formatted in ISO 8601 format or UNIX epoch (seconds since January 1, 1970). For example,
1435708800,2015-07-01T00:00:00-00:00, and2015-07-01T12:30:00-07:00. If you do not provide the time and time zone, the time is assumed to be 12 a.m. UTC.
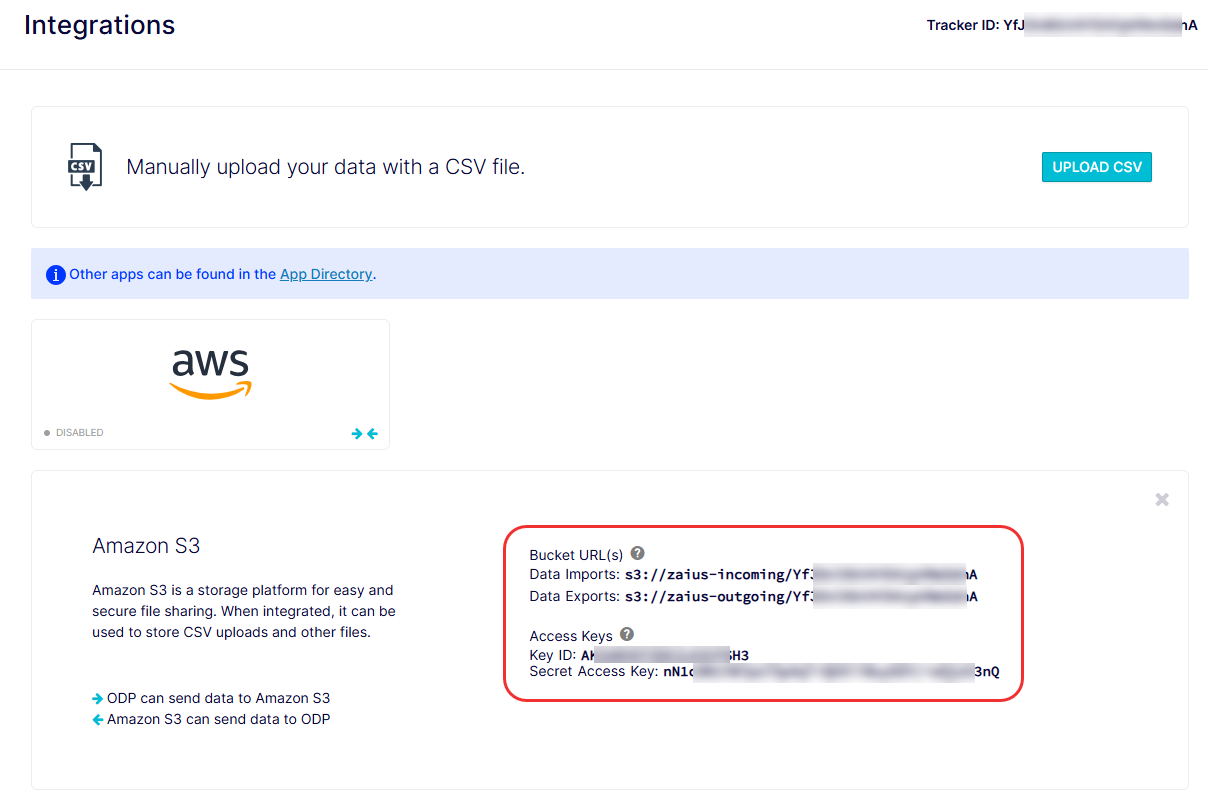
Locate your Amazon S3 credentials
To find your Amazon S3 URLs and access keys:
-
Go to Data Setup > Integrations.
-
Click AWS.
-
Click Generate Access Keys.
-
Copy the Bucket URLs and Access Keys.
Import from Amazon S3 to OCP using command-line
After you place a file in your OCP-incoming bucket, OCP automatically imports it. You can fully automate the import process if you regularly create data for imports and can schedule to add that data to your S3 bucket.
Use the following command to copy a local file to Amazon S3:
aws s3 cp zaius\_customers.csv s3://zaius-incoming/<your tracker ID>/ --sse
Use the following command to copy a directory of files to Amazon S3:
aws s3 sync /tmp/yourlocaldir/ s3://zaius-incoming-temp/<your tracker ID>/ --sse
Export from OCP to Amazon S3
-
Go to Data Setup > App Directory > File Export in OCP.
-
Click Install App.
-
Select the desired Object and Object Fields on the Settings tab.
-
Click Export to initiate the file export.
-
Click Check Status to check the status of the export. When complete, the app returns the S3 folder where you can find the exported files.
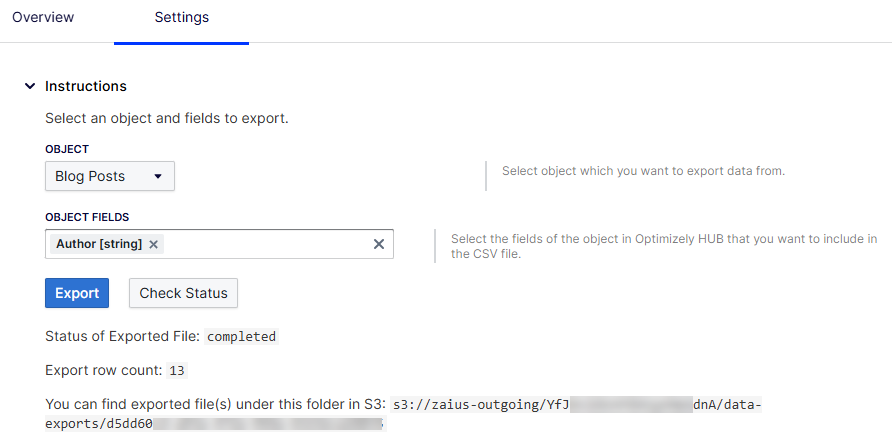
-
Copy the S3 folder the app returns, and paste it in the following command to download the file from the specified folder in the S3 bucket. Replace
filenamewith your desired name for this export file and replacelocal file pathwith the location you want to save this file.aws s3 cp PASTE_S3_FOLDER_PATH_HERE/FILENAME LOCAL_FILE PATHFor example:
aws s3 cp s3://zaius-outgoing/YfJOnlKkV4YD41pVNmSdnA/data-exports/d5dd60cd-a93a-472a-944a-6323eca26035/Blog Posts Export C:\\Users\\<name>\\Desktop
You can also export data from OCP to Amazon S3 using the Start Export Job API. Then you can check the status of your export using the Get Export Job Status API.
Import and export from Amazon S3 using a third-party application
You can use whichever third-party application you prefer. Common developer tools you can use to perform uploads to Amazon S3 include:
- Cyberduck (Windows and Mac) – marketer-friendly
- AWS CLI (Windows, Mac, and Linux)
- AWS SDKs (Java, Python, Node.js, PHP, and more)
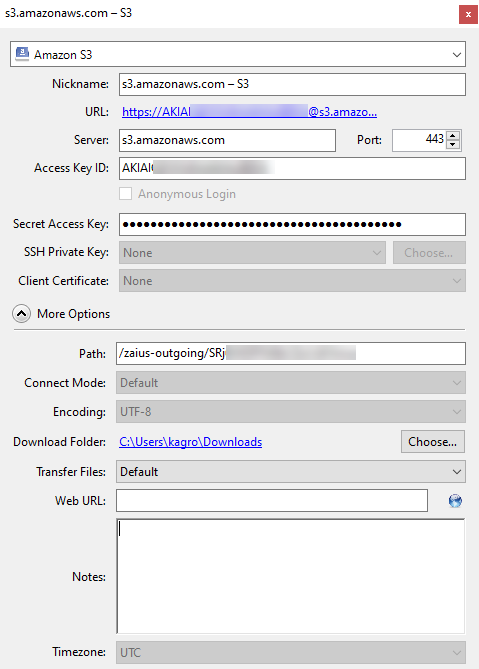
The following instructions are for Cyberduck, which is a free cloud storage browser that you can use with Amazon S3.
-
Download and launch a free tool, like Cyberduck.
-
Expand Action and select New Bookmark in Cyberduck.
-
Select Amazon S3 from the drop-down list.
-
(Optional) Enter a Nickname.
-
Enter the Access Key ID (the Key ID from OCP).
-
Enter the Secret Access Key (the Secret Access Key from OCP).
-
Expand More Options and enter the Path (the Data Exports bucket URL from OCP). Remove
s3:/from the beginning of the URL, leaving only one forward slash. -
Close the pop-up window to save the new bookmark.
Note
See Cyberduck's documentation for information about using Cyberduck to import AWS files.
OCP API upload
Important
Before you import data through the API, you must first create the target objects and fields in the OCP database. See Add custom objects and fields.
After you create your target objects and fields in the OCP database, you can use any of the following endpoints to update objects or view your data schema:
- Update object – Update an existing object in your OCP database.
- List objects – List the details of all objects in your OCP account.
- Get object – List the details of a specific object in your OCP account.
- List fields – List the details of all fields for a specific object in your OCP database.
- Get field – List the details of a single field for a specific object in your OCP database.
- List relations – List the details of all relationships of a specific object in OCP.
- Get relation – List the details of a single relationship of a specific object in OCP.
If you are loading large amounts of data in bulk, ensure every request is done as a batch. Every request can include up to 500 distinct objects.
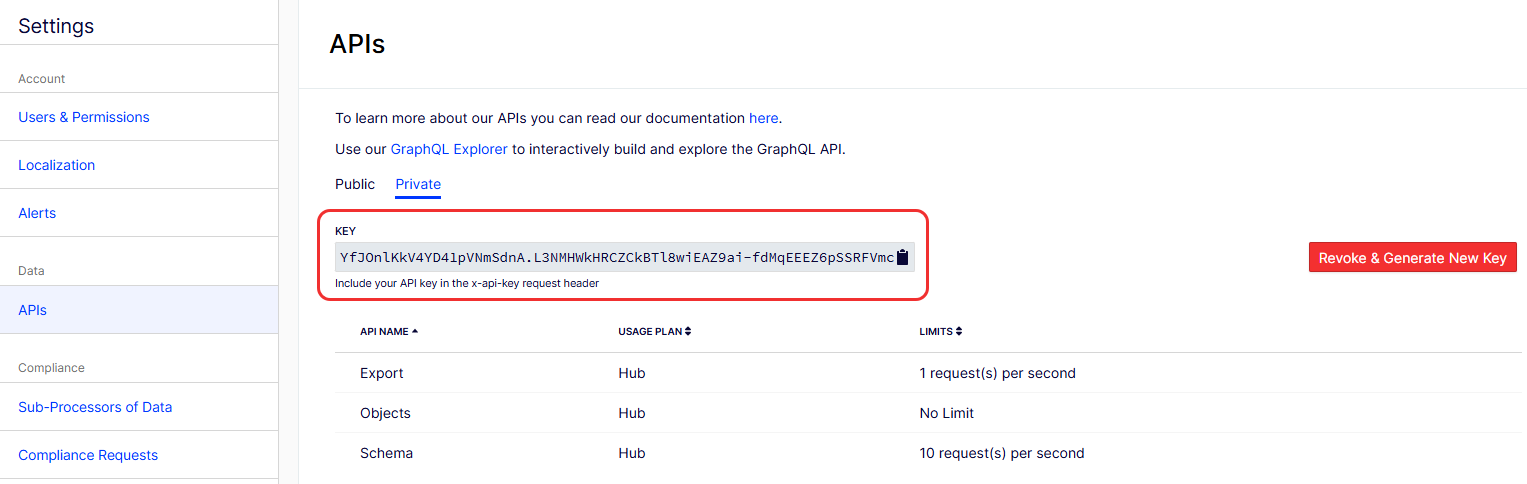
API key
Each OCP account includes an API key that lets you access OCP APIs directly, whether using an iPaaS tool like Tray.ai or Zapier, or a custom build. To find your API key, go to Settings > APIs > Private in the OCP UI. You must include your API key in the header of your API requests.
Regional base URLs
You must use your region's base URL to make an API request:
- US –
https://api.zaius.com - Europe –
https://api.eu1.odp.optimizely.com - Asia-Pacific (APAC) –
https://api.au1.odp.optimizely.com
cURL request example
The following is an example of a cURL request to update a customer service tickets object:
curl --request POST \
     --url https://api.zaius.com/v3/objects/tickets \
     --header 'accept: application/json' \
     --header 'content-type: application/json' \
     --header 'x-api-key: YfJOnlKkV4YD41pVNmSdnA.L3NMHWkHRCZCkBTl8wiEAZ9ai-fdMqEEEZ6pSSRFVmc' \
     --data '
[
  {
    "ticket_agent": "Alex",
    "satisfaction_rating": "5",
    "customer_bucket": "VIP",
    "topic_category": "password reset",
    "ticket_id": "123456",
    "customer_email": "[email protected]"
  }
]
'
Updated about 2 months ago