Optimizely Commerce Connect API overview
Describes an overview of the Optimizely Commerce Connect integration APIs.
NoteSample code used in this article is taken from Quicksilver templates. The Quicksilver Commerce Connect sample site and installation instructions can be downloaded from GitHub.
Prerequisites
For environment settings, see Install and configure the native integration package.
The Main Flows
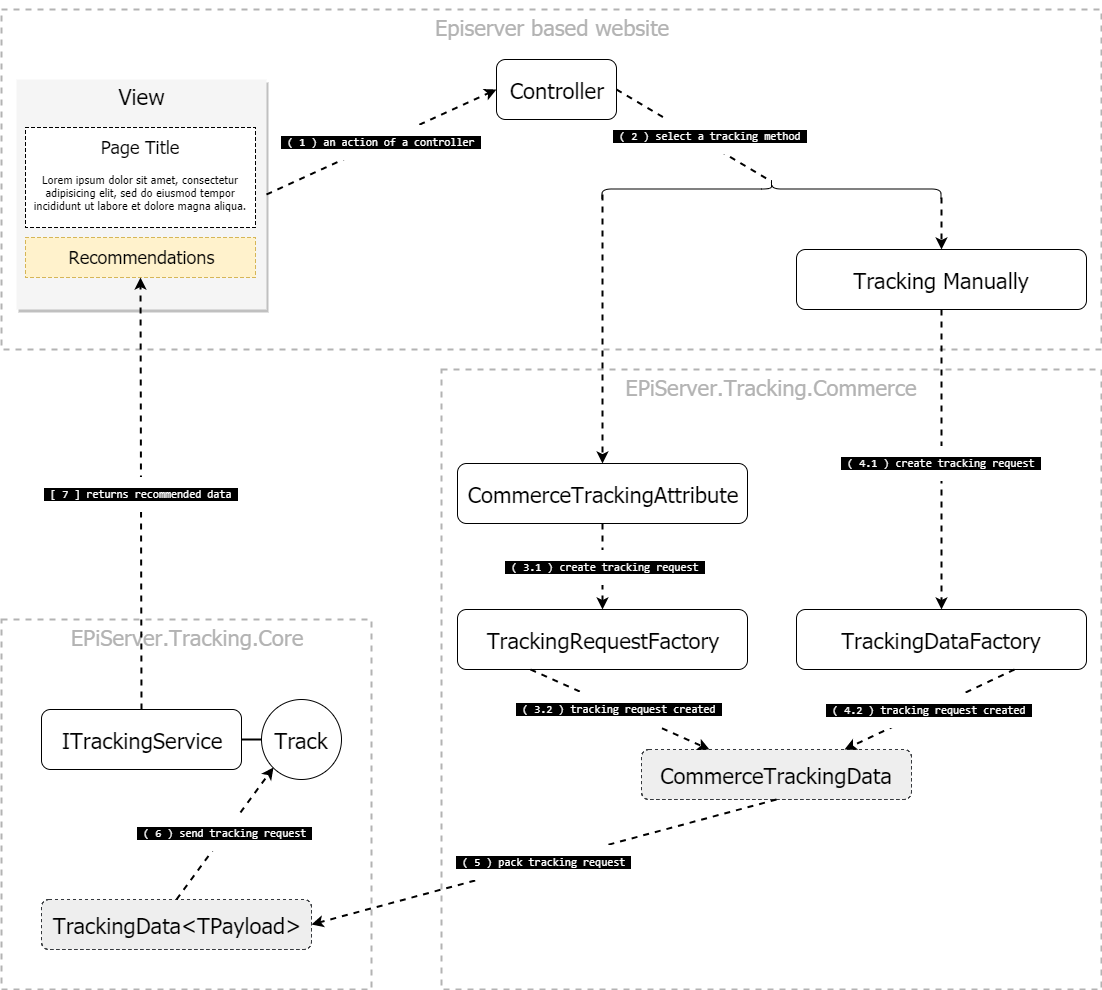
The following diagram illustrates how Optimizely Product Recommendations operates in both tracking modes:

Integration API
Server-Side
- The
EPiServer.Tracking.Corepackage- The
EPiServer.Tracking.Core.ITrackingServiceinterface.
- The
- The
EPiServer.Tracking.Commercepackage- The
EPiServer.Tracking.Core.TrackingServiceExtensionsclass. - The
EPiServer.Tracking.Commerce.CommerceTrackingAttributeclass. - The
EPiServer.Tracking.Commerce.TrackingDataFactoryclass.
- The
Client-Side
- The
_EPiServer.Personalization.Commerce_package- The
epiRecommendationsJavaScript object. Use this to send a tracking request with client-collected tracking data and render the tracking response. - The
TrackingDataFactoryJavaScript object. Collects tracking data from the client.
- The
Marking Clicks
- If a user clicks a recommended item, the click must be tracked to generate useful recommendations. To get information about which recommendation triggered the current request, use the
EPiServer.Tracking.Commerce.IRecommendationContext interface.- The Quicksilver template includes a class,
EPiServer.Reference.Commerce.Site.Features.Recommendations.Services.RecommendationContext, that implements the above interface for tracking clicks on recommended products.
- The Quicksilver template includes a class,
Preparation
Define Recommendation Layout on a Page
To render recommendations, create four sections on a page: upper, left, right, and bottom.
recommendations-upperrecommendations-leftrecommendations-rightrecommendations-bottom
Based on their CSS classes (listed above), recommendations are rendered to the upper, left, right, and bottom areas of a page's main content.
In Views/Shared/_Layout.cshtml, add 4 <div> tags, one for each section, as shown below...
<div class="recommendations recommendations-upper"></div>
<div class="recommendations recommendations-left"></div>
<div class="recommendations recommendations-right"></div>
<div class="recommendations recommendations-bottom"></div>
to the current layout structure.
@{ Html.RenderAction("Index", "Navigation"); }
<div class="quicksilver site-wrapper">
    <div class="main-area">@RenderBody()</div>
    <div class="recommendations recommendations-upper"></div>
    <div class="recommendations recommendations-left"></div>
    <div class="recommendations recommendations-right"></div>
    <div class="recommendations recommendations-bottom"></div>
</div>
@{ Html.RenderAction("Index", "Footer"); }
Updated about 2 months ago