Hosted middleware deployments
Create and deploy hosted middleware using Optimizely Content Marketing Platform (CMP)
NoteThis feature is currently available by invite only. Contact your Customer Success Manager to enable it.
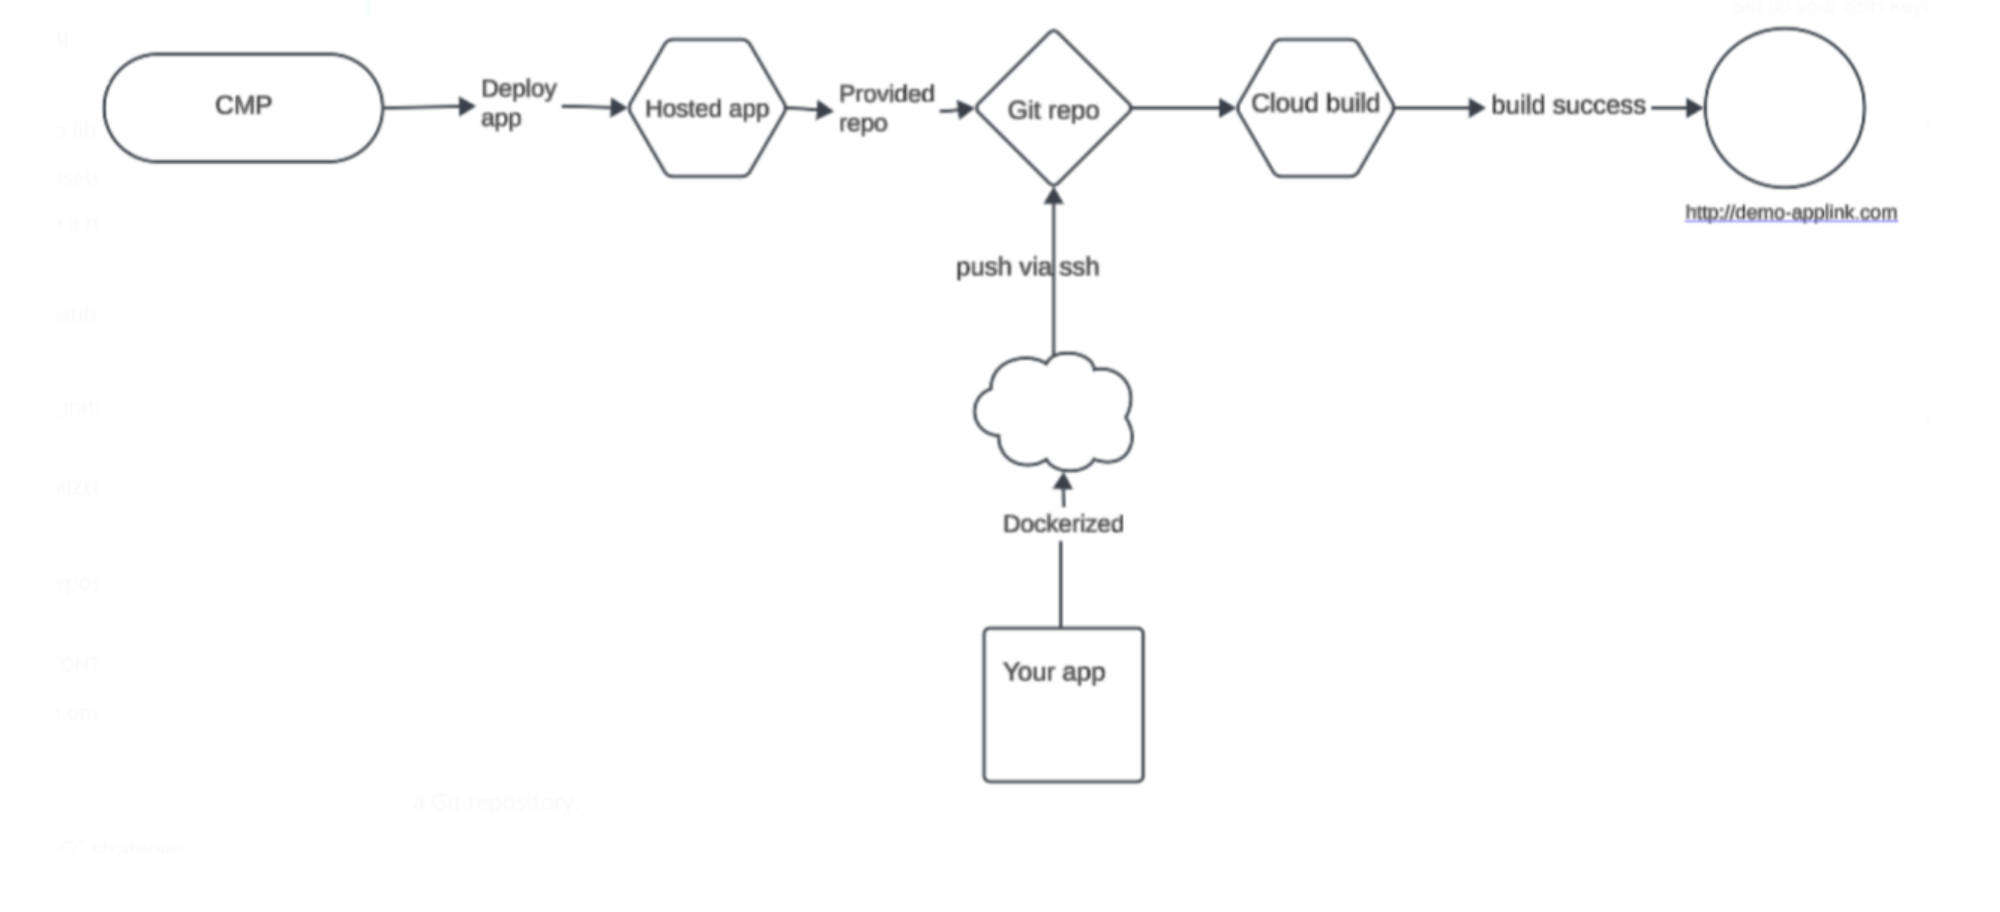
Optimizely Content Marketing Platform (CMP) lets you integrate your systems using middleware. While this usually requires you to host the middleware, CMP provides hosting by implementing a CI/CD pipeline to streamline the process. You only need to write the middleware code while CMP handles the hosting and deployment. Your organization can launch dockerized apps developed using any technology stack. CMP communicates internally with the app.
Here is a flowchart that shows how hosted apps work internally:
Write a hosted middleware
Interface
A hosted middleware must implement the following reserved endpoint:
GET /_status – Health checking endpoint. It must return HTTP 200 to indicate the middleware is ready.
Other than this reserved endpoint, the hosted middleware can implement any other endpoint you want.
Deployment support
A hosted middleware must follow these rules to deploy:
- The repository root must have the docker file named
Dockerfile.production. - The docker file must not use any private base image.
- The middleware server must run on port 8000.
Create and deploy a hosted middleware
Resource provisioning through CMP
-
Log in to CMP and go to Settings > Apps & Webhooks.
-
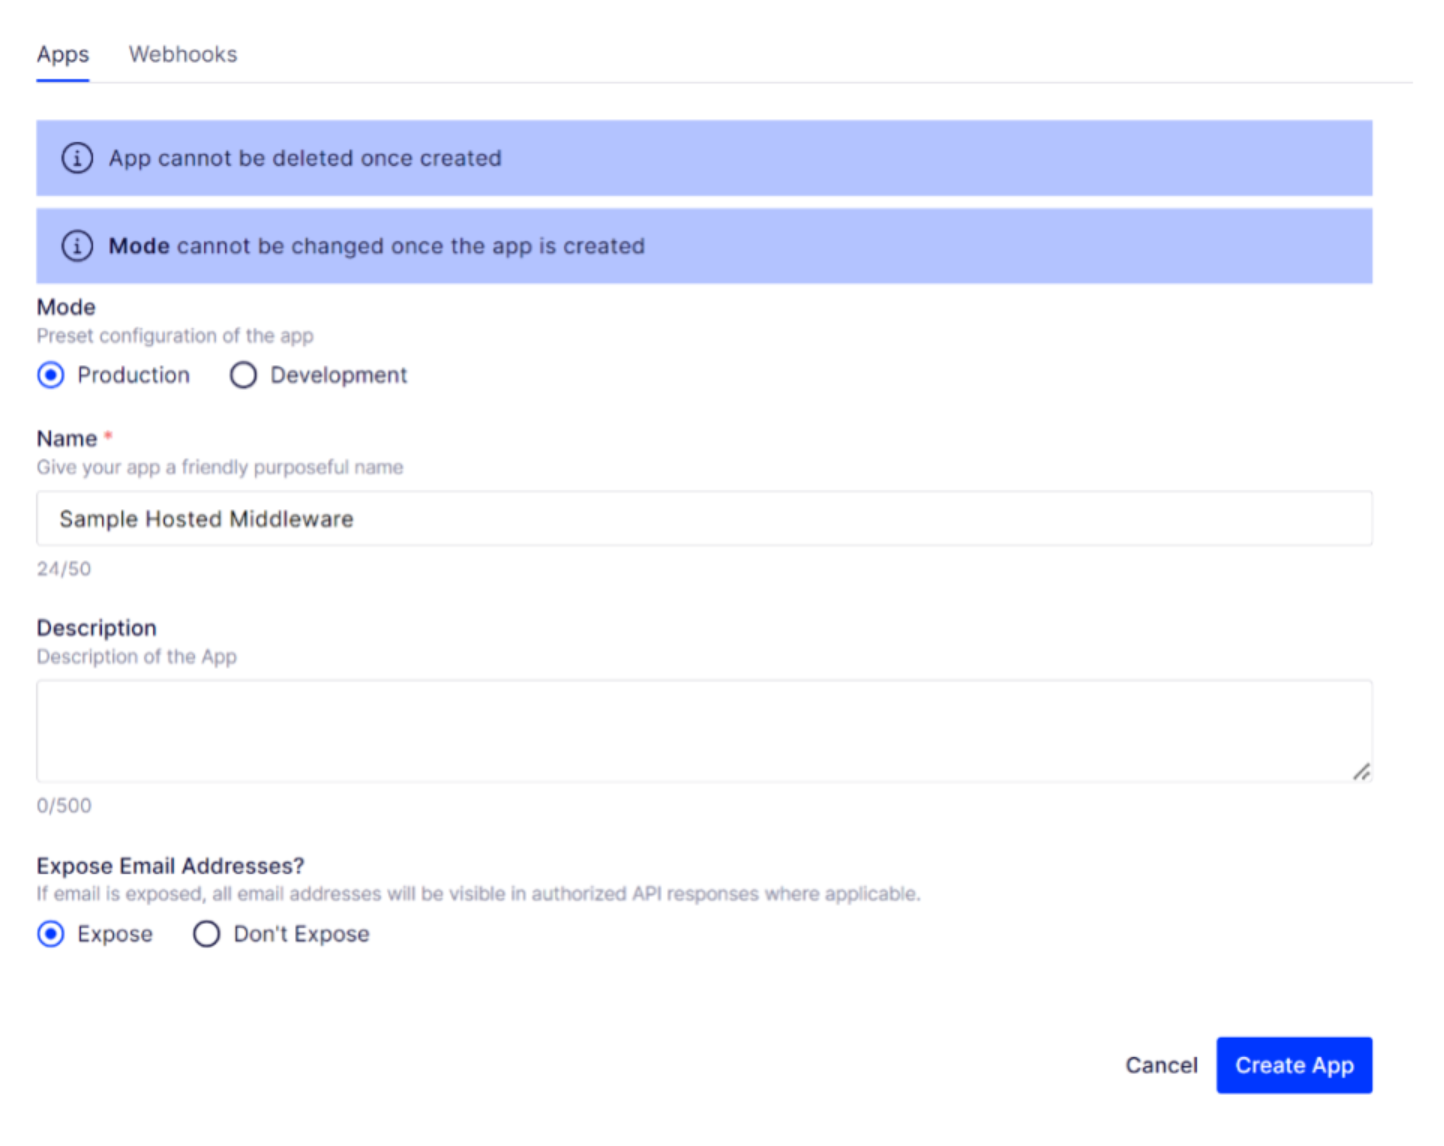
Click Register New and choose Hosted App to create a hosted middleware.
-
Complete the form.
You receive the base URL, client ID, client secret, and a link to add SSH keys. When the provisioning is complete, you obtain a repository URL. The base URL is the root URL of the middleware. For example, if the base URL is
https://www.base-url.comand the middleware server implements aGET /dummyendpoint, the endpoint is available athttps://www.base-url.com/dummy.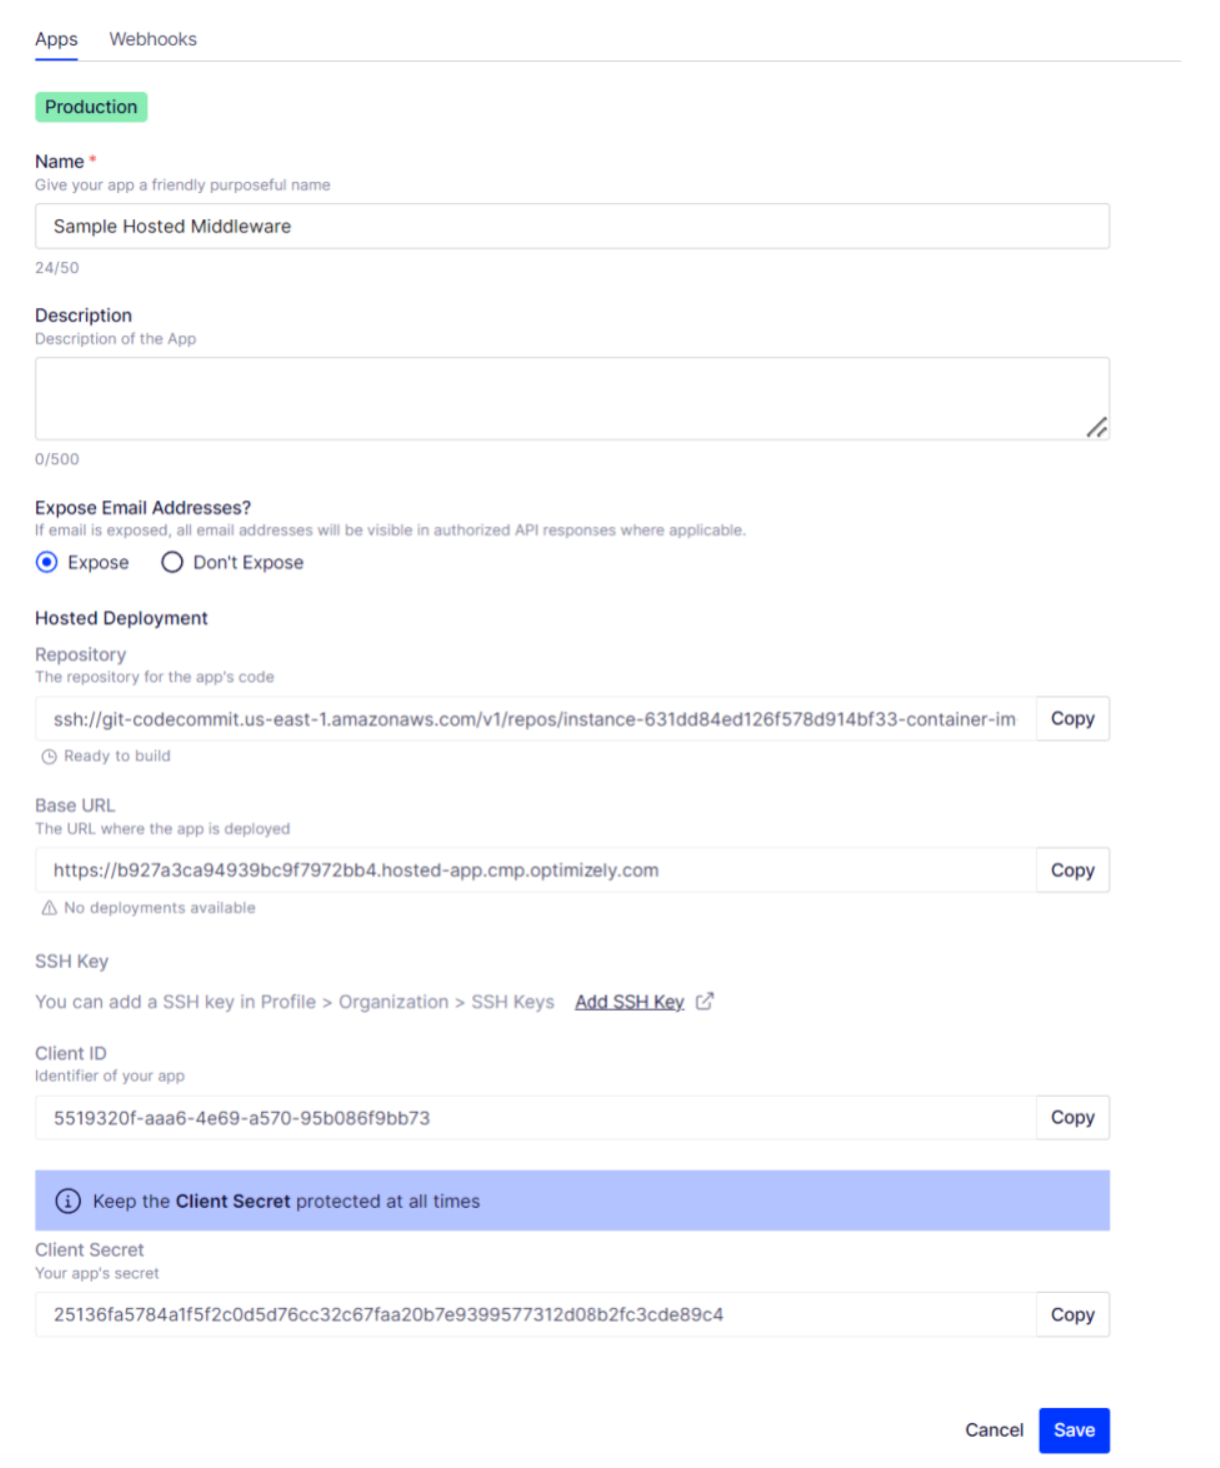
-
Copy the AWS CodeCommit repository URL to push your middleware code to it.
Add SSH keys
- Go to Organization > SSH Keys to add your public SSH key. The public SSH key must be encoded in ssh-rsa or PEM format. The minimum bit length is 2048 bites. After the SSH key upload completes, you recieve an Identity for that key.
- Copy and save the SSH_key_ID.
- Use a text editor on your local machine to create a file named
configin the~/.sshdirectory if it does not exist. - Add the following lines at the end of the file.
Remember to replaceHost git-codecommit.*amazonaws.com User <SSH_key_ID> # e.g. APKAEIBAERJR2EXAMPLE IdentityFile <path_to_your_private_key_file> # e.g. ~/.ssh/codecommit_rsa or ~/.ssh/id_rsa<SSH_key_ID>and<path_to_your_private_key_file>with your own SSH key ID and path. - Run the following command from the terminal to change the permissions for the
configfile:
chmod 600 ~/.ssh/config - Run the following command to test your SSH configuration:
ssh git-codecommit.us-east-1.amazonaws.com
NoteAn organization is limited to a maximum of five SSH keys.
Push code to AWS CodeCommit repository
- Ensure you have a local git repository.
- Add the CodeCommit repo as a remote to your local repo:
git remote add <remote_name> <CodeCommit_repo_URL> - Push your code to the CodeCommit repo:
git push <remote_name> <your_branch>:master # push from branch name <your_branch> to the remote's master
After a successful push, you should see a repository status of Ready to build > Building > Deployed / Build Failed (depending on success or failure), and the status field changes from No deployment available > Waiting for checks to pass... > Ready to use. When you see this status, you can use the middleware.
Authentication
Your middleware can be public or private, depending on what you choose for the app UI. For public middleware, all endpoints are accessible over the internet without authentication. For private middleware, you must send an access_token along with the request to access the endpoints.
The following describes the authentication process:
You need the client_id and client_secret of a middleware to get an access_token. Make an HTTP POST request to the token endpoint of the authorization server to return the access_token in the response payload. The endpoint is POST https://accounts.welcomesoftware.com/o/oauth2/v1/token.
Sample request payload:
{
  "client_id": "12345678-1234-1234-1234-123456789012",
  "client_secret": "my-encrypted-secret-1234",
  "grant_type": "client_credentials"
}
Sample response payload:
{
  "access_token": "b3717c0a-6857-4858-8274-9fe7b51180c9",
  "expires_in": 3599,
  "token_type": "Bearer"
}
Sample request with cURL:
curl --location --request POST '<https://accounts.welcomesoftware.com/o/oauth2/v1/token'>
--header 'Content-Type: application/json'
--data-raw '{
"client_id": "12345678-1234-1234-1234-123456789012",
"client_secret": "my-encrypted-secret-1234",
"grant_type": "client_credentials"
}'
After getting the access_token, you can use it to authenticate your middleware endpoints. Send the access_token as a bearer token in the authorization header in your request.
Sample request with cURL:
curl --request GET '<https://www.base-url.com/dummy'>
--header 'Authorization: Bearer b3717c0a-6857-4858-8274-9fe7b51180c9' \\
Manifest
Apps support manifests. These manifests let you define additional behavior, such as the webhooks that it may use or the environment variables that it may accept. You can define a manifest by including a manifest.json file at the root of the repository.
The following is a JSON schema for the manifest:
{
  "title": "Manifest",
  "type": "object",
  "properties": {
    "name": {
      "title": "Name",
      "type": "string"
    },
    "description": {
      "title": "Description",
      "type": "string"
    },
    "webhooks": {
      "title": "Webhooks",
      "default": {},
      "type": "object",
      "additionalProperties": {
        "$ref": "#/definitions/Webhook"
      }
    },
    "parameters": {
      "title": "Parameters",
      "default": {},
      "type": "object",
      "additionalProperties": {
        "$ref": "#/definitions/Parameter"
      }
    }
  },
  "definitions": {
    "Webhook": {
      "title": "Webhook",
      "type": "object",
      "properties": {
        "description": {
          "title": "Description",
          "type": "string"
        },
        "event_names": {
          "title": "Event Names",
          "type": "array",
          "items": {
            "type": "string"
          }
        },
        "secret": {
          "title": "Secret",
          "type": "string"
        },
        "endpoint": {
          "title": "Endpoint",
          "type": "string"
        }
      },
      "required": [
        "description",
        "event_names",
        "secret",
        "endpoint"
      ]
    },
    "Parameter": {
      "title": "Parameter",
      "type": "object",
      "properties": {
        "label": {
          "title": "Label",
          "type": "string"
        },
        "type": {
          "title": "Type",
          "type": "string"
        },
        "required": {
          "title": "Required",
          "default": false,
          "type": "boolean"
        }
      },
      "required": [
        "label",
        "type"
      ]
    }
  }
}
Manifest properties
- name: string – The app's name.
- description: string – The app's description.
- parameters: object – An object describing the environment variables the app accepts. You can configure these environment variables in the app's configuration page inside CMP.
- webhooks: object – An object describing the webhooks that the app accepts. These webhooks are created automatically when the app is provisioned.
Tips
Using GitHub workflow
You might usually maintain a GitHub repository for your middleware and share it with the other developers. You can use a GitHub action to automatically push your code to the associated CodeCommit repo whenever a PR is merged into the main branch. A sample GitHub workflow can be found in the color-picker-editor example repository.
You must update the env.DEST_REPO variable to your CodeCommit repo URL. You must also add two secrets in your repo, SSH_KEY_ID and SSH_PRIVATE_KEY. SSH_KEY_ID is the identity you got when you added the SSH key in CMP. SSH_PRIVATE_KEY is the value of the SSH private key.
Updated 10 days ago