CDN Proxy
CDN Proxy is another method of implementing Optimizely Performance Edge and is a good choice for customers who cannot use the Edge Subdomain method.
CDN Proxy is another method of implementing Optimizely Performance Edge and is a good choice for customers who cannot use the Edge Subdomain method.
In this approach, a <script> tag with a first-party src reference is included on the page. The request hits your CDN/Worker, configured to forward to or fetch from your Optimizely Performance Edge experiments endpoint. The endpoint returns the minimal JavaScript that the selected experiments and variations require and the asynchronous tracking snippet.

How does it work?
-
Visitor requests your webpage, which includes a first-party script request (for example, a script tag referencing a relative path such as
/optimizely-edge/<project_id>.js).<script src="/optimizely-edge/<project_id>.js"></script>
ImportantOptimizely Performance Edge is not a drop-in replacement for Optimizely Web Experimentation, because the client-side "get" APIs are different (API Reference). If you already have an endpoint like the above for Self-hosting Optimizely Web, we recommend you create a new endpoint for the Optimizely Performance Edge implementation, so you can update your
script srcand Optimizely Web Experimentation API code in the same version.
- Your CDN is configured to automatically fetch requests matching with
/optimizely-edge/<project_id>.jsfrom the Optimizely Edge Decider API (see the Settings tab in your Performance Edge project for the literal value for a given project).
With the Edge Subdomain configuration, Optimizely Performance Edge automatically compresses the response snippet. But, when using your CDN proxy, you must configure the Accept-Encoding headers for compression to occur. If you do not compress the snippet, you may run into issues with it being too large for the CDN you have chosen. For information about your specific CDN and its limitations, refer to the Configure your CDN Proxy section.
-
Optimizely Performance Edge Worker fetches the project or snippet datafile, evaluates URL targeting, makes decisions on any relevant experiments, and generates JavaScript (the microsnippet) to apply changes for the selected variations and inject the whole snippet to be loaded asynchronously on the page.
-
Optimizely Performance Edge Worker returns the microsnippet to your CDN, which returns it as the response body of the script request.
Third-party LimitationsThird-party CDN services' limitations are still applicable when integrating with Optimizely Performance Edge. For more information about a specific CDN's limitations, please see the corresponding section below.
Configure CDN Proxy
The configuration process for a CDN Proxy is slightly different for each CDN Provider.
Find the specific process for your CDN Provider
Akamai
This is a guide for implementing Optimizely Performance Edge through a CDN Proxy for customers who use Akamai.
Response Size LimitationsTo ensure the microsnippet does not exceed Akamai's size quotas, make sure to add Accept-Encoding to your HTTP headers that will be forwarded to Performance Edge.
1. Add a <script> tag
Add the following script tag in the appropriate spot inside the <head> tag on your page.
The format of this snippet should be the following:
<script src="/optimizely-edge/<project_id>.js"></script>
To find <project_id>
- Go to the Settings tab.
- Find the **Project ID **in the UI. You also need an Account ID for the path rewriting configuration.
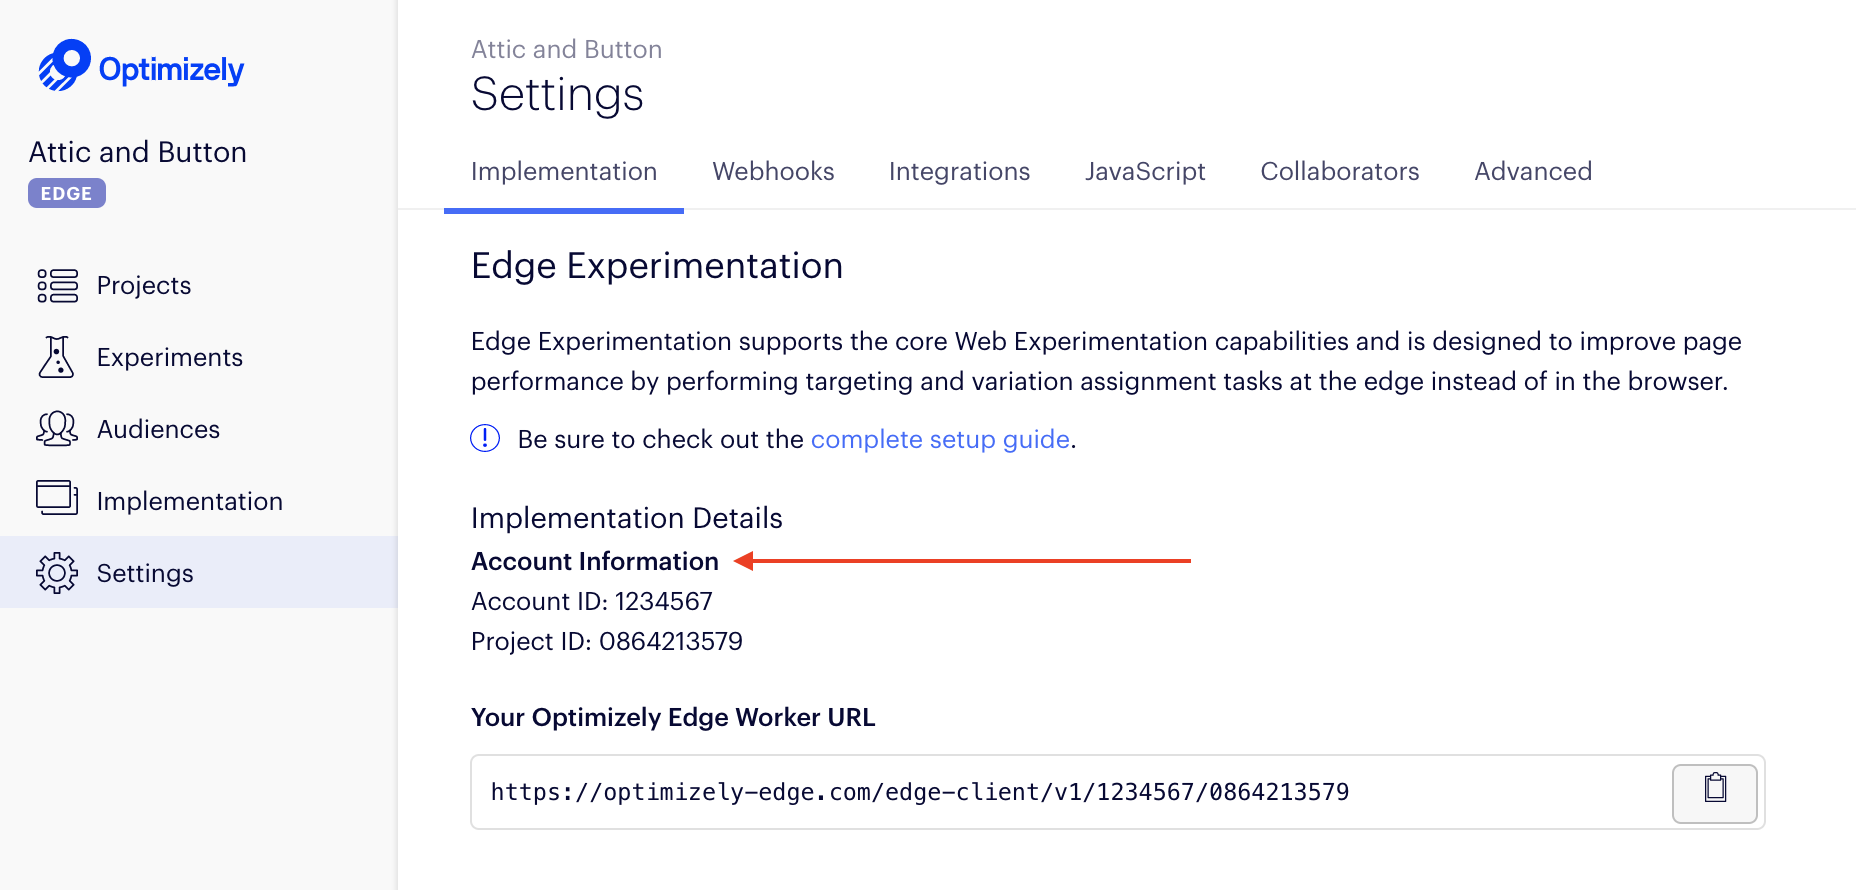
ImportantOptimizely Performance Edge is only supported on pages served over HTTPS. It is not supported on pages that are served over insecure
http://. Contact Optimizely Support and if you are interested in support for insecure HTTP.
2. Add a rule
In Akamai, create a new criteria that will apply the rule on paths that match your Optimizely Performance Edge snippet. For example, /optimizely-edge/<project_id>.js. This is the same path you should have included in the snippet on your site.
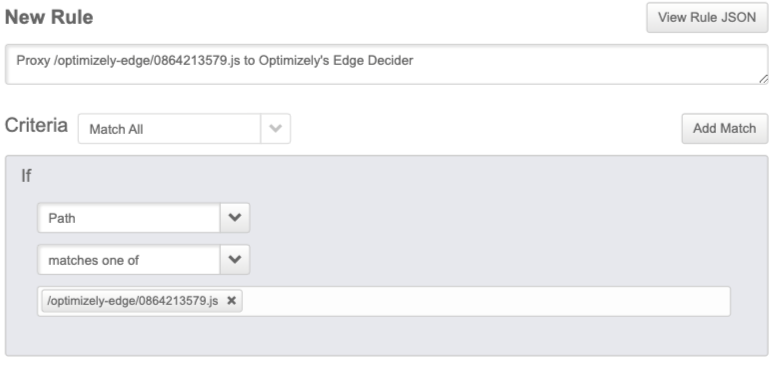
3. Add two behaviors
Next, add the following behaviors:
- Target the origin server.
- Modify outgoing request path behavior.
Target the origin server
- Change the value of Origin Server Hostname field to
optimizely-edge.com. - Set the Forward Host Header value to
Origin Hostname. This will modify the request going from the CDN to the browser.
Modify outgoing request path behavior
Replace part of the incoming path to ensure that the request from the snippet on your page is directed to its location in Optimizely.
Your configuration should match the following specifications:
| Action | Regular Expression Replacement |
| Find what | ^\/optimizely-edge\/<project_id>\.js |
| Replace with | /edge-client/v1/<account_id>/<project_id> |
| Occurrences | All |
| Keep the query parameters | Yes |
This behavior looks for all requests whose paths start with /optimizely-edge/<project_id>.js and replaces that string with a new path: /edge-client/v1/<account_id>/<project_id>. In the following screenshot, this is configured for someone whose Account ID is 1234567 and Project ID is 0864213579.
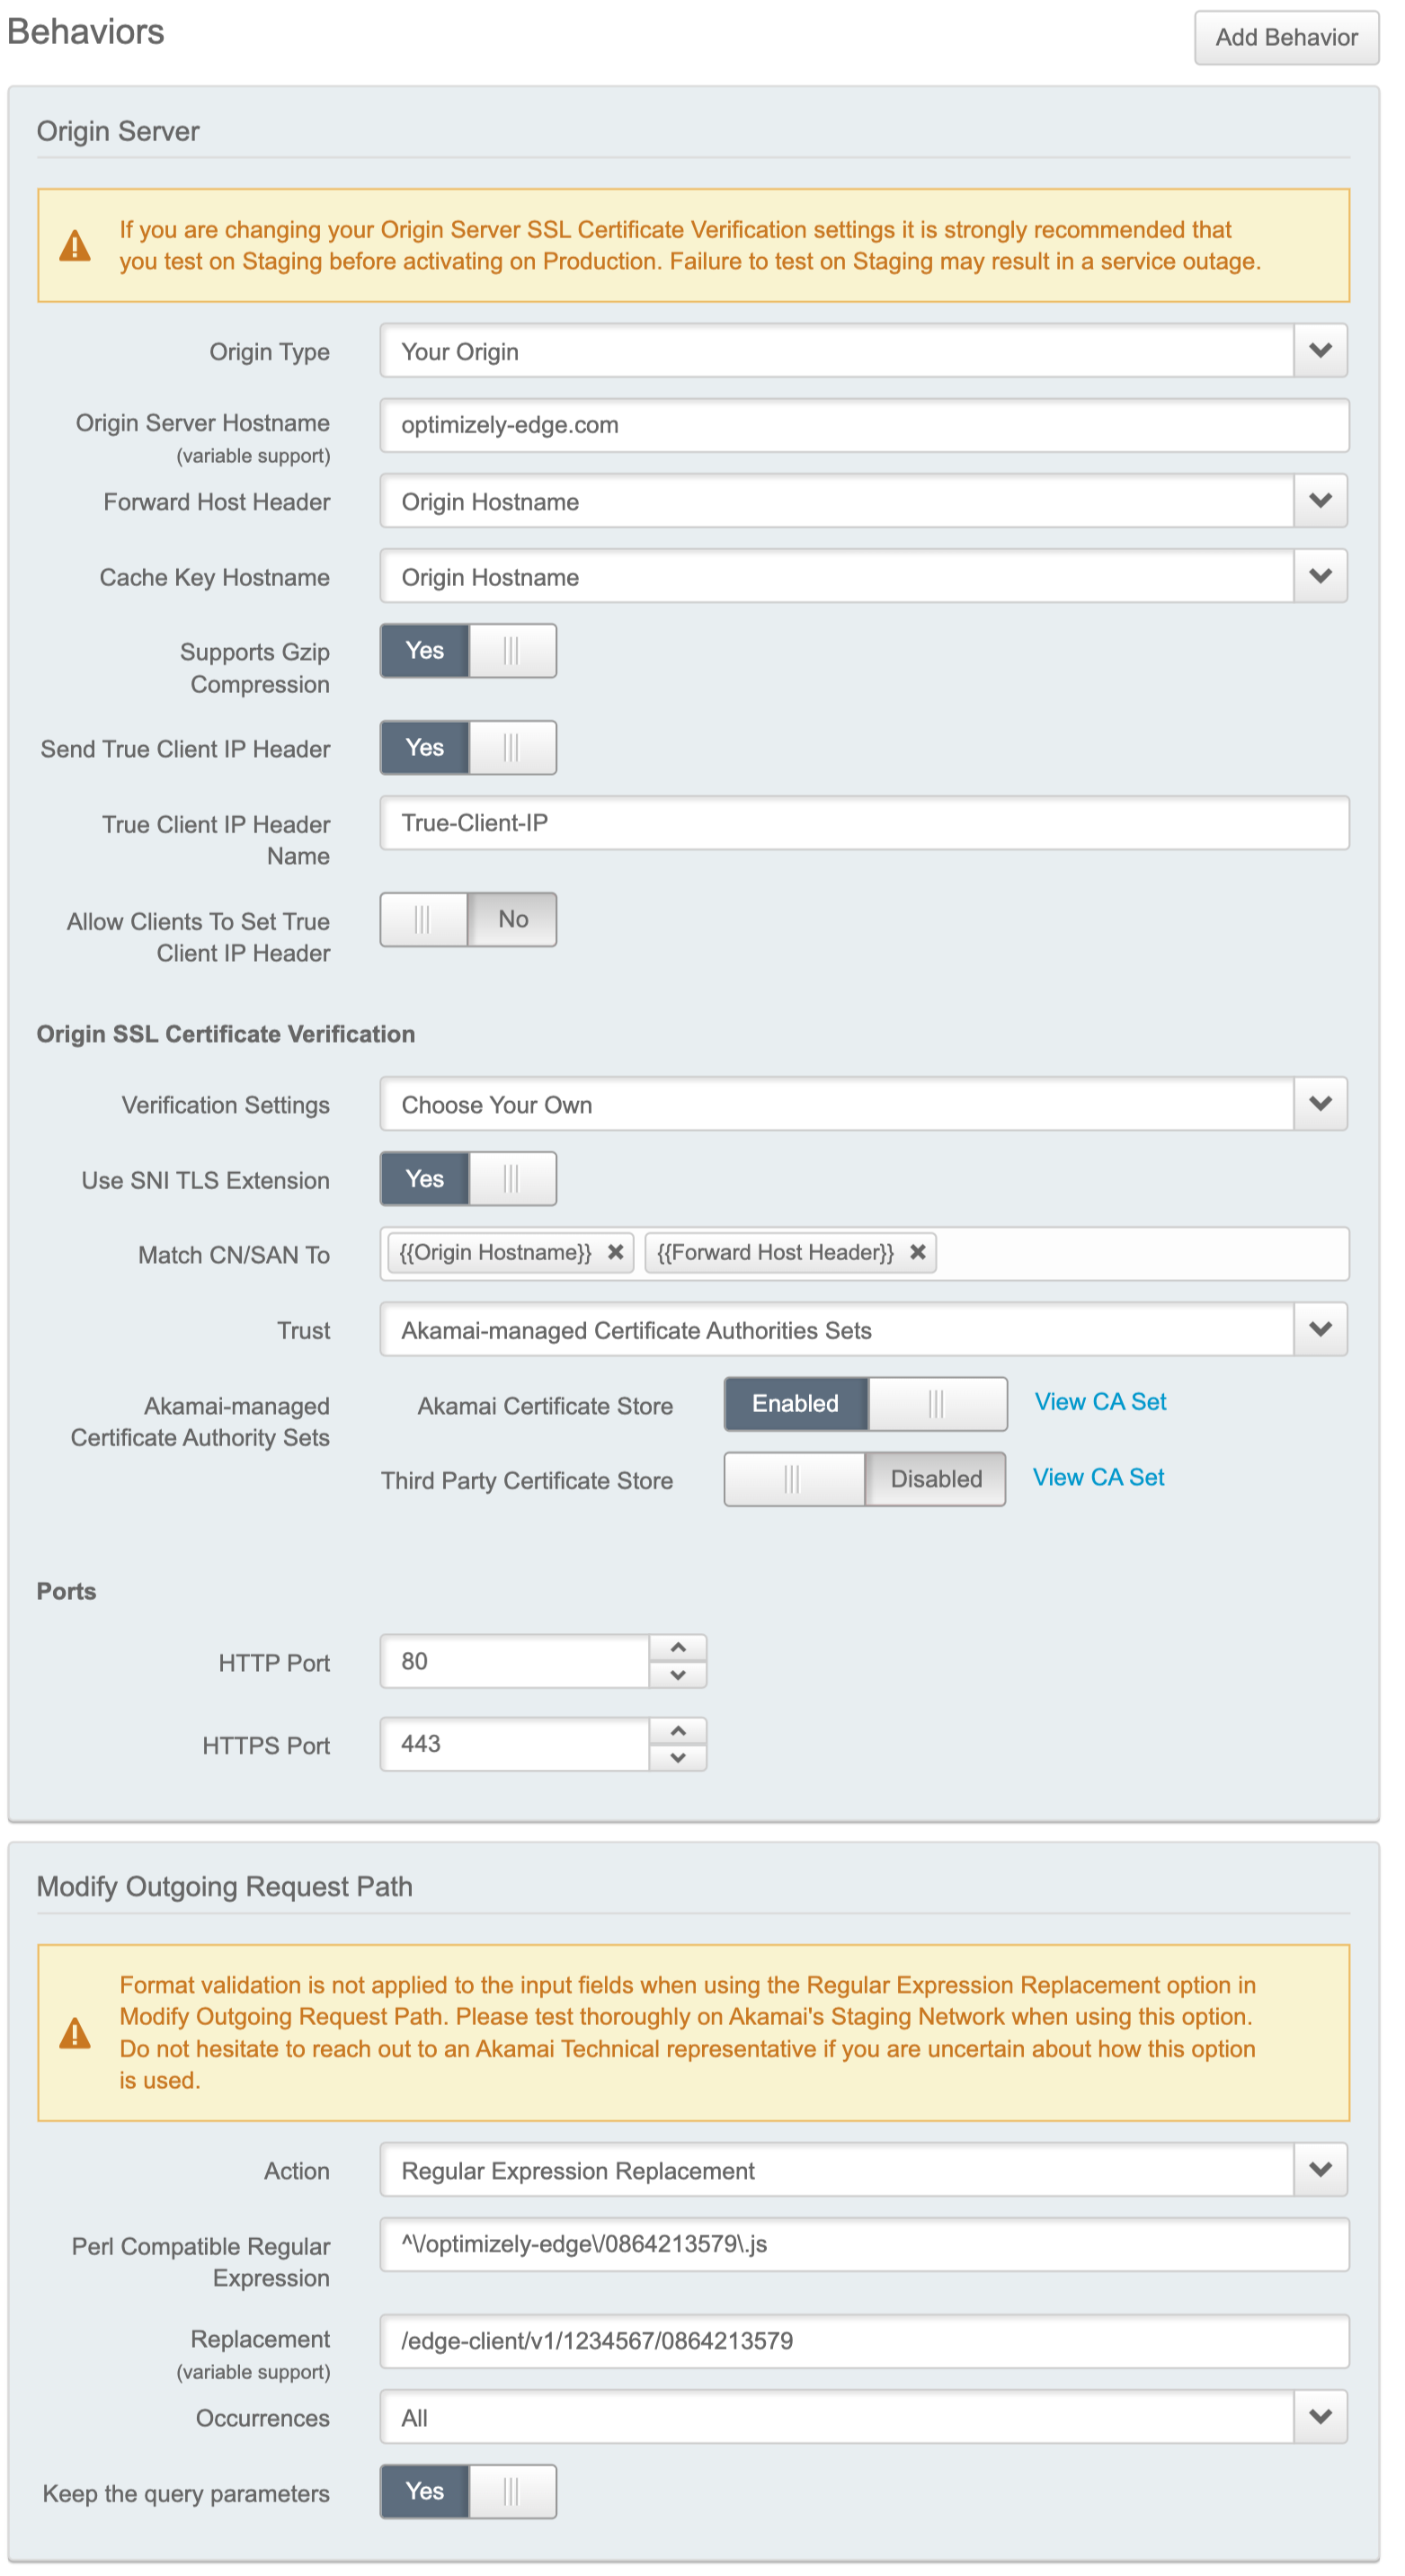
TTL Setting Preservation
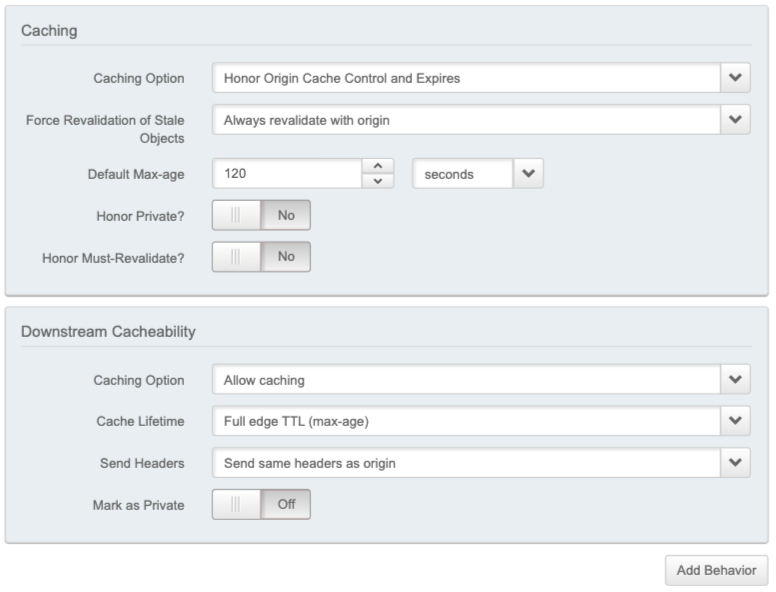
To ensure that Akamai respects the original TTL set in your Optimizely Performance Edge project settings, you must create one additional behavior, for caching.
Configure your new caching behavior to match the following options:
Caching option | Honor Origin Cache Control and Expires |
Force Revalidation of Stale Objects | Always revalidate with origin |
Default Max-age | 120 seconds |
Honor Private | No |
Honor Must-Revalidate | No |
Add a downstream cacheability behavior to match the following:
| Caching Option | Allow Caching |
| Cache Lifetime | Full edge TTL (max-age) |
| Send Headers | Send same headers as origin |
| Mark as Private | Off |
NotIf you wish to filter the cookies that are shared with the Edge Decider for targeting purposes, you may implement an allowlist approach by amending their CDN configuration to modify the outgoing "Cookie" request header sent to the optimizely-edge.com. If you implement an allowlist, make sure that the following cookies used by Optimizely Performance Edge are on that list:
- optimizelyEndUserId
- optimizelyRedirectData
- optimizelyDomainTestCookie
- optimizelyOptOut
- Any other non-Optimizely Performance Edge cookie that you may need for experiment targeting
See Cookies and localStorage in the Optimizely Performance Edge snippet.
The end result
4. Complete your configuration
Save your new rule. You can now leverage your HTTP/2 configuration to request Optimizely Performance Edge.
At the end of this process, your Akamai configuration options should look like the following:

Verify your configuration
To verify your configuration and ensure that the correct data is received in the browser, start by checking that the Edge Decider returns a microsnippet to your browser and that the visitor ID persists across sessions.
- Load the webpage that has the
<script>tag on it. - In the JavaScript console, run
optimizelyEdge. - Verify that
optimizelyEdgereturns asdefined - Confirm that the OEUID cookie (visitor ID) persists (does not change) when refreshing the webpage.
Cloudflare
This is a guide for implementing Optimizely Performance Edge through a CDN Proxy for customers who use Cloudflare.
NoteTo ensure the microsnippet does not exceed Cloudflare's size quotas, make sure to add Accept-Encoding to your HTTP headers that will be forwarded to Optimizely Performance Edge.
1. Create a Cloudflare Worker
Start by creating a new Worker for Optimizely Performance Edge in your Cloudflare account.
- In the Workers tab, select Launch Editor.

- Select Add Script and name your script. You should use a descriptive name, such as
optimizely-edge-forward.
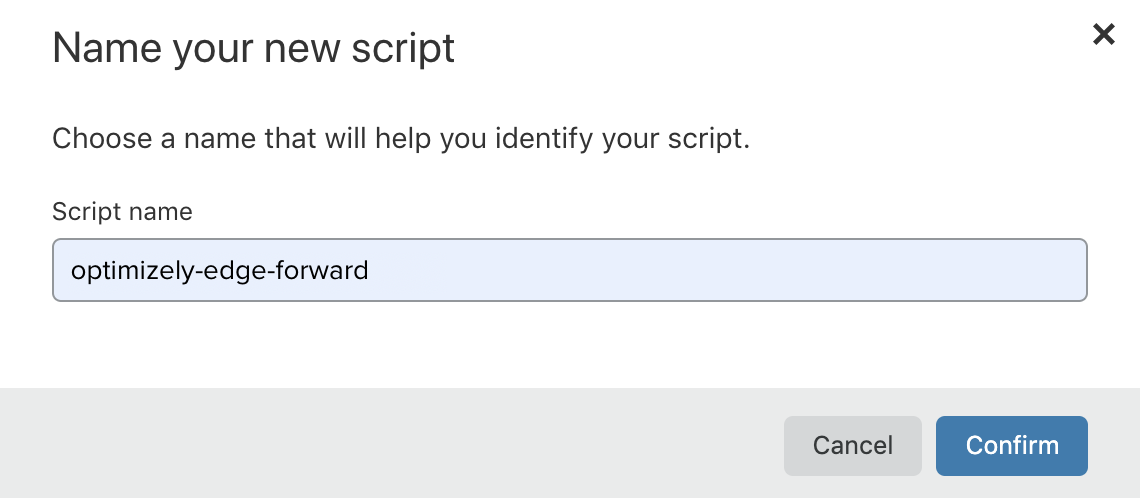
- Click Confirm.
2. Configure the script
Next, configure your script to communicate with the Optimizely Performance Edge API. Add the following JavaScript code to your script to forward all required arguments and any optional arguments that you want to include whenever a request to your Worker's Route is received.
- Copy the following code into your
optimizely-edge-forwardscript. TheTODOcomments which must be updated by you prior to deploying.
'use strict';

// TODO: Replace with your Optimizely Account ID
const ACCOUNT_ID = '12345';
// TODO: Replace with your Performance Edge Project ID
const PROJECT_ID = '67890';

addEventListener('fetch', event => {
  event.respondWith(handleRequest(event.request));
});

/**
 * @param {Request} request
 * @returns {Promise.<Response>}
 *        Response from the Edge Decider, containing the microsnippet.
 */
async function handleRequest(request) {
  try {
    const url = `https://optimizely-edge.com/edge-client/v1/${ACCOUNT_ID}/${PROJECT_ID}`;
    const headers = new Headers(request.headers);

    // Required for IP Address and Location targeting
    headers.set(
      'X-Forwarded-For',
      updateXForwardedFor(
        headers.get('X-Forwarded-For'),
        headers.get('CF-Connecting-IP')
      )
    );

    // Forward headers and cookies, to assist with experiment targeting.
    // For more information, see the Edge Decider API documentation.
    const filteredHeaders = filterHeaders(headers);
    if (filteredHeaders.has('Cookie')) {
      filteredHeaders.set(
        'Cookie',
        filteredHeaders
          .get('Cookie')
          .split(/; */)
          .filter(isOkCookie)
          .join('; ')
      );
    }

    const response = await fetch(
      new Request(
        url,
        new Request(url, { ...request, headers: filteredHeaders })
      )
    );
    return response;
  } catch (e) {
    console.log(e);
    return new Response(e || e.stack);
  }
}

/**
 * @param {String|undefined}
 *        Current value of an 'X-Forwarded-For' header.
 * @param {String} remoteAddr
 *        IP address of the requester.
 * @returns {String}
 *        The given 'X-Forwarded-For', updated to include the given remote address.
 */
function updateXForwardedFor(currentValue, remoteAddr) {
  return currentValue ? `${currentValue}, ${remoteAddr}` : remoteAddr;
}

/**
 * @param {Headers} headers
 * @returns {Headers}
 *        A reduced set of headers to send to the Edge Decider.
 */
function filterHeaders(headers) {
  // Populate this header blacklist as desired.
  // Do NOT add the following to the blacklist:
  //   - Cookie (use the `isOkCookie` function below to filter cookies)
  //   - Referer
  //   - X-Forwarded-For
  // For rationale, see the Edge Decider API documentation.
  const blacklist = [];
  const blacklistLowerCase = new Set(blacklist.map(s => s.toLowerCase()));

  return Array.from(headers.entries())
    .filter(([name]) => !blacklistLowerCase.has(name))
    .reduce((result, [name, value]) => {
      result.set(name, value);
      return result;
    }, new Headers());
}

/**
 * @param {String} cookie
 *        A string like `${name}=${value}`.
 * @returns {Boolean}
 *        Whether to send this cookie to the Edge Decider.
 */
function isOkCookie(cookie) {
  // TODO: Replace with your preferred cookie filtering logic for your app
  if (/session/i.test(cookie)) {
    // Remove any "session" cookies
    return false;
  }
  return true;
}
To find your Project and Account ID
- Go to the Settings tab.
- Find the **Project ID ** and Account ID in the UI.
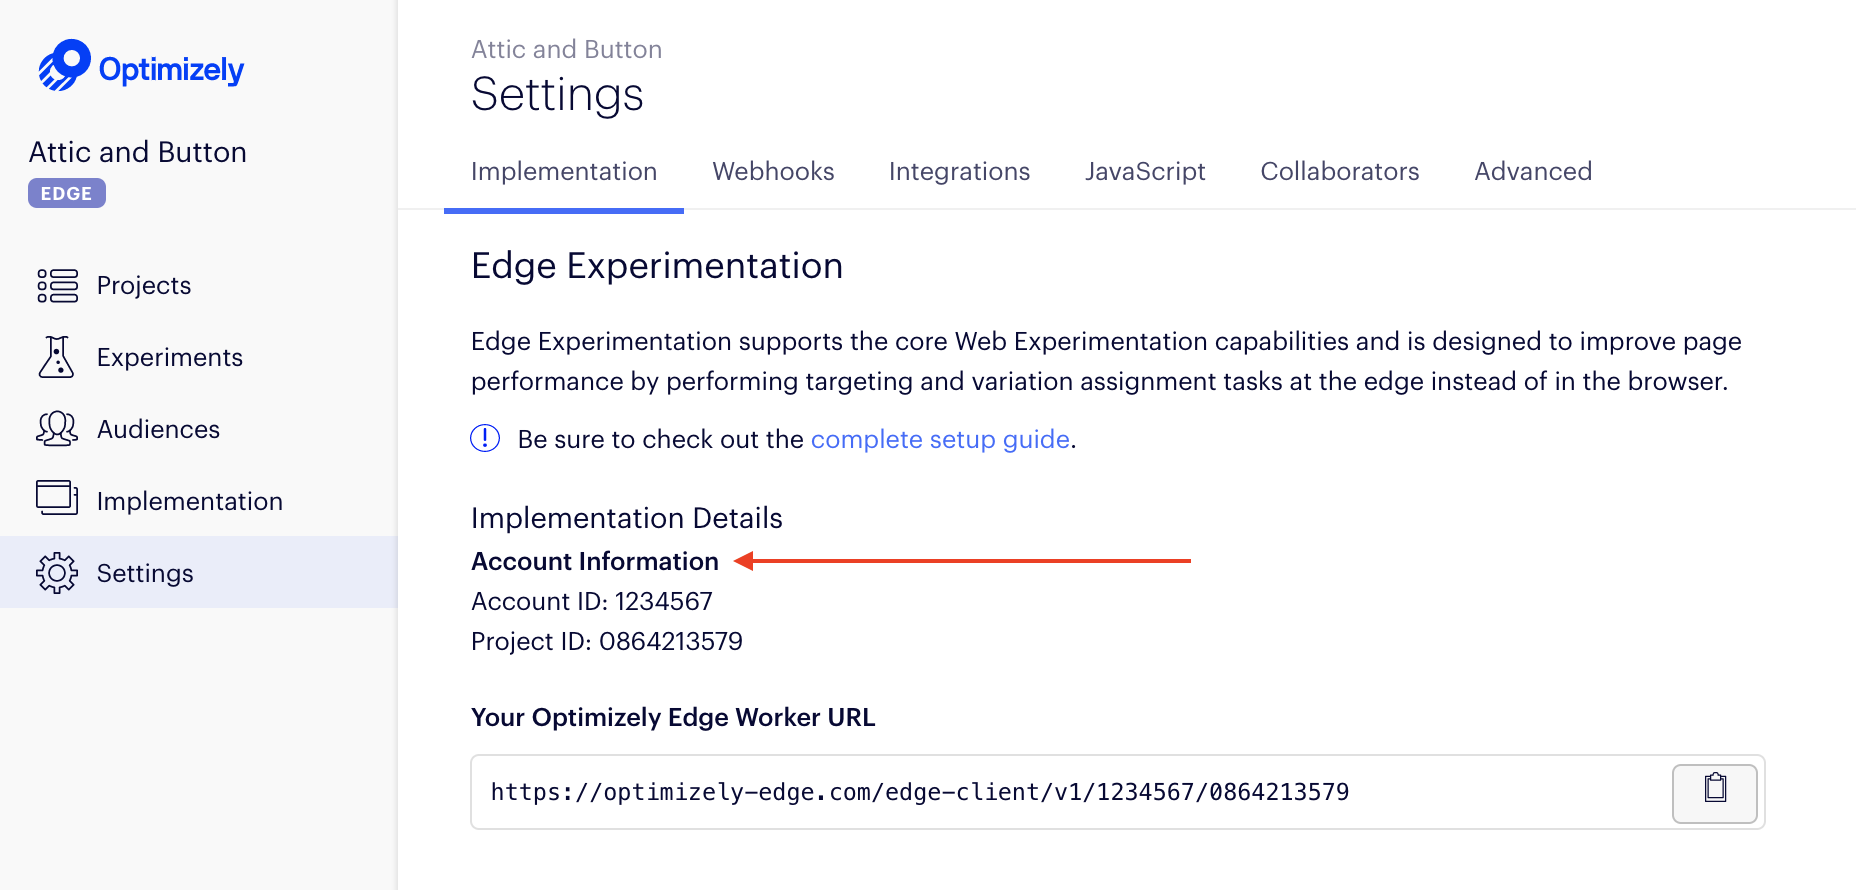
- Save the script.
NoteIf you want to filter the cookies that are shared with the Edge Decider for targeting purposes, you may implement an allowlist approach by amending their CDN configuration to modify the outgoing "Cookie" request header sent to the optimizely-edge.com. If you implement an allowlist, make sure that the following cookies used by Optimizely Performance Edge are on that list:
- optimizelyEndUserId
- optimizelyRedirectData
- optimizelyDomainTestCookie
- optimizelyOptOut
- Any other non-Optimizely Performance Edge cookie that you may need for experiment targeting
See Cookies and localStorage in the Optimizely Performance Edge snippet.
3. Add a Route
Next, add a Route in Cloudflare.
- Go back to the dashboard. In the Workers tab, select Add route.
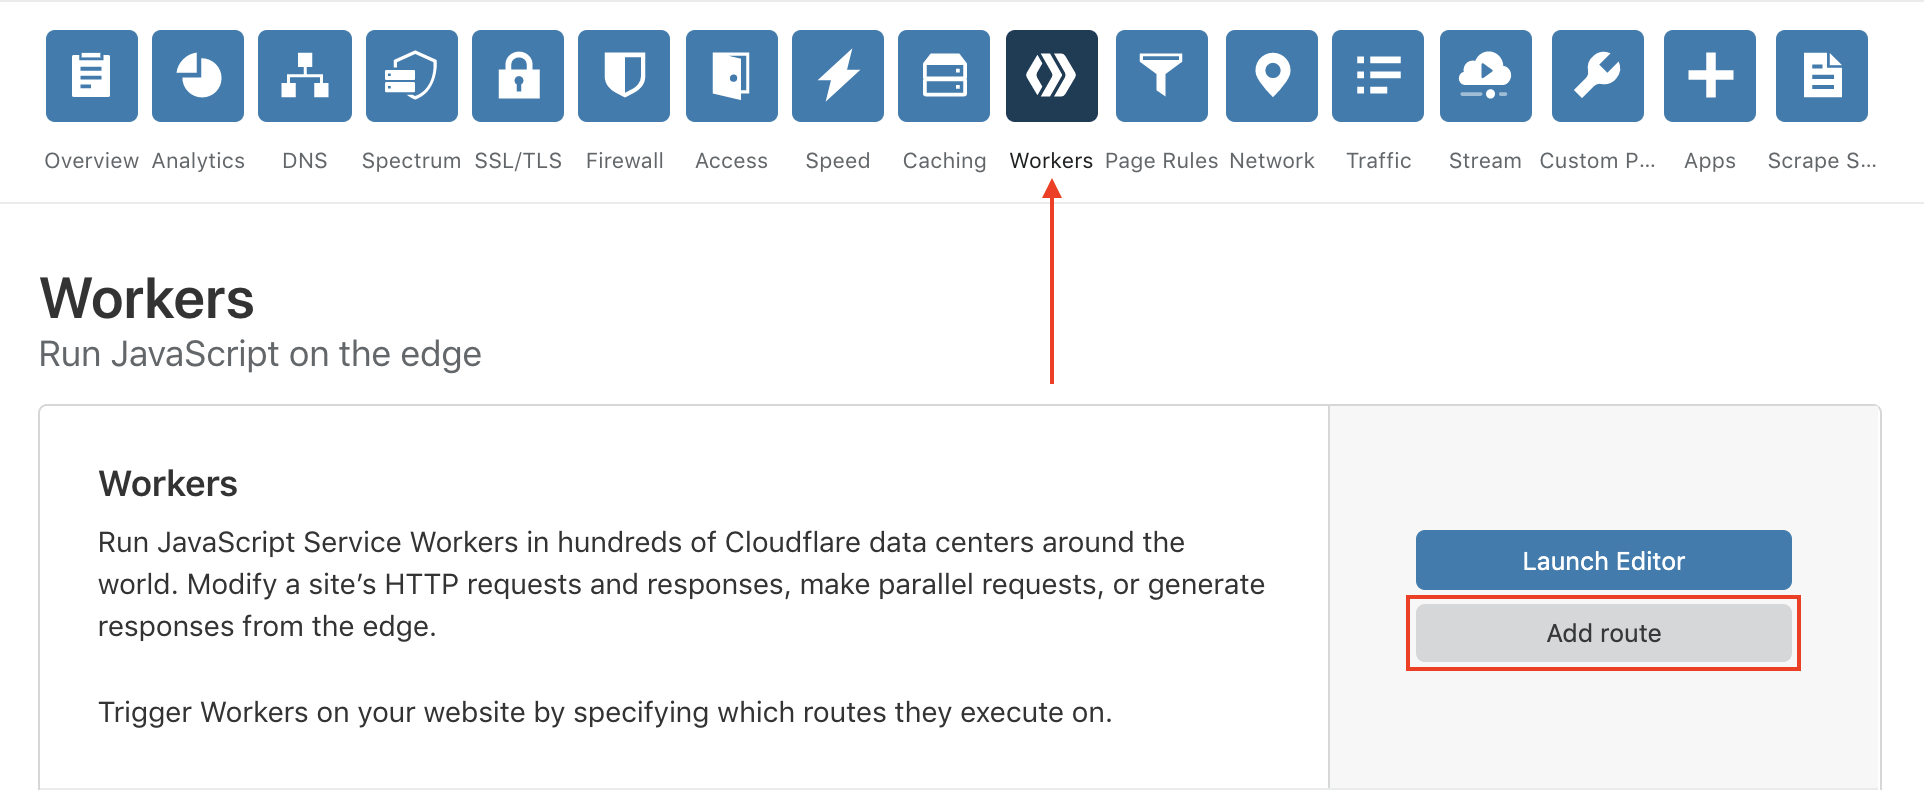
- In the Route field, specify a route that includes your site's domain (for example,
atticandbutton.com) and a distinct pathname such as/optimizely-edge/<project_id>.js.
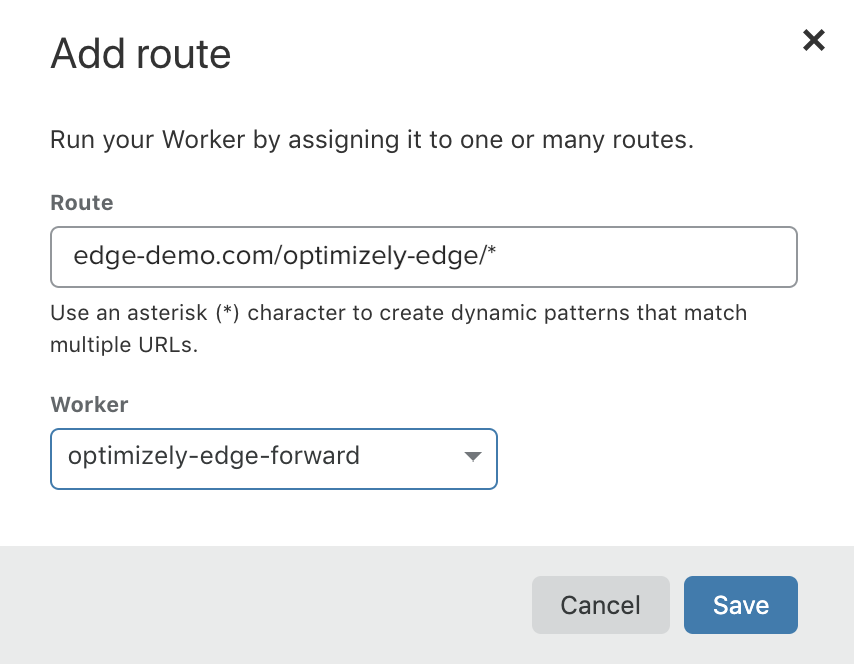
- Click Save.
4. Add a <script> tag
On your webpage, add a <script> tag that uses the same pathname as the Route
<script src=”/optimizely-edge/<project_id>.js”></script>
ImportantOptimizely Performance Edge is only supported on pages served over HTTPS; it is not supported on pages that are served over insecure
http://. Contact Optimizely Support if you are interested in support for insecure HTTP.
Verify your configuration
To verify your configuration and ensure that the correct data is received in the browser, start by checking that the Edge Decider returns a microsnippet to your browser and that the visitor ID persists across sessions.
- Load the webpage that has the
<script>tag on it. - In the JavaScript console, run
optimizelyEdge. - Verify that
optimizelyEdgereturns asdefined - Confirm that the OEUID cookie (visitor ID) persists (does not change) when refreshing the webpage.
CloudFront
This is a guide for implementing Optimizely Performance Edge through a CDN Proxy if you use AWS CloudFront.
Prerequisites
You must have a CloudFront distribution configured for your site. If you need to configure one, see Getting Started with CloudFront.
Overview
The core of the implementation is a Lambda@Edge Function in your CloudFront Distribution. If you already know how to use CloudFront/Lambda@Edge, or have particular needs, then use this short guide to configure the Function.
| Property | Value |
|---|---|
| Path Pattern | optimizely-edge/* |
| Cache Based on Selected Request Headers | "None (Improves Caching)" – this setting ensures that every request is forwarded to optimizely-edge.com and the correct response is fetched for the viewer's current context. |
| Function Behavior | Proxy requests to the Optimizely Edge Decider endpoint for your Performance Edge project. |
| Permissions | In additional to typical Lambda@Edge requirements, you must also allow access to the Function to make outbound Internet requests to the https://optimizely-edge.com origin. |
NoteTo ensure the microsnippet does not exceed Amazon CloudFront Lambda@Edge's size quotas, make sure to add Accept-Encoding to your HTTP headers that will be forwarded to Optimizely Performance Edge.
1. Create a CloudFront CacheBehavior
Start by creating a new Cache Behavior in your CloudFront distribution that matches the pattern optimizely-edge/*.
This is the Cache Behavior that you select when you create the Lambda Function trigger later. Since Optimizely intercepts requests before they reach the origin, you can use whatever Origin you want.

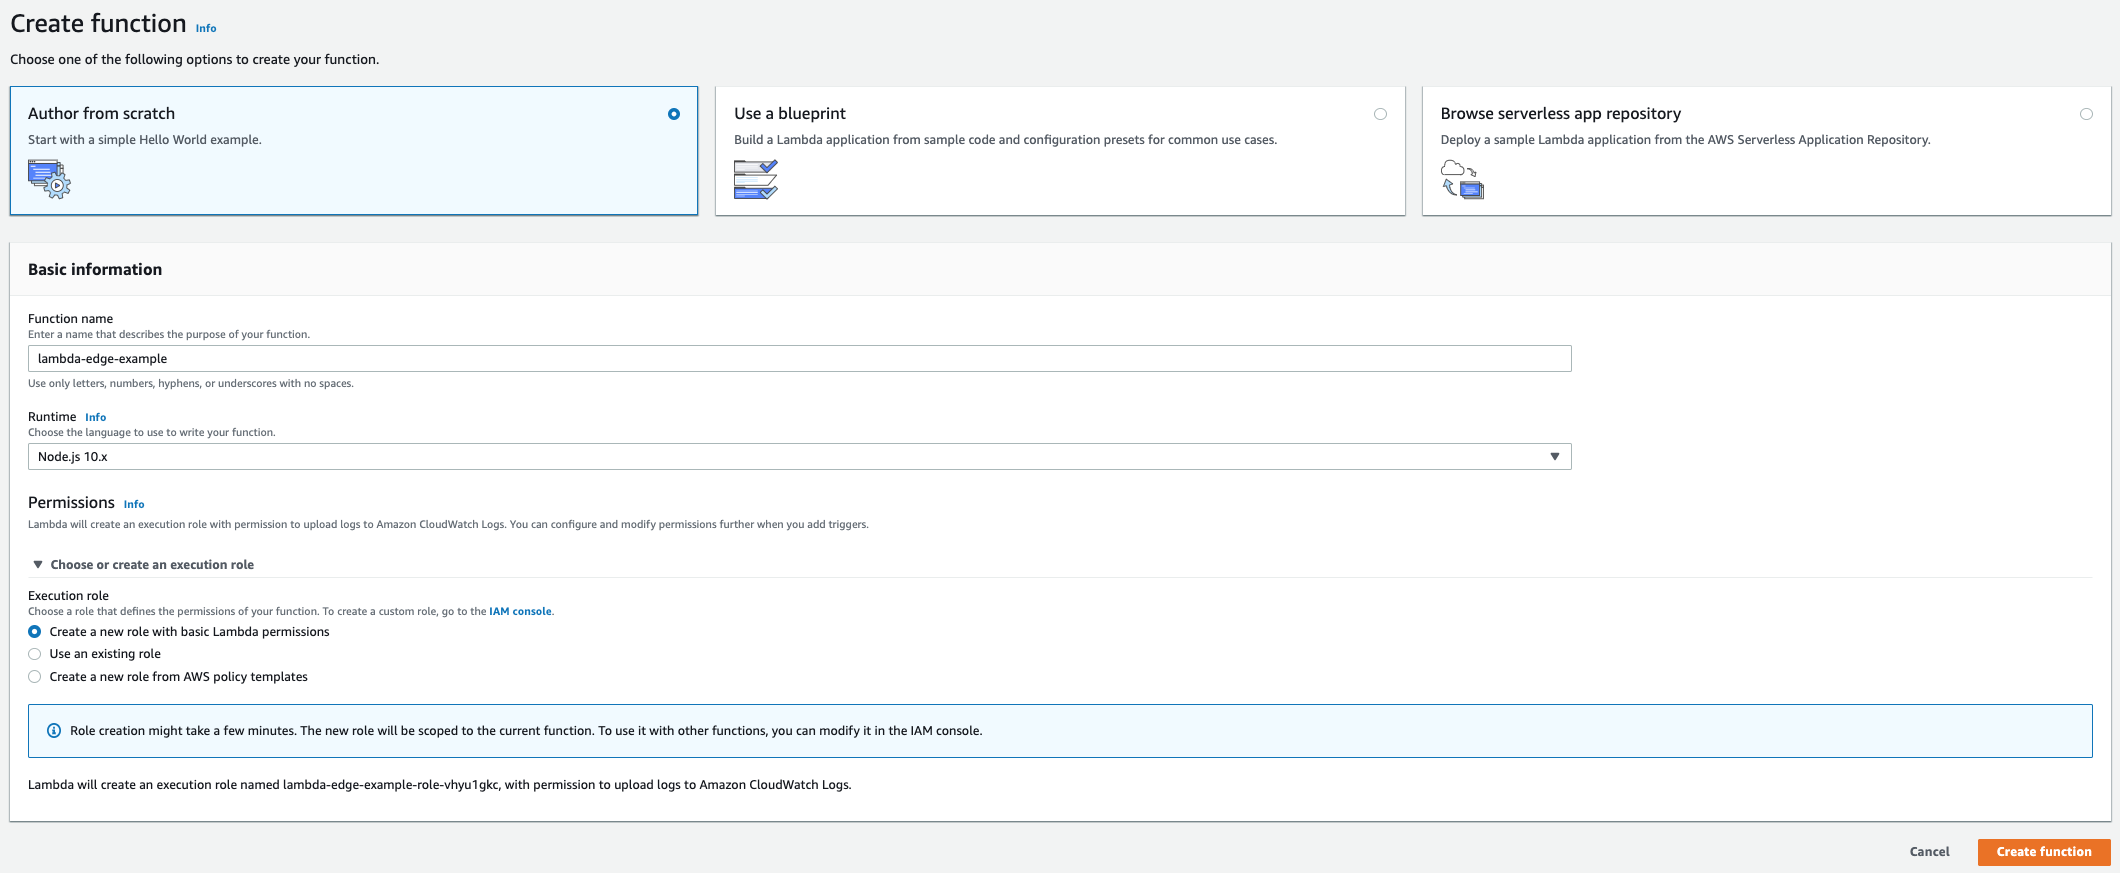
2. Create a Lambda Function
Create a new Lambda Function for Performance Edge in your AWS account.
This guide walks through how to do it with the AWS Console, but you can use any automation framework of your choice. See instructions for creating a Lambda@Edge Function in the Lambda Console.
Make sure you are using a supported runtime. This example uses nodejs10.x.
Make sure to set your Function Handler to index.optimizelyEdge in order for Lambda to properly invoke the following Function code.
3. Add the script code
Next, configure your script to communicate with the Optimizely Performance Edge API.
Add the following JavaScript code to your Function to forward all required arguments and any optional arguments that you want to include whenever a request to your Function is received. You will configure the CloudFront trigger in the following step.
- Copy the following code into your Function. You need to update all "TODO" comments before you deploy.
'use strict';

const https = require('https');

// TODO: Replace with your Optimizely Account ID
const ACCOUNT_ID = '12345';
// TODO: Replace with your Performance Edge Project ID
const PROJECT_ID = '67890';

// Headers from the Edge Decider response that should be included in the CloudFront viewer response.
// Make sure this doesn't include any blacklisted headers!
// See: https://docs.aws.amazon.com/AmazonCloudFront/latest/DeveloperGuide/lambda-requirements-limits.html#lambda-blacklisted-headers
const RESPONSE_HEADER_WHITELIST = [
  'cache-control',
  'content-type',
  'set-cookie',
  'content-encoding',
];

/**
 * An object that Lambda@Edge passes to a function when it's handling a CloudFront viewer request.
 * See https://docs.aws.amazon.com/AmazonCloudFront/latest/DeveloperGuide/lambda-event-structure.html#lambda-event-structure-request
 * @typedef {Object} CloudFrontRequestEvent
 */

/**
 * The object returned from a Lambda@Edge function that creates an HTTP response.
 * See https://docs.aws.amazon.com/AmazonCloudFront/latest/DeveloperGuide/lambda-generating-http-responses-in-requests.html#lambda-generating-http-responses-object
 * @typedef {Object} CloudFrontResponse
 */

/**
 * The Lambda entry point.
 *
 * @param {CloudFrontRequestEvent} event
 * @returns {Promise.<CloudFrontResponse>}
 *        Always fulfills.
 */
exports.optimizelyEdge = event => {
  const { request } = event.Records[0].cf;
  const headers = Object.entries(
    request.headers
  ).reduce((acc, [name, [{ value }]]) => {
    acc[name] = value;
    return acc;
  }, {});

  // Required for IP Address and Location targeting
  headers['x-forwarded-for'] = updateXForwardedFor(
    headers['x-forwarded-for'],
    request.clientIp
  );

  // Forward headers and cookies, to assist with experiment targeting.
  // For more information, see the Edge Decider API documentation.
  const filteredHeaders = filterHeaders(headers);
  if (filteredHeaders.cookie) {
    filteredHeaders.cookie = filteredHeaders.cookie
      .split(/; */)
      .filter(isOkCookie)
      .join('; ');
  }

  return nodeRequest({
    host: 'optimizely-edge.com',
    path: `/edge-client/v1/${ACCOUNT_ID}/${PROJECT_ID}`,
    method: 'GET',
    headers: filteredHeaders
  });
};

/**
 * @param {Object} headers
 * @returns {Object}
 *        A reduced set of headers to send to the Edge Decider.
 */
function filterHeaders(headers) {
  // Populate this header blacklist as desired.
  // Do NOT add the following to the blacklist:
  //   - Cookie (use the `isOkCookie` function below to filter cookies)
  //   - Referer
  //   - X-Forwarded-For
  // For rationale, see the Edge Decider API documentation.
  const blacklist = new Set(
    [
      // DON'T remove this; leave it to `nodeRequest` to populate the Host header in the
      // request to the Edge Decider
      'Host',
    ].map(s => s.toLowerCase())
  );

  return Object.entries(headers).reduce((result, [name, value]) => {
    if (!blacklist.has(name)) {
      result[name] = value;
    }
    return result;
  }, {});
}

/**
 * @param {String|undefined}
 *        Current value of an 'X-Forwarded-For' header.
 * @param {String} remoteAddr
 *        IP address of the requester.
 * @returns {String}
 *        The given 'X-Forwarded-For', updated to include the given remote address.
 */
function updateXForwardedFor(currentValue, remoteAddr) {
  return currentValue ? `${currentValue}, ${remoteAddr}` : remoteAddr;
}

/**
 * @param {String} cookie
 *        A string like `${name}=${value}`.
 * @returns {Boolean}
 *        Whether to send this cookie to the Edge Decider.
 */
function isOkCookie(cookie) {
  // TODO: Replace with your preferred cookie filtering logic for your app
  if (/session/i.test(cookie)) {
    // Remove any "session" cookies
    return false;
  }
  return true;
}

/**
 * Node.js' `https.request`, adapted to the Cloudfront programming model
 * and promisified.
 *
 * @param {Object} options
 *        Options to Node.js' `https.request` (https://nodejs.org/docs/latest-v12.x/api/https.html#https_https_request_options_callback)
 * @returns {Promise.<CloudFrontResponse>}
 *        Surely fulfills.
 */
function nodeRequest(options) {
  return new Promise(resolve => {
    let data = [];
    const req = https.request(options, res => {
      let binary = false;
      if (res.headers['content-encoding']) {
        binary = true;
      }

      res.setEncoding(binary ? 'binary' : 'utf8');

      res.on('data', chunk => {
        data.push(Buffer.from(chunk, 'binary'));
      });

      res.on('end', () => {
        const body = Buffer.concat(data);
        resolve(httpToLambdaResp(res, body.toString('base64'), 'base64'));
      });
    });

    req.on('error', e => {
      resolve(errorResponse(e));
    });

    req.end();
  });
}

/**
 * @param {Error} e
 * @param {Number} statusCode
 * @returns {Promise.<CloudFrontResponse>}
 */
function errorResponse(e, statusCode = 500) {
  return Promise.resolve({
    status: 200,
    body: `// Error getting snippet response ${statusCode}: ${e.message}`,
    headers: {
      'content-type': [
        {
          key: 'Content-Type',
          value: 'application/javascript'
        }
      ]
    }
  });
}

/**
 * Format a Node.js response and body content for CloudFront consumption
 *
 * @param {http.ServerResponse} response
 *       See https://nodejs.org/docs/latest-v12.x/api/http.html#http_class_http_serverresponse
 * @param {String} body
 *       Contents of the response body
 * @param {String} bodyEncoding
 *       Encoding of the response body
 * @returns {CloudFrontResponse}
 */
function httpToLambdaResp(response, body, bodyEncoding) {
  const resp = {
    status: response.statusCode,
    body,
    bodyEncoding,
    headers: {}
  };

  let headerVal;
  for (let headerName of RESPONSE_HEADER_WHITELIST) {
    headerVal = response.headers[headerName];
    if (headerVal) {
      if (!Array.isArray(headerVal)) {
        headerVal = [headerVal];
      }
      resp.headers[headerName] = headerVal.map(eachVal => ({
        value: eachVal
      }));
    }
  }
  return resp;
}
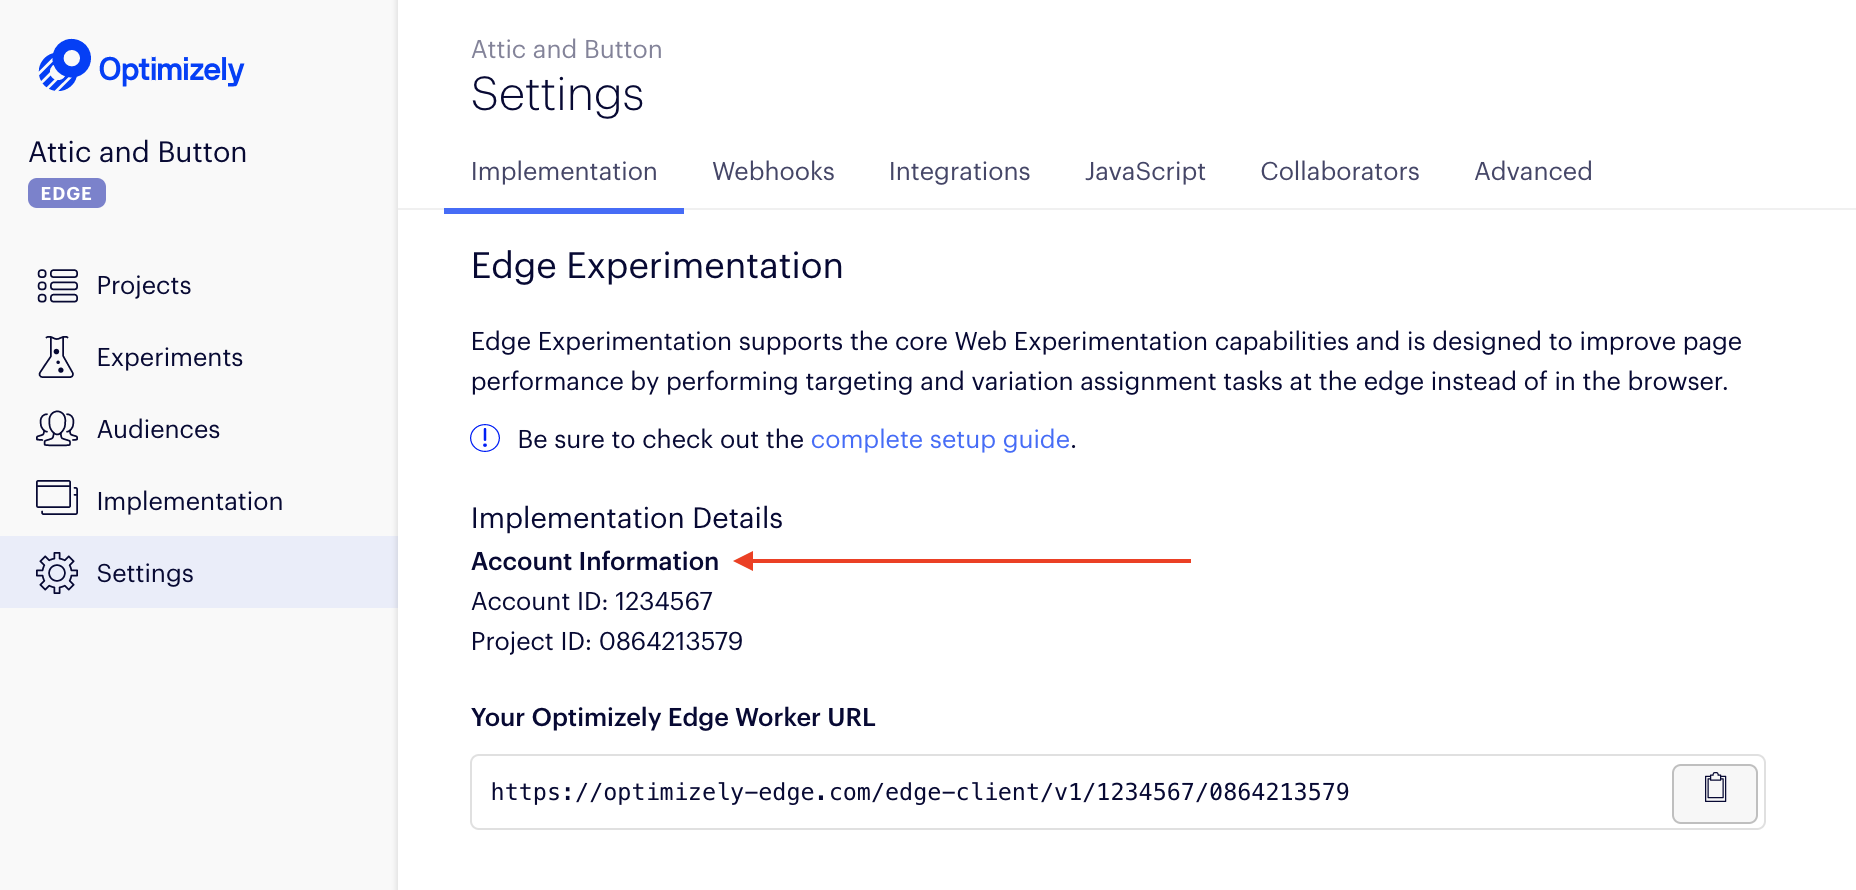
To find your Project and Account ID
- Go to the Settings tab.
- Find the **Project ID ** and Account ID in the UI.
- Save the Function.
NoteIf you want to filter the cookies that are shared with the Edge Decider for targeting purposes, you may implement an allowlist approach by amending their CDN configuration to modify the outgoing "Cookie" request header sent to the optimizely-edge.com. If you implement an allowlist, make sure that the following cookies used by Optimizely Performance Edge are on that list:
- optimizelyEndUserId
- optimizelyRedirectData
- optimizelyDomainTestCookie
- optimizelyOptOut
- Any other non-Optimizely Performance Edge cookie that you may need for experiment targeting
SeeCookies and localStorage in the Optimizely Performance Edge snippet.
4. Add a CloudFront Trigger
Next, add a Trigger to call your Function from CloudFront.
- In the Designer page, select Add Trigger.

- Choose "CloudFront" and configure a trigger for the Cache Behavior you created in Step 1. Under CloudFront event, be sure to select Viewer request to route the request to your Function before it goes to the Origin.
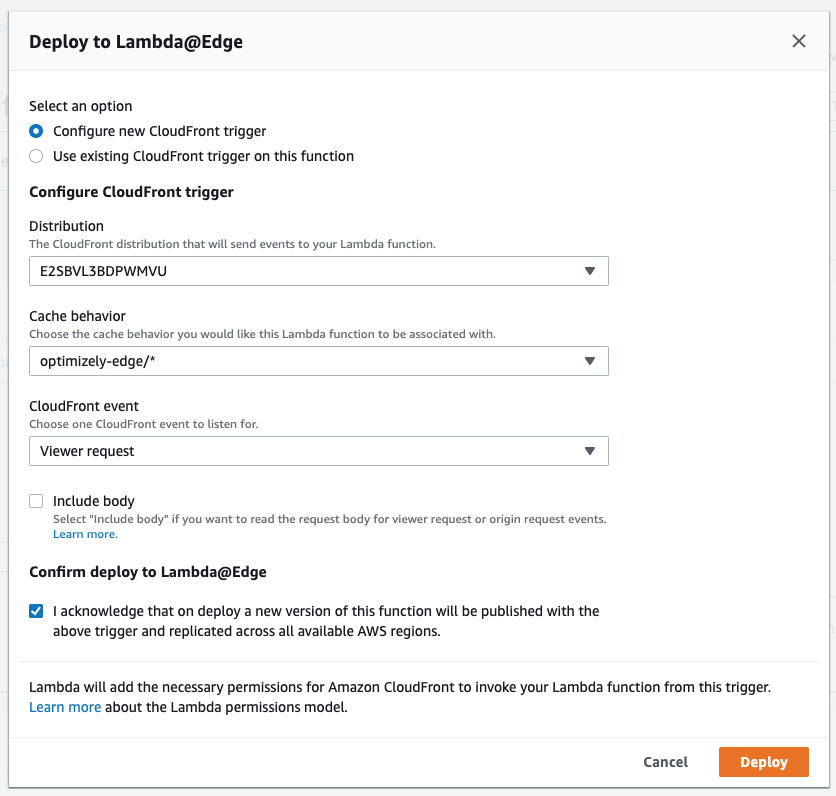
- Click Deploy.
5. Add a <script> tag
On your webpage, add a <script> tag that uses the same pathname as the Route you created previously
<script src=”/optimizely-edge/<project_id>.js”></script>
ImportantOptimizely Performance Edge is only supported on pages served over HTTPS. It is not supported on pages that are served over insecure
http://. Contact Optimizely Supportif you are interested in support for insecure HTTP.
Verify your configuration
To verify your configuration and ensure that the correct data is received in the browser, start by checking that the Edge Decider returns a microsnippet to your browser and that the visitor ID persists across sessions.
- Load the webpage that has the
<script>tag on it. - In the JavaScript console, run
optimizelyEdge. - Verify that
optimizelyEdgereturns asdefined - Confirm that the OEUID cookie (visitor ID) persists (does not change) when refreshing the webpage.
Fastly
This is a guide for implementing Optimizely Performance Edge through a CDN Proxy if you use Fastly.
Response Size LimitationsTo ensure the microsnippet does not exceed Fastly's size quotas, add Accept-Encoding to your HTTP headers that will be forwarded to Performance Edge.
1. Add a <script> tag
Add the following script tag in the appropriate spot inside the <head> tag on your page:
<script src="/optimizely-edge/<project_id>"></script>
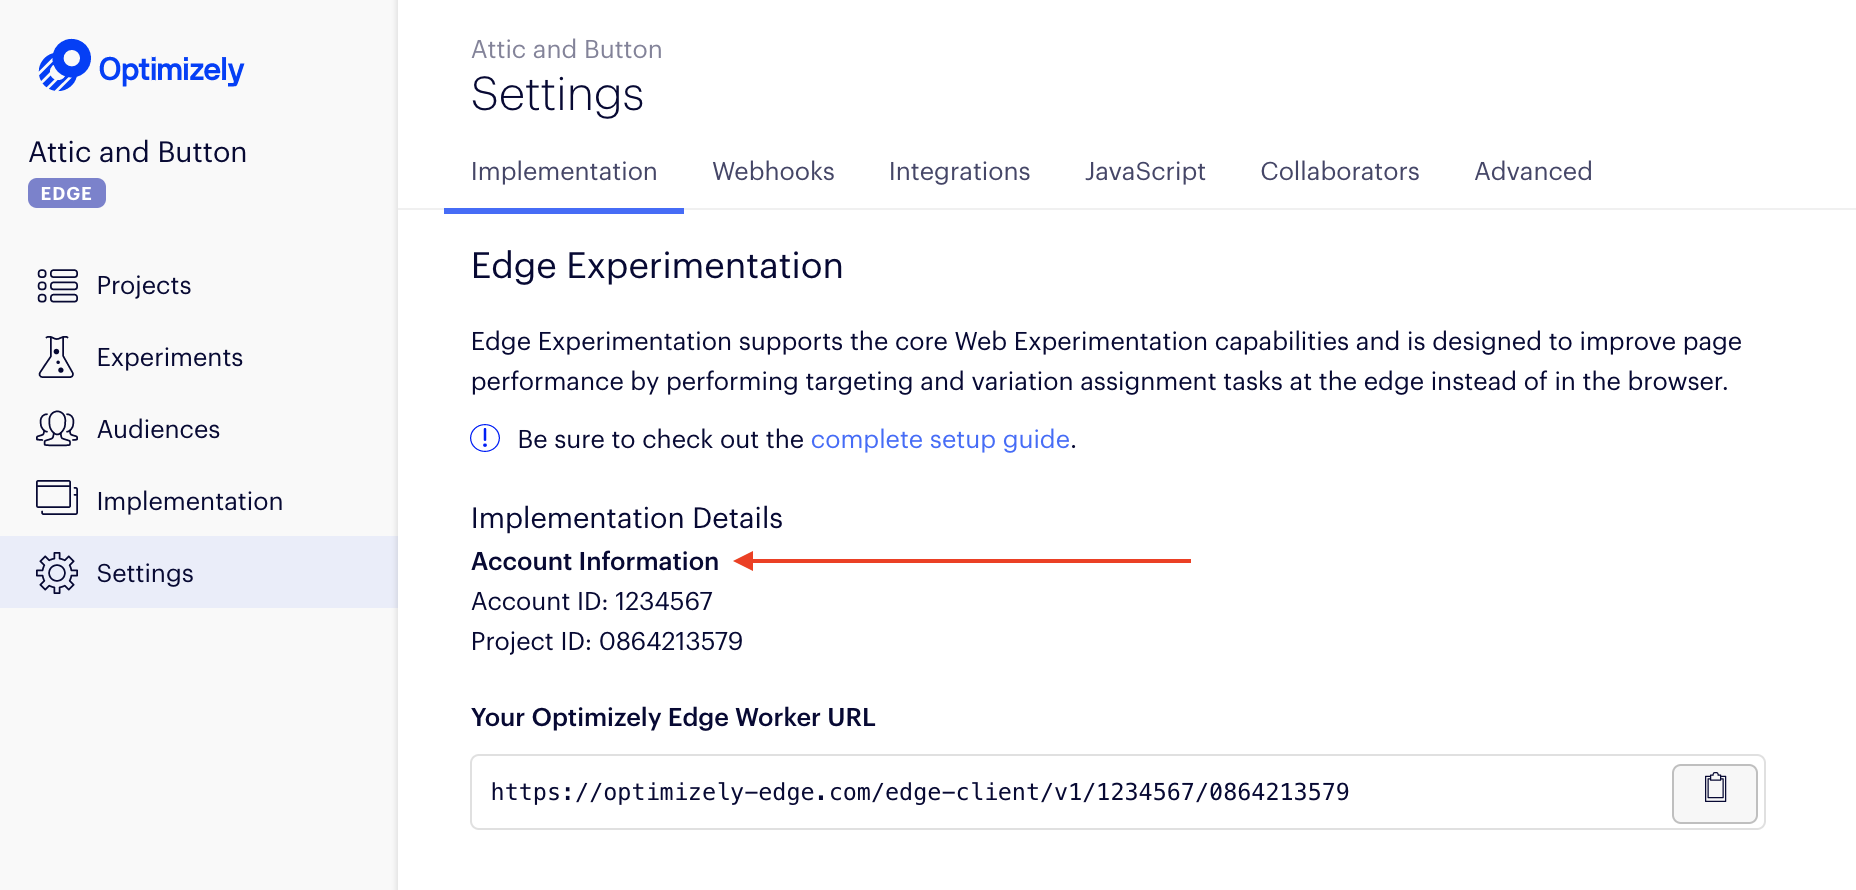
To find <project_id>
- Go to the Settings tab.
- Find the **Project ID **in the UI. You need the Account ID for the path rewriting configuration..
ImportantOptimizely Performance Edge is only supported on pages served over HTTPS. It is not supported on pages that are served over insecure
http://. Contact Optimizely Support if you are interested in support for insecure HTTP.
2. Create a new host
In Fastly, create a new host under Origins > Host that matches URLs ^/optimizely-edge/.
Noteoptimizely-edge.com only supports HTTPS, so make sure that TLS from Fastly to optimizely-edge.com is enabled.

3. Create a host header override
Create an override host matching the condition you created previously that sets the host to optimizely-edge.com.

4. Create an override path
Create an override path matching the condition you created previously that replaces the^/optimizely-edge/ with /edge-client/v1/<account-id>/.

NoteIf you want to filter the cookies that are shared with the Edge Decider for targeting purposes, you may implement an allowlist approach by amending their CDN configuration to modify the outgoing "Cookie" request header sent to the optimizely-edge.com. If you implement an allowist, make sure that the following cookies used by Optimizely Performance Edge are on that list:
- optimizelyEndUserId
- optimizelyRedirectData
- optimizelyDomainTestCookie
- optimizelyOptOut
- Any other non-Optimizely Performance Edge cookie that you may need for experiment targeting
See Cookies and localStorage in the Optimizely Performance Edge snippet.
Verify your configuration
To verify your configuration and ensure that the correct data is received in the browser, start by checking that the Edge Decider returns a microsnippet to your browser and that the visitor ID persists across sessions.
- Load the webpage that has the
<script>tag on it. - In the JavaScript console, run
optimizelyEdge. - Verify that
optimizelyEdgereturns asdefined - Confirm that the OEUID cookie (visitor ID) persists (does not change) when refreshing the webpage.
Updated 5 months ago
