
Flutter
Welcome to the quickstart guide for Optimizely's Flutter SDK.
Welcome to the quickstart guide for Optimizely's Full Stack Flutter SDK. Follow the steps in the guide below to roll out a feature and start your first experiment. You will need an account to follow this guide, if you do not have one yet, you can register for a free account at Optimizely.com.
Steps:
- Create a project in the Optimizely application
- Install the SDK
- Instantiate Optimizely in your app
- Create a feature flag (with variable) in Optimizely
- Implement the feature in your app
- Create an event to track in Optimizely
- Implement event tracking in your app
- Launch the experiment for your feature.
0. Create a legacy project in Optimizely
- Navigate to app.optimizely.com.
- Select Projects > Create New Project...
- Select Create Full Stack Project .
- Enter an applicable name.
- Select Use legacy experience
- Select Create Project
1. Install the SDK
To work with the SDK:
- Install the Flutter plugin in Android Studio.
- In Android Studio, create a new Flutter project (File -> New -> New Flutter Project...) called
optimizely_flutter_quickstart. - Select Java for Android language. Select Swift for iOS language.
- Toggle Android and iOS for Platform.

- Click Finish.
- To install the Optimizely Full Stack Flutter SDK. Open the pubspec.yaml file and add:
dependencies:
  optimizely_flutter_sdk: ^1.0.1
The full source code for the Flutter SDK is available on GitHub.
- Copy the following code sample into the main.dart file for your app. Replace
<Your_SDK_Key>with your SDK key.
To find your SDK Key in your Optimizely project:
- Navigate to Settings
- Copy the SDK Key for your Production Environment
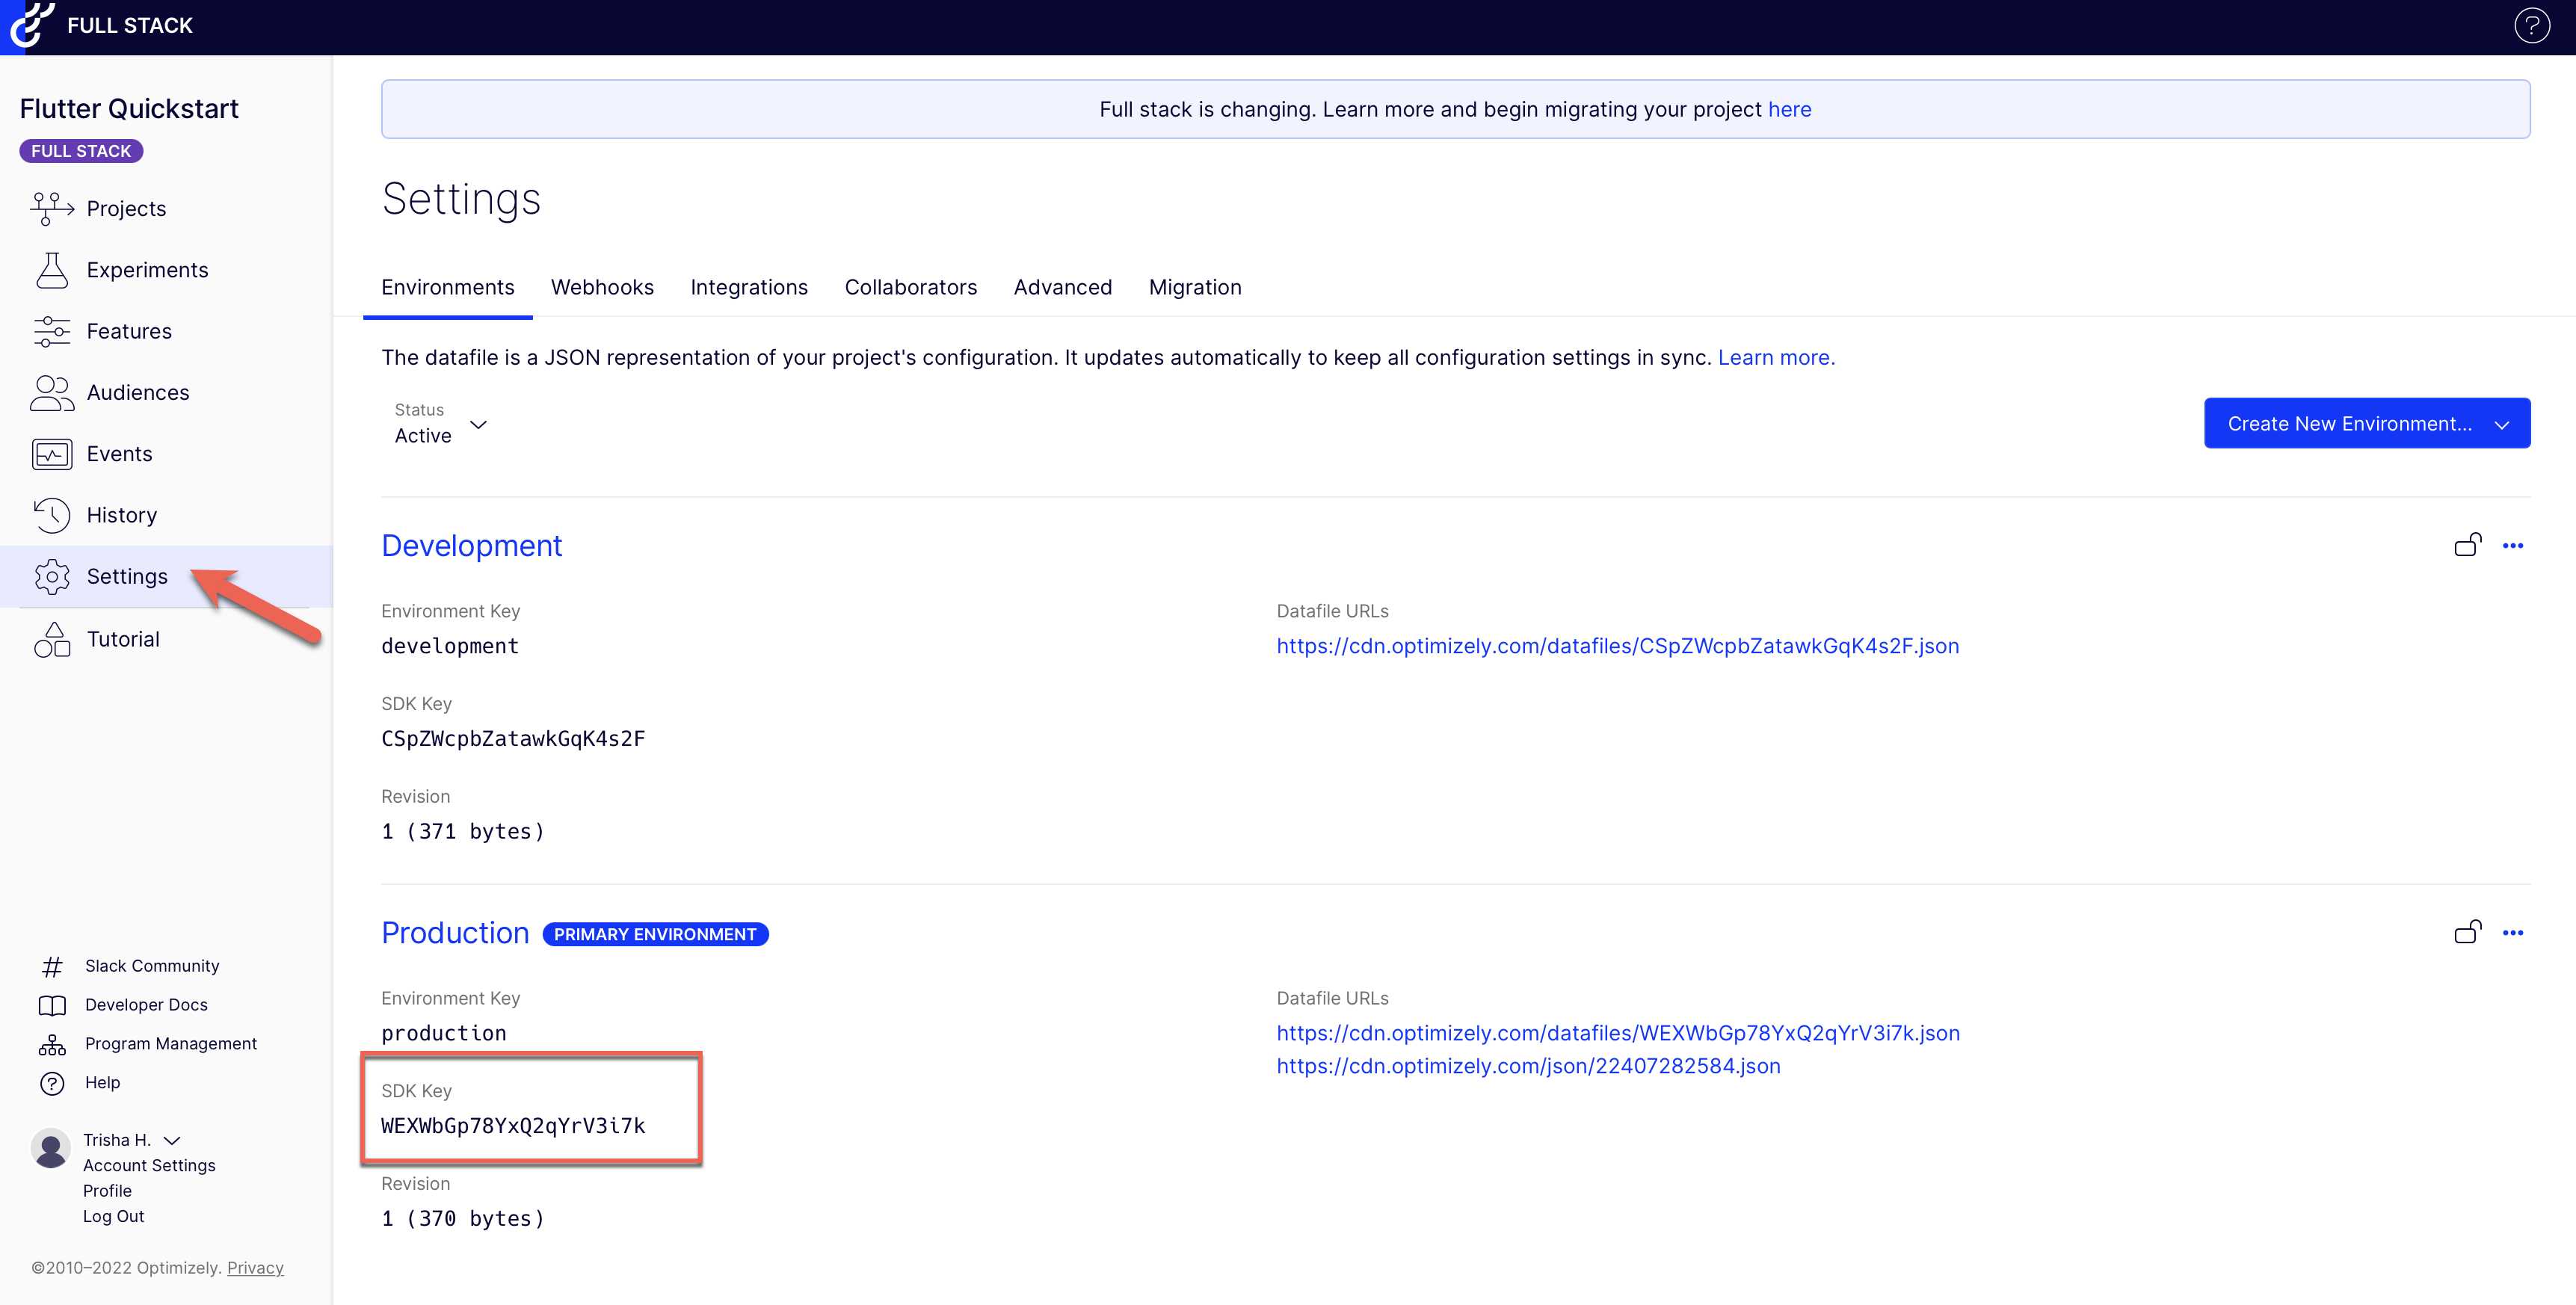
Click image to enlarge
import 'dart:math';
import 'package:flutter/material.dart';
import 'package:optimizely_flutter_sdk/optimizely_flutter_sdk.dart';
import 'dart:async';

// NOTE: You need to change this SDK key to your project's SDK Key
const String sdkKey = "Your_SDK_Key";
const String logTag = "OPTIMIZELY_QUICK_START";

void main() {
  runApp(const MyApp());
  var productSorter = ProductSorter();
  productSorter.initializeQuickStart();
}

class MyApp extends StatefulWidget {
  const MyApp({Key? key}) : super(key: key);

  @override
  State<MyApp> createState() => _MyAppState();
}

class _MyAppState extends State<MyApp> {
  String uiResponse = 'Unknown';

  @override
  void initState() {
    super.initState();
  }

  @override
  Widget build(BuildContext context) {
    return MaterialApp(
      home: Scaffold(
        appBar: AppBar(
          title: const Text('Quick start example app'),
        ),
        body: Center(
          child: Text(uiResponse),
        ),
      ),
    );
  }
}

class ProductSorter {
  String _datafileHost = "https://cdn.optimizely.com";
  String _datafileSuffixAndroid = "/datafiles/%s.json";
  String _datafileSuffixIOS = "/datafiles/%@.json";

  Future<void> initializeQuickStart() async {
    // Setting up custom datafile URL format
    Map<ClientPlatform, DatafileHostOptions> datafileHostOptions = {};

    datafileHostOptions[ClientPlatform.android] =
        DatafileHostOptions(_datafileHost, _datafileSuffixAndroid);

    datafileHostOptions[ClientPlatform.iOS] =
        DatafileHostOptions(_datafileHost, _datafileSuffixIOS);

    // Initializing OptimizelyClient
    var flutterSDK = OptimizelyFlutterSdk(
        sdkKey, datafileHostOptions: datafileHostOptions);
    var response = await flutterSDK.initializeClient();
    if (response.success) {
      flutterSDK.addConfigUpdateNotificationListener((msg) {
        runQuickStart(flutterSDK);
      });
      await runQuickStart(flutterSDK);
    }
  }

  Future<void> runQuickStart(OptimizelyFlutterSdk flutterSDK) async {
    /* --------------------------------
     * to get rapid demo results, generate random users. Each user always sees the same variation unless you reconfigure the flag rule.
     * --------------------------------
     */
    // simulate 50 users
    var rangeMax = 9999;
    var rangeMin = 1000;
    var range = Random();
    var hasOnFlags = false;

    for (int i = 0; i < 10; i++) {
      var userId = "${range.nextInt(rangeMax - rangeMin) + rangeMin}";
      /* --------------------------------
       Create hardcoded user & bucket user into a flag variation
       --------------------------------
      */
      var user = await flutterSDK.createUserContext(userId);
      // "product_sort" corresponds to a flag key in your Optimizely project
      var decisionResponse = await user!.decide("product_sort");
      var decision = decisionResponse.decision;
      // did decision fail with a critical error?
      if (decision?.variationKey == null) {
        print("\n\n$logTag decision error: ${decisionResponse.reason}");
      }
      // get a dynamic configuration variable
      // "sort_method" corresponds to a variable key in your Optimizely project
      String sortMethod = decision?.variables["sort_method"] as String;

      if (decision!.enabled) {
        // Keep count how many visitors had the flag enabled
        hasOnFlags = true;
      }
      /* --------------------------------
         Mock what the users sees with print statements (in production, use flag variables to implement feature configuration)
         --------------------------------
      */
      // always returns false until you enable a flag rule in your Optimizely project
      print("\n\n$logTag Flag ${(decision.enabled
          ? "on"
          : "off")}. User number ${user
          .getUserId()} saw flag variation: ${decision
          .variationKey} and got products sorted by: ${sortMethod} config variable as part of flag rule: ${decision
          .ruleKey}");
    }
    if (!hasOnFlags) {
      print(
          "\n\n$logTag Flag was off for everyone. Some reasons could include:" +
              "\n1. Your sample size of visitors was too small. Rerun, or increase the iterations in the FOR loop" +
              "\n2. By default you have 2 keys for 2 project environments (dev/prod). Verify in Settings>Environments that you used the right key for the environment where your flag is toggled to ON." +
              "\nCheck your key at  https://app.optimizely.com/v2/projects/YOUR_PROJECT_ID/settings/implementation");
    }
  }
}
2. Instantiate Optimizely
import 'package:flutter/material.dart';
import 'package:optimizely_flutter_sdk/optimizely_flutter_sdk.dart';
import 'dart:async';

// NOTE: You need to change this SDK key to your project's SDK Key
const String sdkKey = "<Your_SDK_Key>";
OptimizelyFlutterSdk? flutterSDK;

void main() async {
  runApp(const ProductsSorterApp());

// Initializing OptimizelyClient
  flutterSDK = OptimizelyFlutterSdk(sdkKey,
      datafilePeriodicDownloadInterval: 900,
      eventOptions: const EventOptions(
      batchSize: 1, timeInterval: 60, maxQueueSize: 10000));
  var response = await flutterSDK.initializeClient();
}
Remember to replace <Your_SDK_Key> with your own.
Note
Notice that each environment has its own SDK key.
3. Create a feature flag
A feature flag lets you control which users are exposed to a new feature in your app. For this quickstart, imagine that you run an online store and you are rolling out a new ‘discount’ feature that shows different discounts to try to increase sales. Create a feature in Optimizely named ‘discount’ and give it a variable named ‘amount’.
Create a feature flag in your Optimizely project:
- Navigate to Features > New Feature.
- Name the feature key discount
- Click Add Variable
- Name the variable amount
- Set the variable type to "Integer"
- Set the variable default value to 5 (this represents $5)
- Skip the rest of the dialog and click Create Feature.
Here is a visual for how to set it up:

Click image to enlarge
4. Implement the feature
Next, use the SDK’s Decide method and get Feature is Enabled to determine whether to show or hide the discount feature for a specific user. You can roll out the discount feature to a percentage of traffic and run an experiment to show different discounts to just a portion of users. Once you learn which discount value works best to increase sales, roll out the discount feature to all traffic with the amount set to the optimum value.
var user = await flutterSDK!.createUserContext(userId, attributes);
var decideResponse = await user!.decide("discount");
if (decideResponse.success && decideResponse.decision!.enabled) {
   print("discount is applicable");
}
Even before you decide which discount amounts to test, you can code logic for exposing them. You can set the different discount values at any time in Optimizely (we’ll set them in the last step). For now, use the Get Feature Variable by getting variable out of decision object to return the discount amount for a specific user.
if (decideResponse.success && decideResponse.decision!.enabled) {
   var amount= decideResponse.decision?.variables["amount"];
} else {
   print("No discount");
}
If you care about updating your application quickly after editing your flags in the Optimizely app, then register for updates to your config. That way, you can rerun decide whenever there's an update. Register for updates with code like the following example:
var updateConfigListenerId = await flutterSDK!.addConfigUpdateNotificationListener((msg) async {
    var decideResponse = await user!.decide("discount");
    if (decideResponse.success && decideResponse.decision!.enabled) {
      var discountAmount = decideResponse.decision?.variables["amount"];
    }
  });
It is a good idea to pass in attributes to Decide, as this allows you to target your audience better. You can even pass back different values for a variable, depending on the state of the feature flag.
5. Create an event
In Optimizely, you will use event tracking to measure the performance of your experiments. Exposing users to new features influences them to behave in different ways. Tracking the users’ relevant actions is how we capture the impact those features had. This means we need to define which actions we want to track.
Since we are experimenting with a new discount feature it makes sense to track if the user goes on to make a purchase after they have been shown a discount.
Create an event named ‘purchase’ in your Optimizely project:
- Navigate to Events > New Event
- Set the event key to purchase
- Click Create Event

Click image to enlarge
6. Implement event tracking
You need a way to tell Optimizely when a user has made a purchase in your app and map this event in your app code to the specific event you created in Optimizely. Luckily the SDK has a method for that! Simply use the ‘trackEvent’ method on the SDK client usercontext and pass in the key for the event you created (‘purchase’).
//after we have confirmed purchase completed
await user.trackEvent("purchase");
7. Launch the experiment
At this point, you have set up almost everything we need to run your Full Stack experiment. You have:
- Set up feature flag (with variable)
- Implemented dynamic serving of the feature & variable in the app
- Set up event to track the impact of the feature
- Implemented tracking of purchase event in the app
The only thing left to set up is the experiment itself! To create an experiment in your Optimizely project:
- Navigate to Experiments
- Click Create New > Feature Test
- In the Feature box, select the discount feature
- Click Create Feature Test

Click image to enlarge

Click image to enlarge
By default, Optimizely creates an experiment with two variations: one with the feature on and one with the feature off. Toggling the feature on for both variations will cause Optimizely to show the discounts to all users who are part of the experiment (a single user only ever sees one variation).
- Toggle the feature on for both variations
- For variation_1 set the discount value to 5
- For variation_2 set the discount value to 10
- Click Save to save your changes

Click image to enlarge
Next, click on Metrics in the left side-panel and add your new purchase event as a metric for your experiment and save to your experiment.

Click image to enlarge

Click image to enlarge
Now click Run in the top left of the experiment page in your chosen environment and your experiment will start.

Click image to enlarge
Note
To test the different variations of the experiment, you will need to pass in unique
userIdsto the SDK methods. One way to do this is to use a random number generator to pass in randomuserIds.
Congratulations! You have successfully set up and launched your first Optimizely Full Stack experiment. While this example focused on optimizing sales, Optimizely’s experimentation platform can support an open-ended set of experimentation use cases.
Review our documentation for more info and to learn more ways to optimize your software using experimentation.
Updated about 2 years ago