Quick start
Describes the most important steps to get started with Optimizely Content Delivery API.
Install packages
Optimizely Content Delivery API consists of one main NuGet package, EPiServer.ContentDeliveryApi.Cms, and some additional NuGet packages let you install only the necessary functionality. The packages are described in Install Content Delivery API.
Install the NuGet packages in your solution using the NuGet Package Manager in Visual Studio or with the command line:
dotnet add package EPiServer.ContentDeliveryApi.CmsAdd search
If you added the EPiServer.ContentDeliveryApi.Search package, install Optimizely Search & Navigation, and add a license. Configure the API in ConfigureServices in startup.cs:
services.AddContentSearchApi(options => {
  options.MaximumSearchResults = 10;
});
Set access rights
NoteContent that has read access for the 'Everyone' role is available through the API by default. You can change this in the following ways:
- Configure
AllowedScopesinContentDeliverApiOptions. Then requests need to have any of these scopes to call the API.- Configure
RequiredRoleinContentDeliveryApiOptions. Then assign these roles read access to each content item that should be available in the API.
WarningYou should not expose content that contains secure information, such as API keys.
See Configuration and API authentication.
Configure Content Delivery API options
Configure the API in ConfigureServices in startup.cs:
services.AddContentDeliveryApi(options => {
  options.SiteDefinitionApiEnabled = true;
});
If you do not make the API public, client JavaScript cannot anonymously consume the API, and you must log in when requesting the API from a REST client.
Content Delivery API and HTTP Caching
You can control how long the API response is cached by adding the Cache-Control header to the response. Configure the cached time with HttpResponseExpireTime :
services.ConfigureContentApiOptions(o => {
  o.HttpResponseExpireTime = TimeSpan.FromSeconds(1);
});
Access site definition API
In the previous section, you enabled a special site definition API that is useful for debugging scenarios. The site definition API is accessed by: https://www.mywebsite.com/api/episerver/v3.0/site/?language=en
The site definition API returns data such as siteSettings, language selectors, and currencies. You can query the API for specific pages or blocks like this: http://www.mywebsite.com/api/episerver/v3.0/content/{contentID}/
The content, if it exists, is returned in JSON format. For example:
{
  	contentLink: {},
    name: "About us",
    language: {},
    existingLanguages: null,
    masterLanguage: {},
    contentType: [],
    parentLink: {}
}
Depending on your data and what you want to achieve, you may need added customizations.
Serialize the data
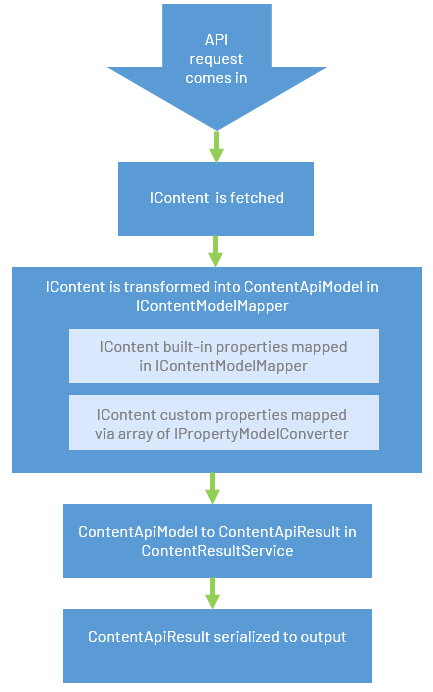
When data is requested, Content Delivery API serializes the data, that is, IContent is turned into JSON, before it is returned to the client. Depending on your site and needs, you may want to customize this serialization. See Serialization.

Re-index Search & Navigation
This step is unnecessary if you set up a site from the beginning. Still, for existing sites with existing content, you should run the EPiServer Find Content Indexing job in the admin view to ensure your content is properly re-indexed.
Test and verify the API
You should have the following endpoints available on your host site:
| # | POST/GET | Endpoint | Description |
|---|---|---|---|
| 1 | GET | /api/episerver/v3.0/content/{ContentIdentifier} | Retrieve content by content reference or content guid |
| 2 | GET | /api/episerver/v3.0/content?references={ContentIdentifier\[]} | Retrieve multiple content items |
| 3 | GET | /api/episerver/v3.0/content/{ContentIdentifier}/children | Retrieve child content of a content reference |
| 4 | GET | /api/episerver/v3.0/content/{ContentIdentifier}/ancestors | Retrieve ancestor content for a content reference |
| 5 | GET | /api/episerver/v3.0/site | Retrieve a list of sites in the system and their associated properties |
To verify that the API is working properly, open the Site Definition API in your browser:
http://<your-site-url>/api/episerver/v3.0/site/You should now get a 200 OK response and see the site and its associated properties:
[{
  "name": "ContentDeliveryAPI",
  "id": "124a76ca-932c-4e0d-a6e0-ae82f1a11899",
  "contentRoots": {
    "contentAssetsRoot": {
      "id": 4,
      "workId": 0,
      "guidValue": "99d57529-61f2-47c0-80c0-f91eca6af1ac",
      "providerName": null,
      "url": null,
      "expanded": null
    },
    "globalAssetsRoot": {
      "id": 3,
      "workId": 0,
      "guidValue": "e56f85d0-e833-4e02-976a-2d11fe4d598c",
      "providerName": null,
      "url": null,
      "expanded": null
    },
    "rootPage": {
      "id": 1,
      "workId": 0,
      "guidValue": "43f936c9-9b23-4ea3-97b2-61c538ad07c9",
      "providerName": null,
      "url": null,
      "expanded": null
    },
    "wasteBasket": {
      "id": 2,
      "workId": 0,
      "guidValue": "2f40ba47-f4fc-47ae-a244-0b909d4cf988",
      "providerName": null,
      "url": null,
      "expanded": null
    },
    "startPage": {
      "id": 5,
      "workId": 0,
      "guidValue": "3c745ea7-390c-4878-a11b-9f4cb1204e6e",
      "providerName": null,
      "url": "/en/",
      "expanded": null
    }
  },
  "languages": [{
      "isMasterLanguage": true,
      "urlSegment": "en",
      "displayName": "English",
      "name": "en"
    },
    {
      "isMasterLanguage": false,
      "urlSegment": "sv",
      "displayName": "Swedish",
      "name": "sv"
    }
  ],
  "hosts": [{
      "name": "localhost:60238",
      "type": "Undefined",
      "language": null
    },
    {
      "name": "*",
      "type": "Undefined",
      "language": null
    }
  ]
}]
Use Postman
Postman is a free tool that you can use as an API client to send REST calls. With Postman, you can connect to APIs and simulate calls to endpoints and their responses without setting up a backend server.
To test the Content Delivery API, you can use a tool such as Postman and send a request to one of the endpoints mentioned in the above section.
See also: How To Enable Block Preview Inline Editing Using React And Episerver Headless blog post by Jon D. Jones.
Updated 4 months ago
